Discussion Lists: Why is the From: header being rewritten?

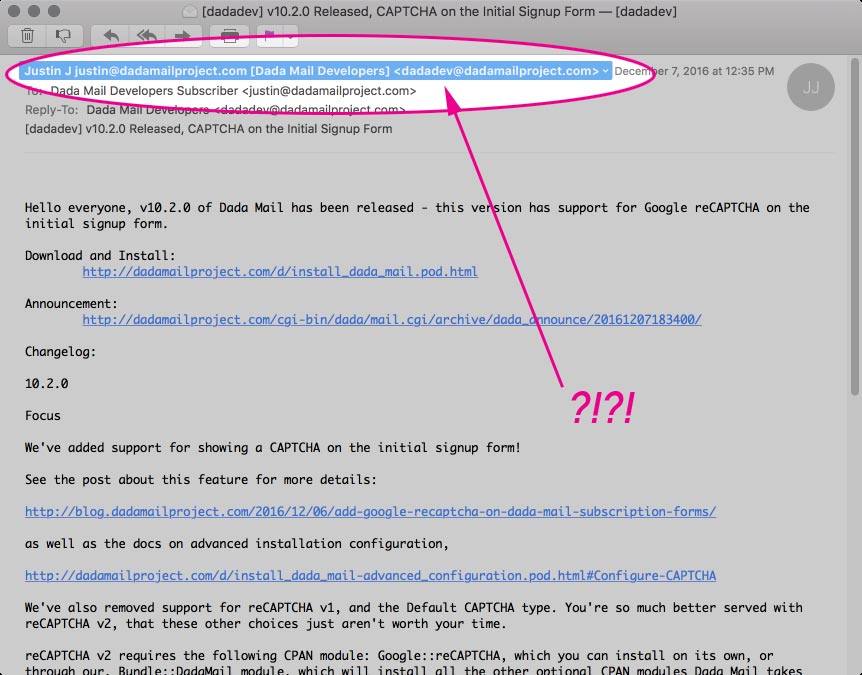
Recently, I’ve been getting many people wondering why, when running a discussion list in Bridge, that the From: header is rewritten from it’s original form, say:

From: "Subscriber Name" <subscriber@their-domain.com>

to something else completely :

From: "Subscriber Name subscriber@their-domain.com [List Name]" <list.email@your-domain.com>

In my first example, the name of the subscriber (Subscriber Name) occupies the phrase of the From: header, and the email address of the subscriber (subscriber@their-domain.com) is where the address should be. Pretty straightforward.

In the rewritten From header, the phrase is now: "Subscriber Name subscriber@their-domain.com [List Name]" <list.email@your-domain.com)> – that is, the name of the subscriber (as before), then their own email address, and finally the name of the mailing list in brackets. The actual address portion of the From: header is the List Email address (list.email@your-domain.com) – the address you send a message to, to start a thread.

Why not just keep it like it was?

While it’s true that discussion list software – including Dada Mail used to maintain the From: header in its original form, it’s not something we can do anymore, without impacting deliverability in a major way. A big job of a mailing list manager (like Dada Mai) is successfully send out messages to the subscribers of the mailing list, right?

Here’s why this doesn’t work, anymore.

DMARC Policies

Sometime in 2014, Yahoo Changed their “DMARC” policy to only accept email messages that have a @yahoo.com email address in the From: header that also originated from a Yahoo server. Here’s Yahoo explaining it themselves. This actually makes a ton of sense: ow, only messages that say they are from a yahoo.com address, and sent through Yahoo’s mail system will be accepted for delivery by basically everyone that’s following the DMARC Policy rules (and that means Yahoo themselves, Gmail, Hotmail – all the big players).

This is a big win in trying to keep the problem of spoofing email addresses to send unsolicited email and other harmful payloads, but it had a dire consequence:

It broke every single discussion mailing list in the world. And this isn’t hyperbole, this is exactly what Internet Engineering Council expert John R. Levine, a specialist in email infrastructure and spam filtering, actually wrote.  A mailing list that’s keeping say, a @yahoo.com address in the From: header looks exactly like a email message with a spoof’d @yahoo.com address in the From: header.

To counter act this change in policy, discussion mailing lists had to adapt. The primary change that’s been suggested is to change the From: header to utilize the List Email as the actual address, and add more information in the phrase of the address, exactly like Dada Mail does. In fact, Dada Mail uses the exact same pattern as Yahoo’s own group mailing lists.

Thankfully, when this change happened (literally, over a weekend, without any real warning), Dada Mail already had support for this in its Bridge plugin, called: p.p. Mode. One needed simply to enable this feature, and be all set. After the Yahoo policy change, we made this option enabled by default, then removed the option altogether in v10, more than 2 1/2 years later. Being able to disable this option has no real benefit, except to break your mailing list, so it seemed a pretty bad option to have around.

There is an option available to customize what gets set in the phrase of the From: header, and that option can be accessed in the list control panel, under: Plugins: Bridge. Look for the option labeled, From: header phrase: By default, its value is,

<!-- tmpl_var original_from_phrase default="Subscriber" --> <!-- tmpl_var subscriber.email --> [<!-- tmpl_var list_settings.list_name -->]

These are mostly a series of email template tags, the same ones you may also use in the Subject, or Body of your message:

<!-- tmpl_var original_from_phrase default="Subscriber" --> is context specific for this job, as its value will contain the original phrase as it was sent. If there is no phrase, “Subscriber” will instead be printed.

<!-- tmpl_var subscriber.email --> will be replaced with the email address of the message’s original sender.

<!-- tmpl_var list_settings.list_name --> will be set to the name of your mailing list.

Hopefully, that helps you understand why the changes are being made without getting too technical.

What about Announce-Only Mailing Lists?

A similar problem can befall an announce-only mailing list, but isn’t fixed so cleverly. The problem will happen if you’ve set up the List Owner or the List Admin email address to be an address that’s not specifically tied to the mail system you’re using.

So for example, if you’re using the sendmail command (the default option), you most likely have to use an email address that belongs to the same domain that you have Dada Mail installed on – this is also our general advice, no matter how you’re sending out messages. In other words,  if my domain is, your-domain.com, my email address for the List Owner and List Admin needs to be something like, list.owner@your-domain.com and not list.owner@gmail.com.

If you’re sending via SMTP, you most likely need to authenticate the SMTP connection anyways, but both the List Owner, and List Administrator will need to be allowed to send through this SMTP server.

If you’re sending through Amazon SES, the email addresses you’re using for both the List Owner and List Admin need to be a verified address or an address belonging to a verified domain.

Hope this all helps. Happy sending, everyone!


Review: InMotion Hosting for Dada Mail

I recently gave an InMotion Hosting a test drive, to see how it would fair as platform to run Dada Mail, along with the rest of your site. I’m happy to report back that it’s just about as perfect as a shared hosting account can be for Dada Mail.

Click to see InMotion Hosting’s Business Plans

Read on for more details, as well as how you can save 20% on a Pro Dada installation done by us, when you sign up for a new InMotion Hosting account, using our affiliate links!

This review is for InMotion Hosting’s Power Plan, which is one of their least expensive hosting packages. You can see all of InMotion Hosting’s business plans here.

cPanel

InMotion Hosting’s Power Plan includes cPanel, which from my experience is both one the most powerful, and easiest-to-use web hosting control panel there is – especially for running self-hosted web apps written in Perl, like Dada Mail.

Some much so, I specifically target development of Dada Mail to make sure it works well on cPanel-based accounts, and use them in my installation instructions, screencasts, and tutorials.

InMotion’s flavor of cPanel currently comes with the following accoutrements:

File Manger

File Manager allows you to add/edit/remove files from your hosting account, as well as change permissions of those files. That’s all you’ll need to setup and install Dada Mail, so no need to utilize FTP or ssh, which makes installation of Dada Mail well within the reach of a casual user, and follows the installation instructions closely.

MySQL

The Power Plan comes with an up-to-date version of MySQL and support for up to 50 separate databases (Dada Mail will require just one). PostgreSQL is also available, if you wish to go that route.

Perl

Perl on this hosting plan is very much up-to-date. Dada Mail requires at the very least v5.10.1 of Perl, and v5.16.3 is available by default. Having an up to date Perl makes more features available, gives you the best performance, and an up-to-date Perl means less worry about bugs or security problems. Kudos for this, as many cPanel-based hosting accounts lag behind with older versions of Perl offered by default – either v5.10.1, or a supremely ancient v5.8.8. Yuck!

Perl Module Installer w/Compiler Support

Along with an up-to-date Perl, the Perl Module Installer is also enabled in InMotion’s offerings, which  itself has support to install modules that may need compilation. This tool is the easiest way for a casual user to tap into the most advanced features of Dada Mail which require the additional installation of freely available Perl modules.

Features like CSS Inlining, Google reCAPTCHA, Amazon SES Sending, Send a Webpage support (and may more) rely on Perl modules that are outside the standard Perl library. With this tool, you can easily install them.

DNS Zone Editor

The DNS Zone Editor is also available, which becomes important when you would like to set up Sending with Amazon SES, and would like as well to set up proper SPF and DMARC records. Using Dada Mail with Amazon SES sending is one of the most cost-effective ways to run your mailing list, by far, and InMotion Hosting’s Power Plan will support everything you need.

Cronjobs

Cronjob support: check!

One-Click Installer!

If the installation of Dada Mail leaves you a little too breathless to want to take on yourself, InMotion Hosting also comes with an Installer for Dada Mail, with a pretty up-to-date version of Dada Mail available, which I think is powered by Softaculous. I’ve seen one-click installers that offer increasingly old, and out of date versions of Dada Mail, so it’s a nice change to see this one-click installer do the right thing, and keep current.

It is a little awkward to find Dada Mail, as Softaculous categorizes web apps by the language they’re written in, and InMotion Hosting’s cPanel will default to showing you PHP (not Perl), so here’s what you can do:

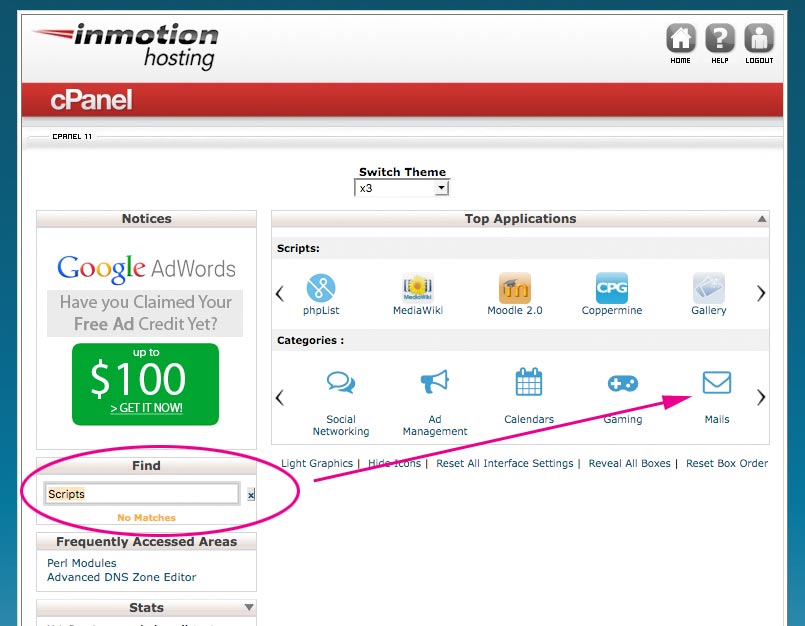
In the cPanel, look for, “Scripts”, by typing, “Scripts” in the Find search box. That will show two boxes labeled Scripts: and Categories:. Click on any of the icons in the, Categories: box. That will show you all the apps available in that category (but only for PHP, not Perl!):

inmotion_find_dada_mail0

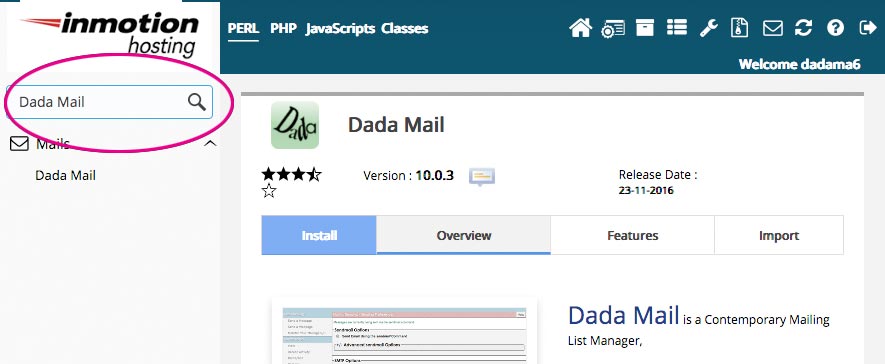
Fear not: once in this directory of apps, just use the search box in the upper left hand corner, and search for, “Dada Mail” – the link to install Dada Mail will come right up,

inmotion_find_dada_mail1

If you have a Pro Dada Subscription, you can install Dada Mail this way, then turn it into Pro Dada. And away you go! One more small point, if you do decide to install this way, make sure to still set up the cronjob, as it’s not done by this installer!

Hourly Sending Limit

If anything, this may be where InMotion Hosting falls a little short. By default, they’ve told me there’s a limit of 250 messags/hour you may send, but you may contact support to have this limit raised to something more realistic for a mailing list (like 750 messages/hour). Using the mail server provided to you with your shared hosting account can work well for starting out, but if your mailing lists are an important part of your business, I would unapologetically suggest moving to your email sending to Amazon SES, which Dada Mail installed on InMotion Hosting 100% supports, which is great news.

Pro Dada Installations: 20% Off for New InMotion Affiliate Signups

Here’s our affiliate link, which you can use to sign up for a new account with InMotion Hosting:

Click to see InMotion Hosting’s Business Plans

Once you’ve signed up with InMotion, request a Pro Dada installation on our request form. Mention that you’ve signed up for InMotion Hosting, and we’ll give you 20% off the total of your Pro Dada install (we’ll know that you’ve done this, as we’ll get a notice about the domain name signed up). Not too shabby!


Add Google reCAPTCHA on Dada Mail Subscription Forms

You’ve asked, we (finally!) answered: v10.2.0 of Dada Mail supports CAPTCHA on the initial signup form!

Although the app has supported CAPTCHA for many years for a whole bunch of things in the app, we never added support for the initial signup form. We were worried about the usability of forcing your potential subscribers to solve a CAPTCHA.

Why have we changed our minds?

Google’s latest reCAPTCHA system is a whole lot more usable to work with, and the threat of abuse on things like newsletter subscription forms is just not going away. So, why not make support at least an option?  Those who would like the subscription form to work as it always has still can. Everyone else can enjoy the enhanced security. Seems like a big win.

Another big change in Dada Mail’s CAPTCHA system is that we now only support the latest version of Google’s reCAPTCHA system (version 2). In the past, we also supported reCAPTCHA version 1, as well as a CAPTCHA system based on, Authen::Captcha.  To keep the code simple and bug-free for something so security-specific, we’ve removed these other choices.

Setting up Google reCAPTCHA in Dada Mail

Create a Site and Secret Key Pair

Sign up for the Google reCAPTCHA service at,

http://www.google.com/recaptcha/admin

and create a site and secret key pair for the site you have Dada Mail installed at, as outlined here:

https://developers.google.com/recaptcha/docs/start

Make sure you record both the site and secret key somewhere safe – we’ll be using them, later.

Configure Dada Mail to use Google ReCAPTCHA

Plugging in the site and secret keys, and telling Dada Mail to use Google reCAPTCHA is done in Dada Mail’s global configuration. The easiest way to work with that is through Dada Mail’s included web-based installer, so an install or upgrade would be the perfect time to set all this up. If you have v10.2.0 (or later) of Dada Mail installed, you can also drop back into the installer to make these configuration changes.

Once in the installer’s configure screen, look for the Advanced Options. This is where you can setup the plugins/extensions, as well as many of Dada Mail’s more advanced features. If you do not see these options, click the button labeled, Show/Hide Advanced Options…

Next, look for a checkbox labeled, Configure CAPTCHA Options. Check the box, and the CAPTCHA options will be revealed.

Check the box labeled, Add CAPTCHA on all subscription forms if it’s not already checked.

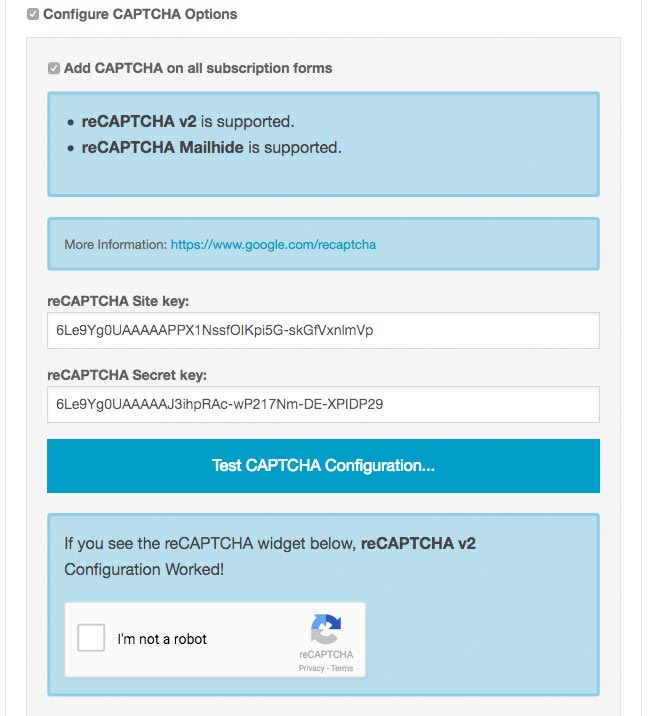
Now, you’ll need to plug in the site key and secret key in the textboxes labeled, reCAPTCHA Site key: and, reCAPTCHA Secret key:

Once that’s all set up, you can test to make sure if everything works, but clicking the button labeled, Test CAPTCHA Configuration… If everything works correctly, you’ll be shown a working reCAPTCHA v2 widget!

google_recaptcha_v2

And you’re done! Complete the installation process, and enjoy a CAPTCHA-full Dada Mail.

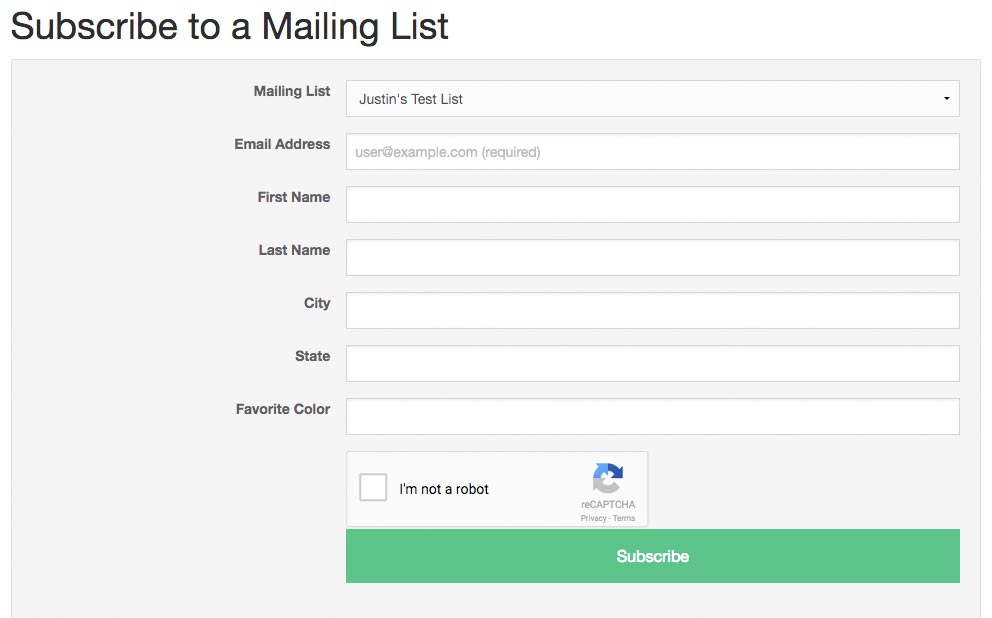
Here’s what my own subscription form now looks like, with the added reCAPTCHA widget,

google_recaptcha_v2_1

Just remember, if you have a subscription form that you’ve added directly to your website, and you have CAPTCHA now configured, those forms will have to be updated. The code available in the list control panel under, Appearance: Subscription Form HTML will do the trick.

Missing CPAN Module?

Dada Mail’s Google reCAPTCHA support requires the Google::reCAPTCHA Perl module, which you can install from CPAN in a few different ways.

Need More Help?

We offer installation services for Dada Mail, including setting up Google reCAPTCHA for your site. See all our installation services here.