Setting up a private notification system with Dada Mail

We recently started offering Lifetime upgrade overage to our install/upgrade options, complementing the one-time, and yearly upgrades. We also give people the choice on if they would like us to upgrade them whenever a new release is put out, instead of having them request an upgrade from us. This can save us both time.

But, we don’t want these upgrades to come as a huge surprise, and we don’t want to stop communicating with our clients. So, we decided to set up a simple upgrade notification mailing list for our paid clients, and of course: we used Dada Mail to allow us to set everything up within minutes. Here’s how we did it:

Continue reading…

Dada Mail v11.2.0 Released

Dada Mail v11.2.0 is out the door! Being a feature-rich release, there’s a quite a few things to go over. Below will expand upon the changelog to help you discover the new features in Dada Mail.

No, “Send a Webpage” screen! (But don’t worry!)

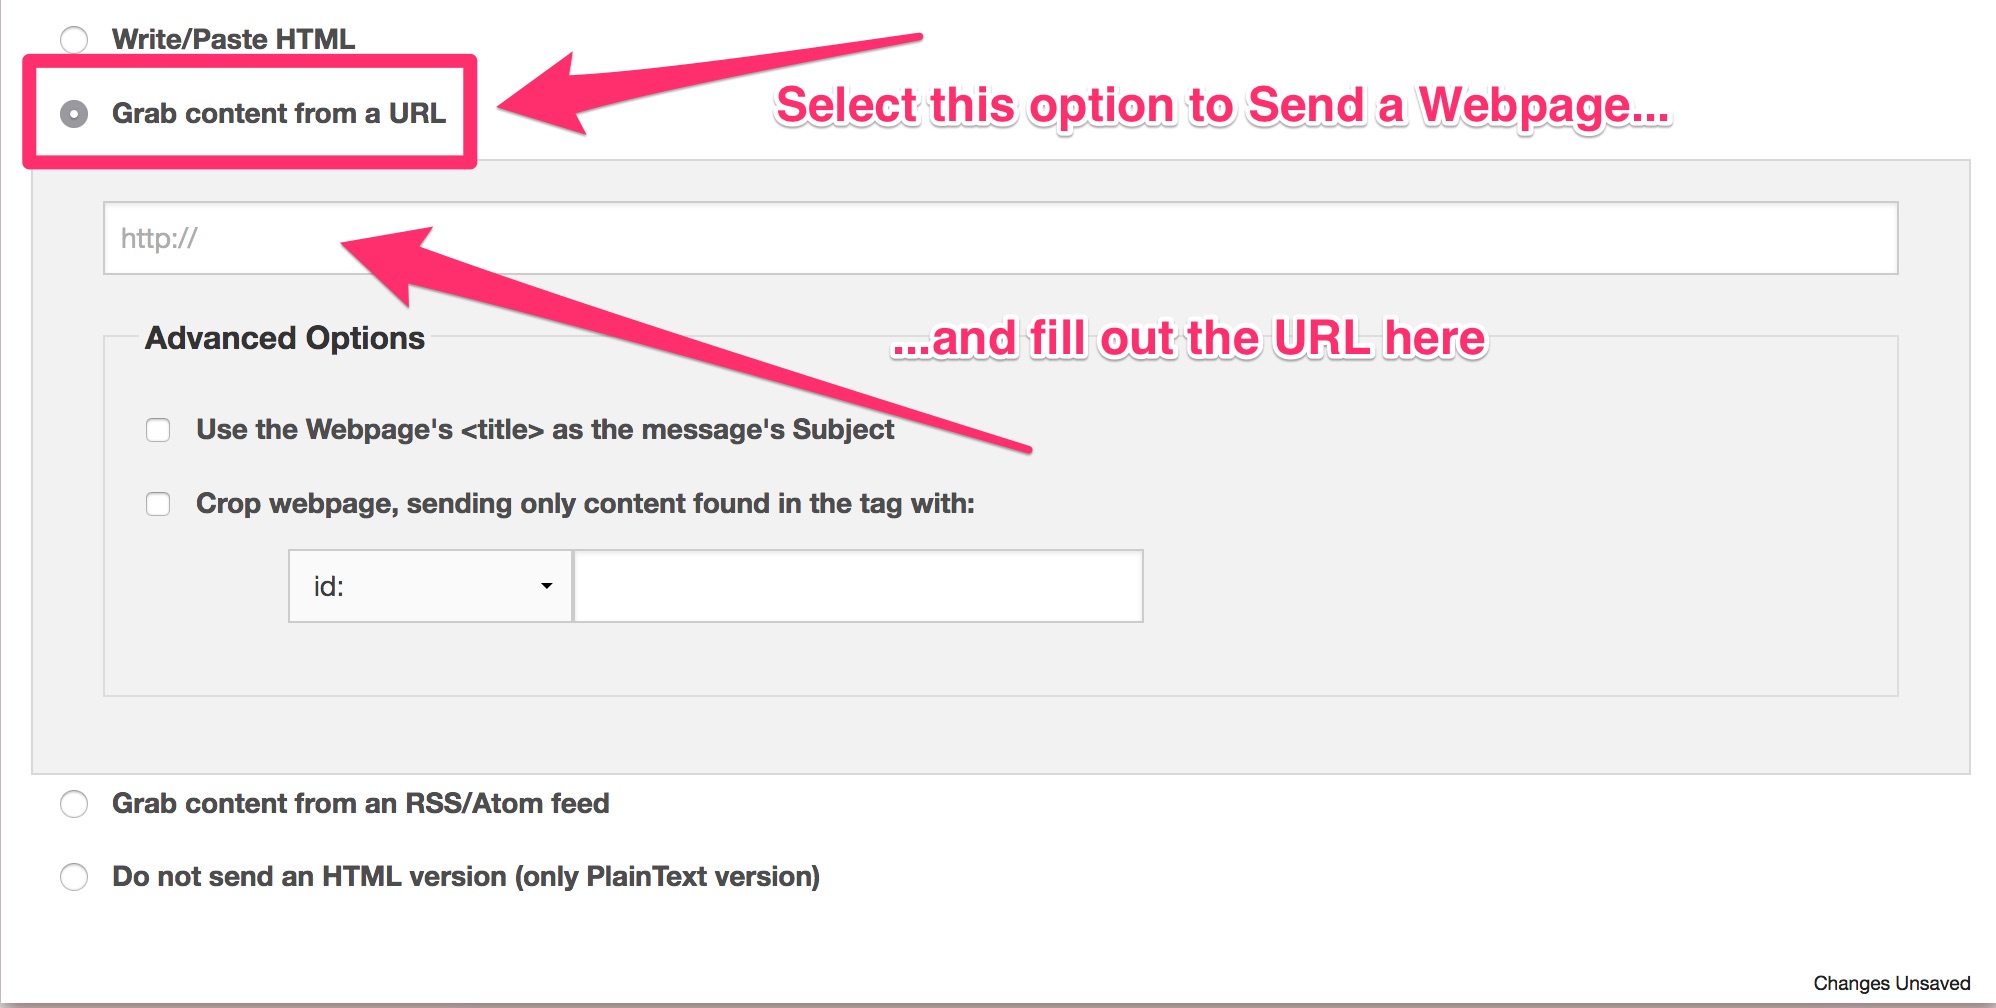
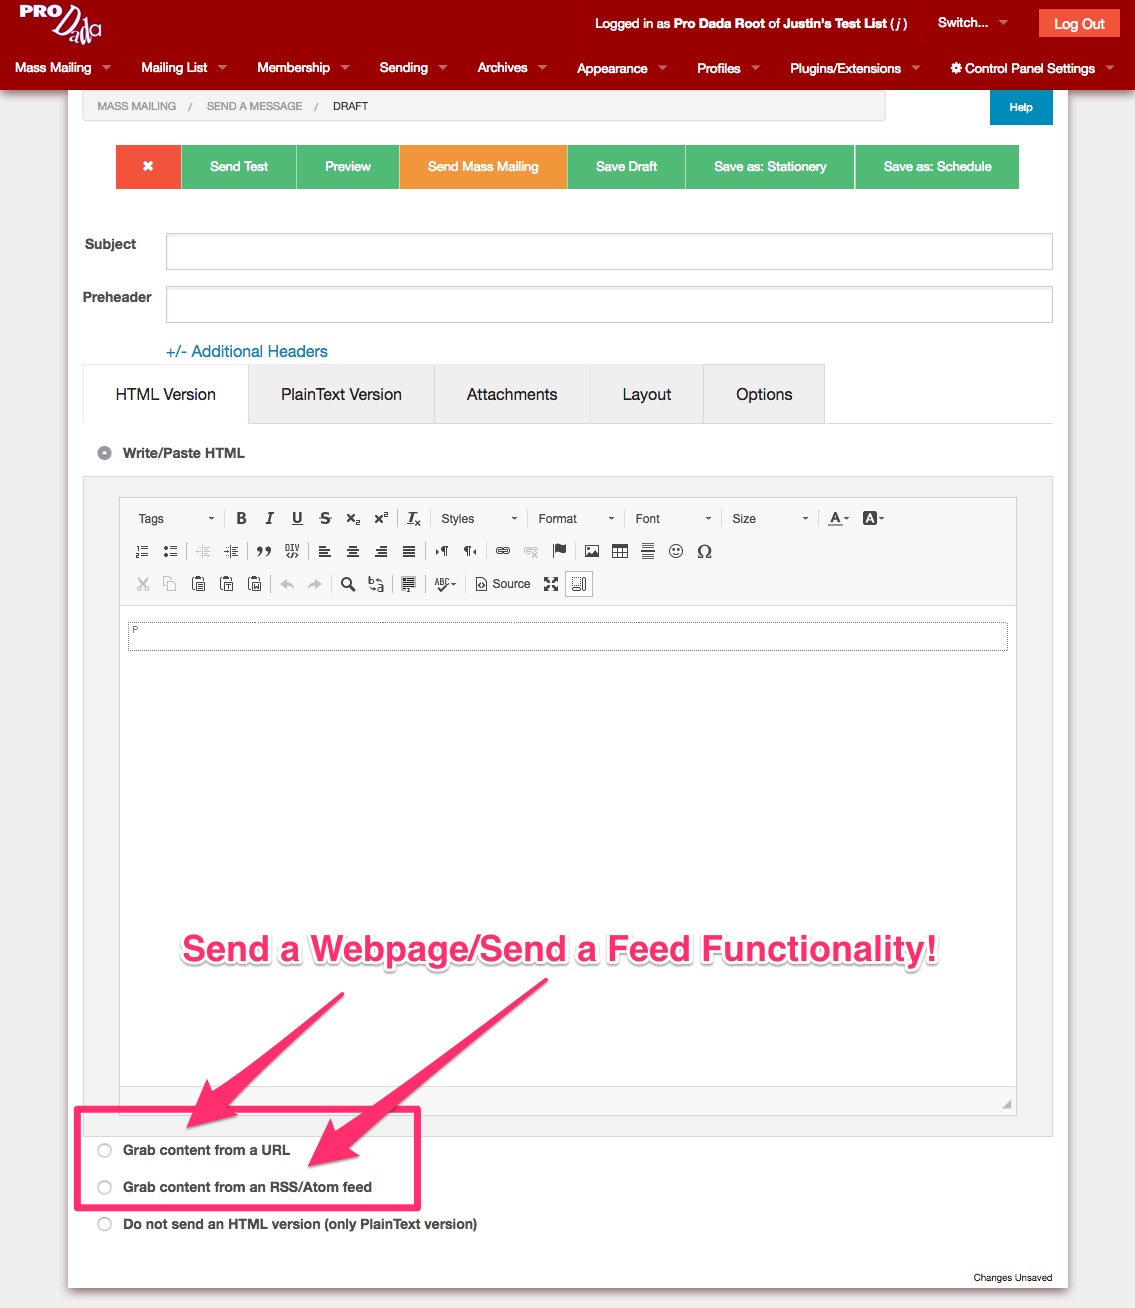
Dada Mail v11.2.0 is the first release to remove the Send a Webpage screen since it was introduced many, many years ago. Please don’t worry though, ALL the features found within that screen have been folded into Dada Mail’s Send a Message screen. We’re hoping that this design change helps simplify how and where you can go from within the list control panel to create a message.

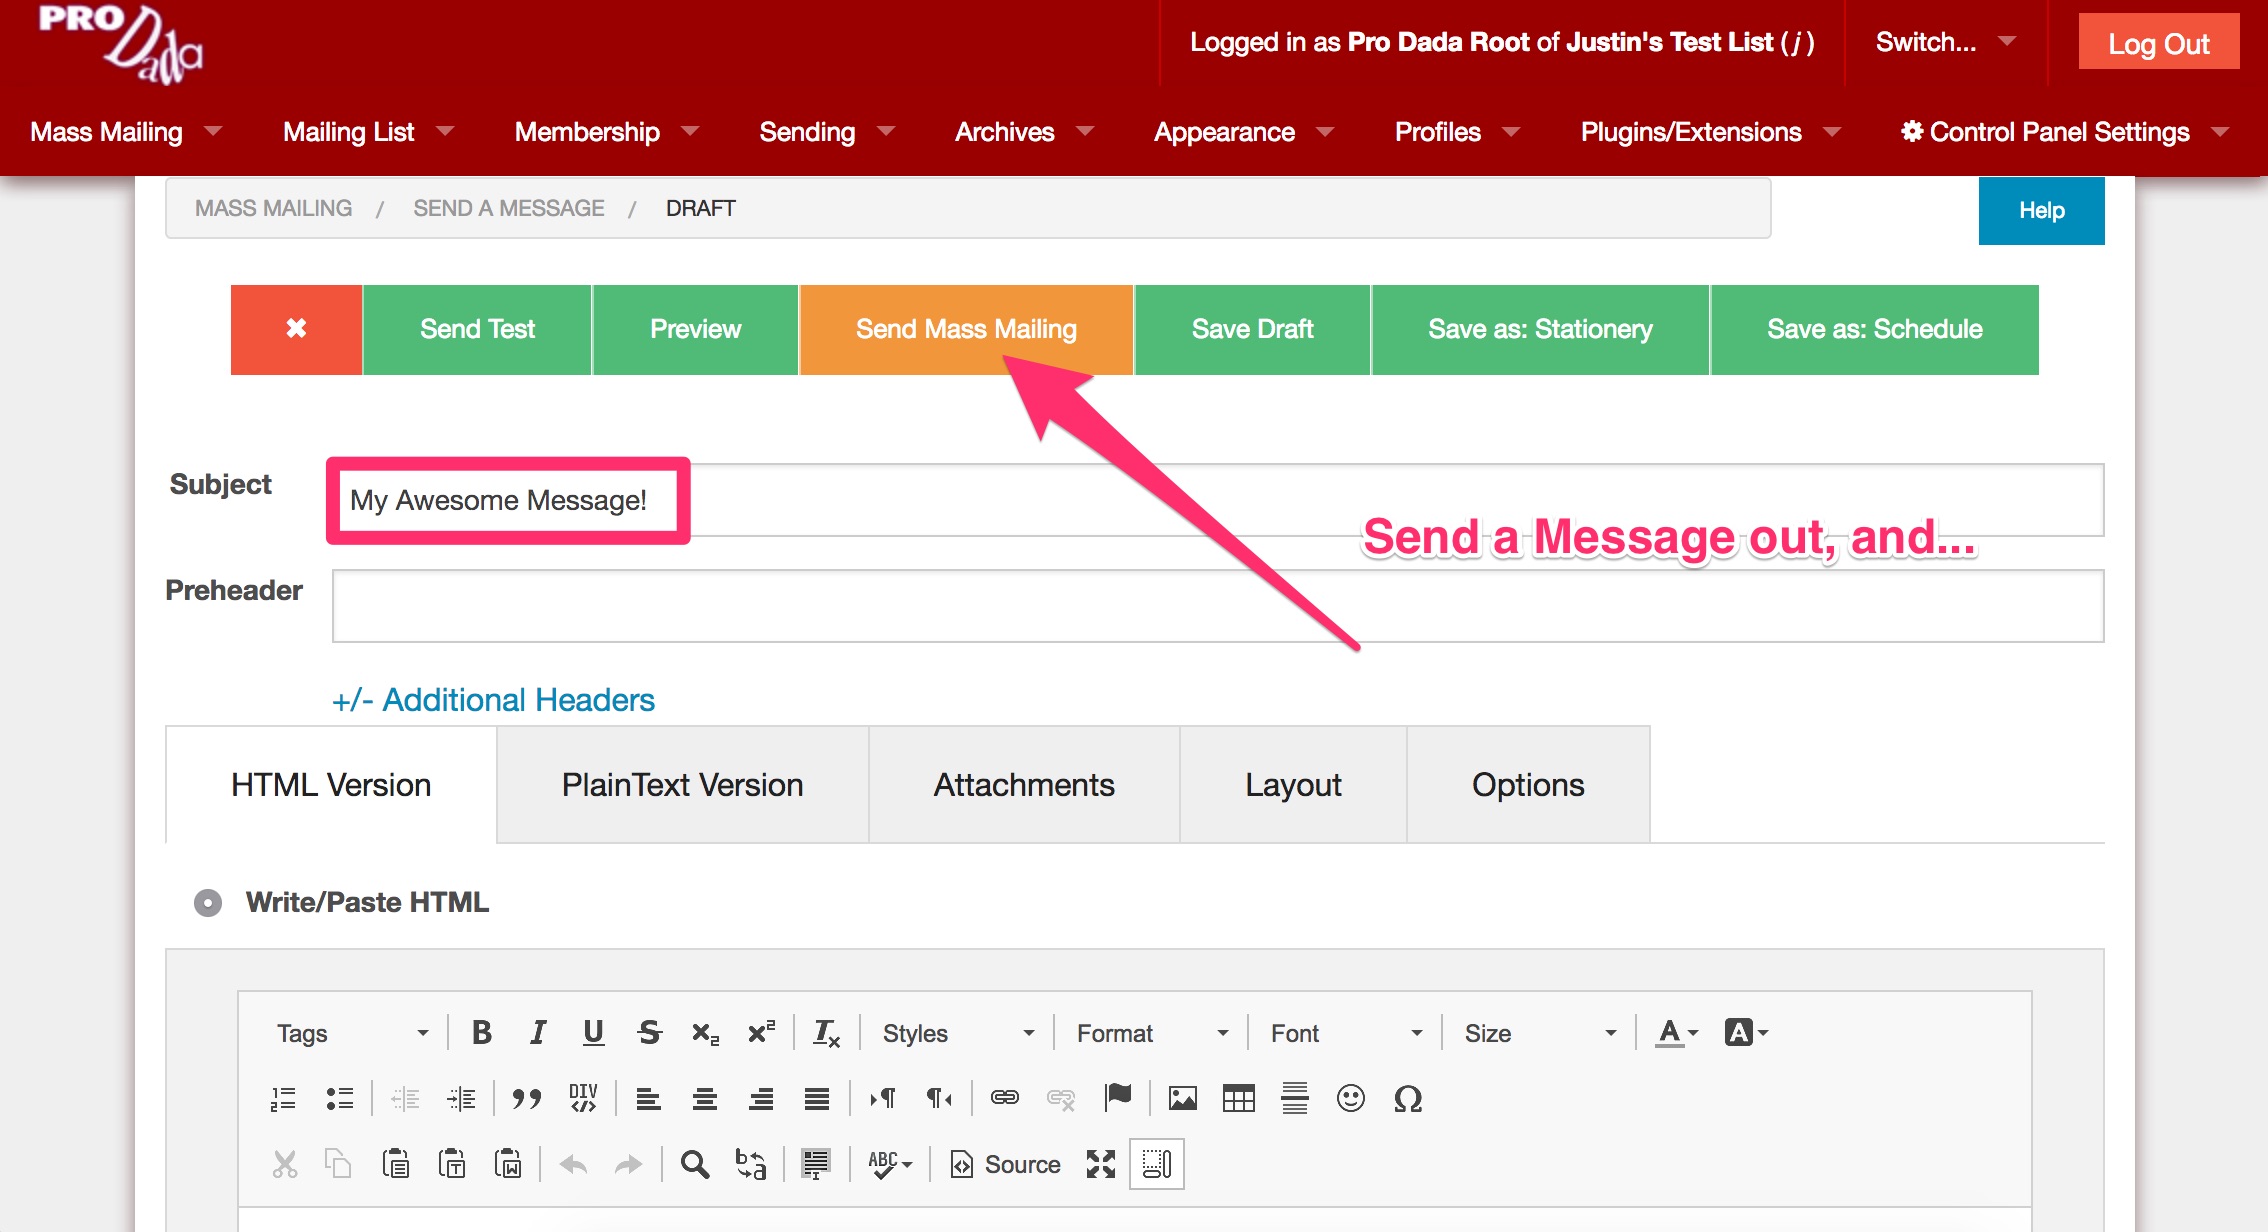
Look below the rich text editor for additional ways to create a message.

A mass mailing message can be created by:

  • writing or pasting content into the rich text editor
  • fetching the message from a specific URL
  • creating the message from a RSS/Atom feed

One small, but important change you’ll also discover is a simple check for any unsaved changes. If you do navigate away from the, Send a Message screen with any unsaved changes, a prompt will alert you about this, and give you a choice of canceling the navigation.

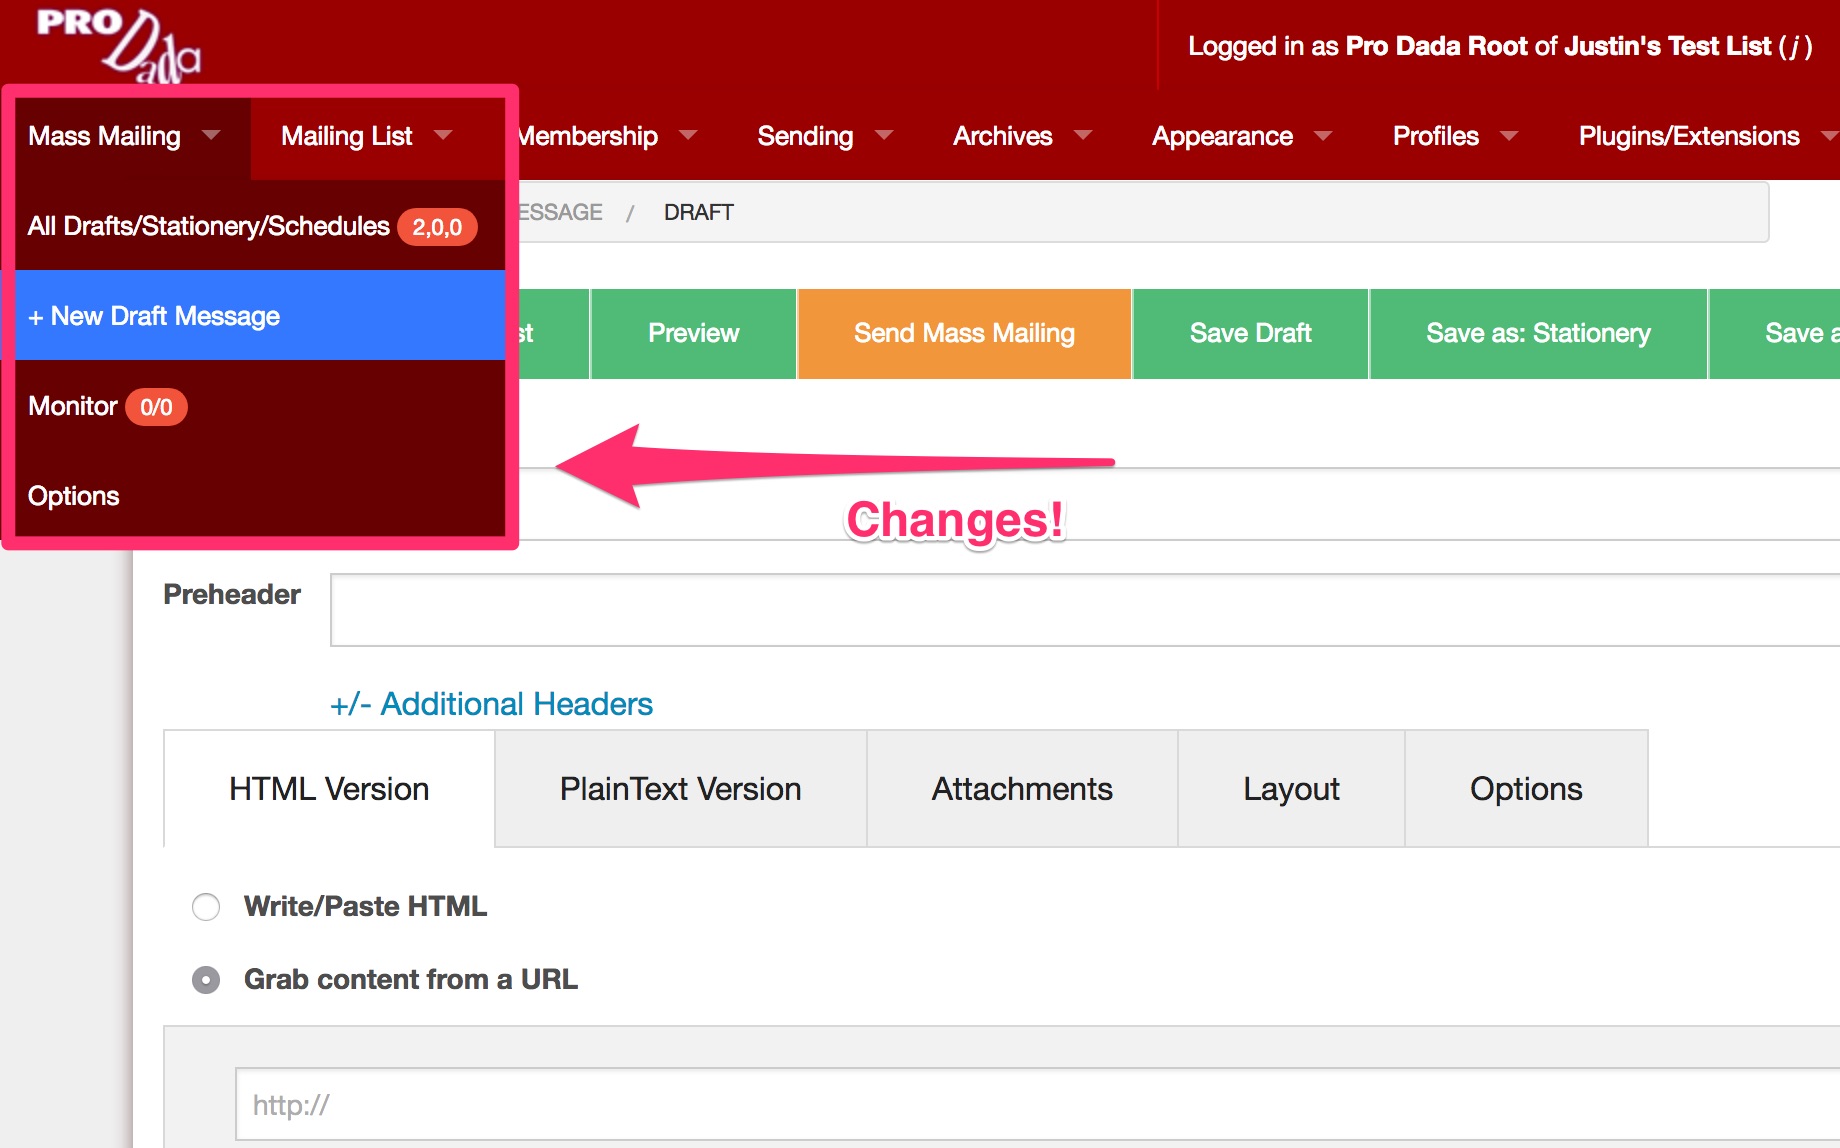
We’ve also changed the list control panels top menu:

Drafts/Stationery/Schedules now reads, All Drafts/Stationery/Schedules. This screen is where you would select the draft message you would like to work with. This screen is also the default screen you’ll see when you log into your list control panel.


We’re hoping these changes help simplify creating and working with multiple draft messages.

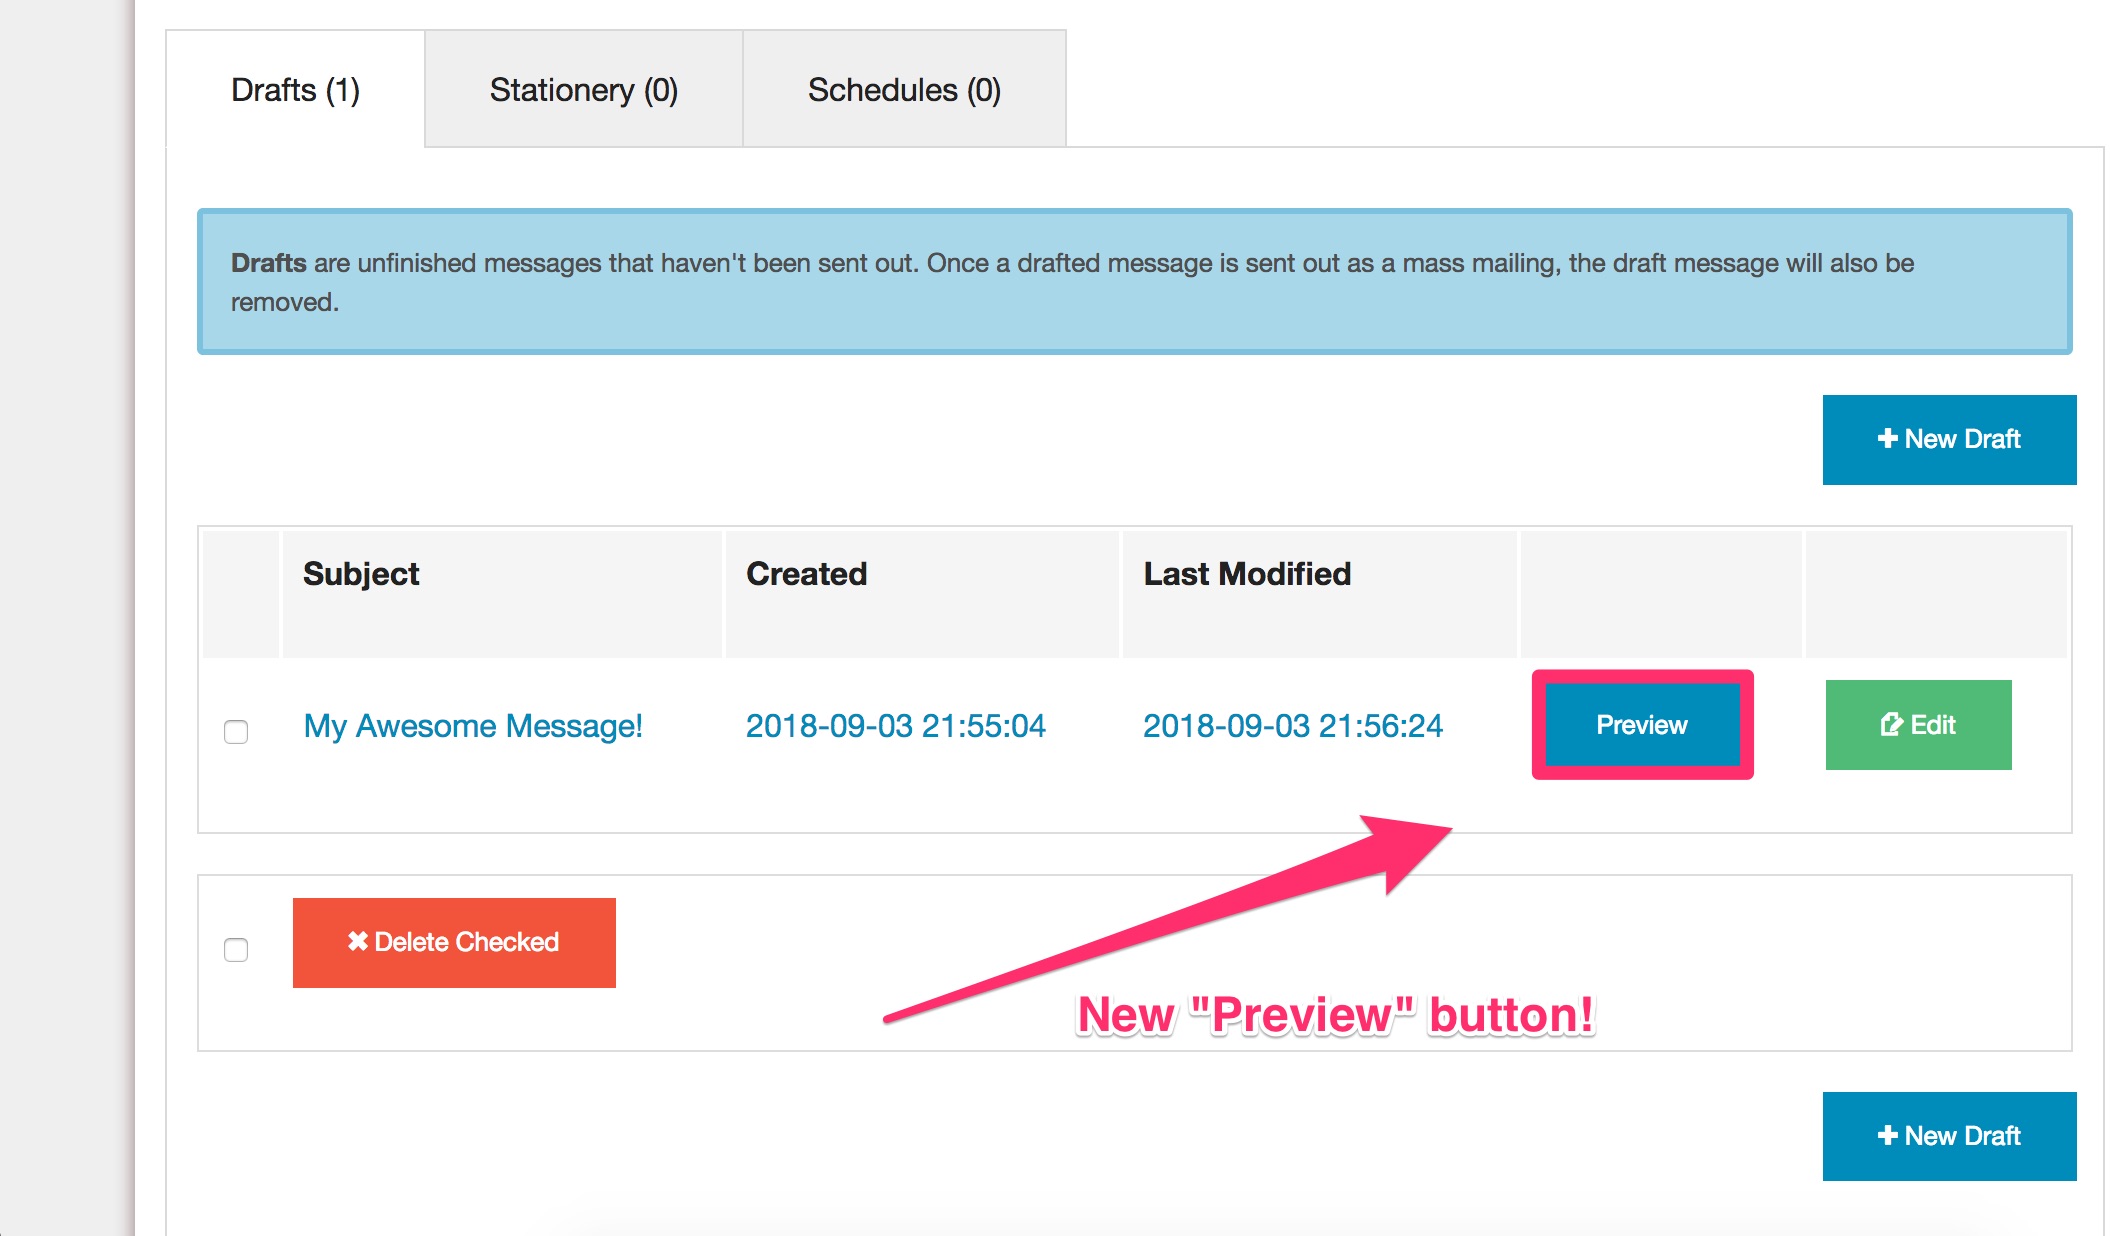
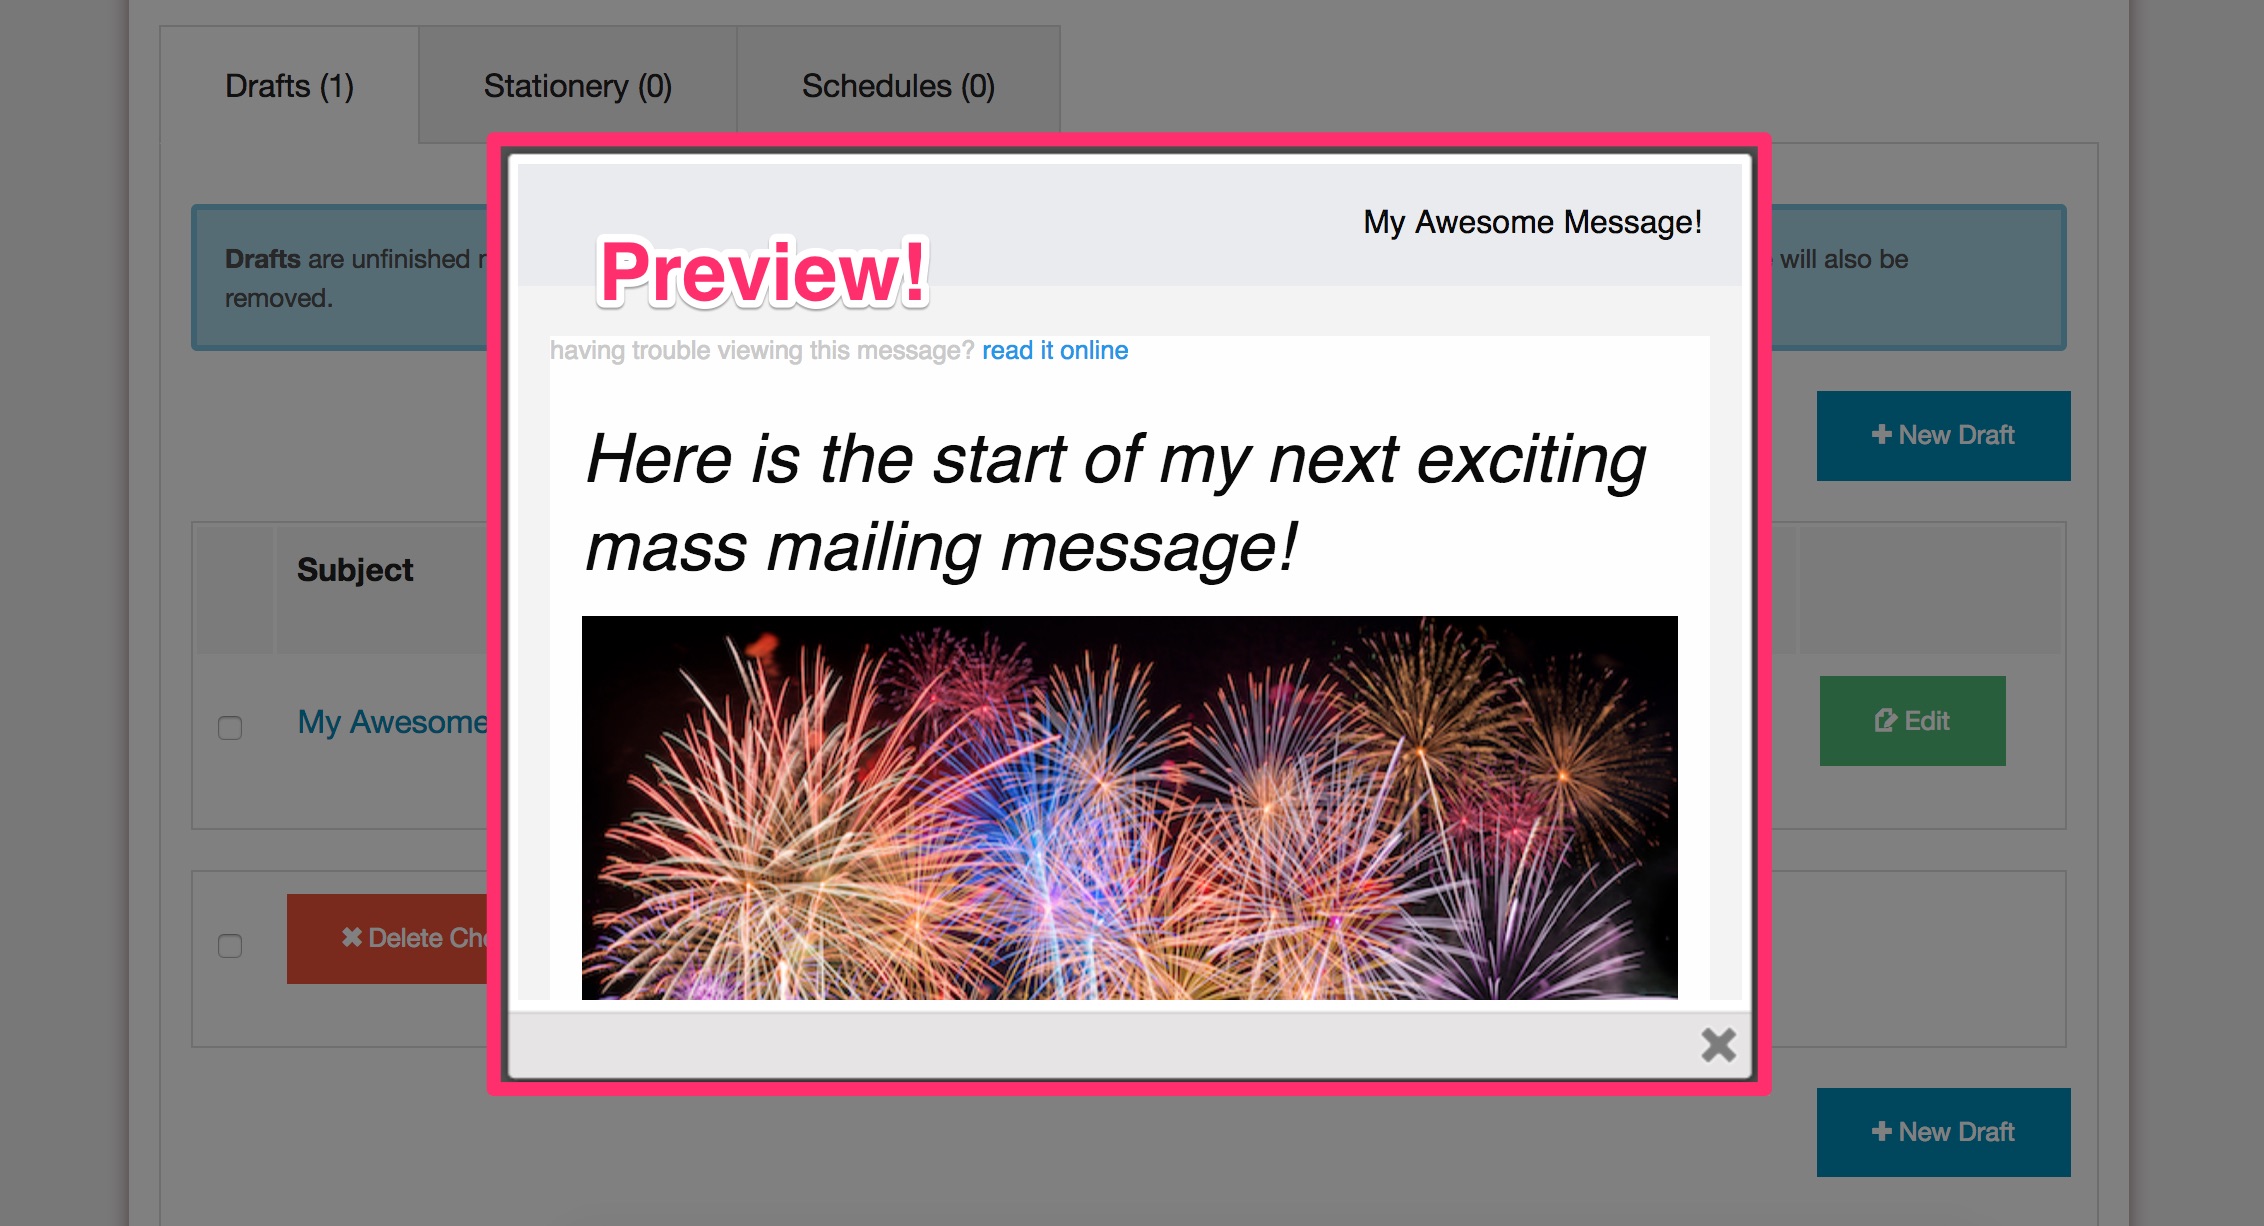
The All Drafts… has a few changes itself. The biggest one is the inclusion of a, Preview button, so you can see and compare draft messages, without having to go to the Send a Message screen!

(once clicked)

Both Send a Message and Send a Webpage aren’t listed. Instead a new menu item reads, + New Draft Message. Clicking on this menu item will take you to the Send a Message screen, and will always create a new draft message, rather than loading an already-existing draft message.

New Option: Save Sent Draft Messages as Stationery

Many times, people would like to re-use a previously sent message for a new mass mailing. Now,
Dada Mail has an option to save previously sent messages you’ve authored in the list control panel as
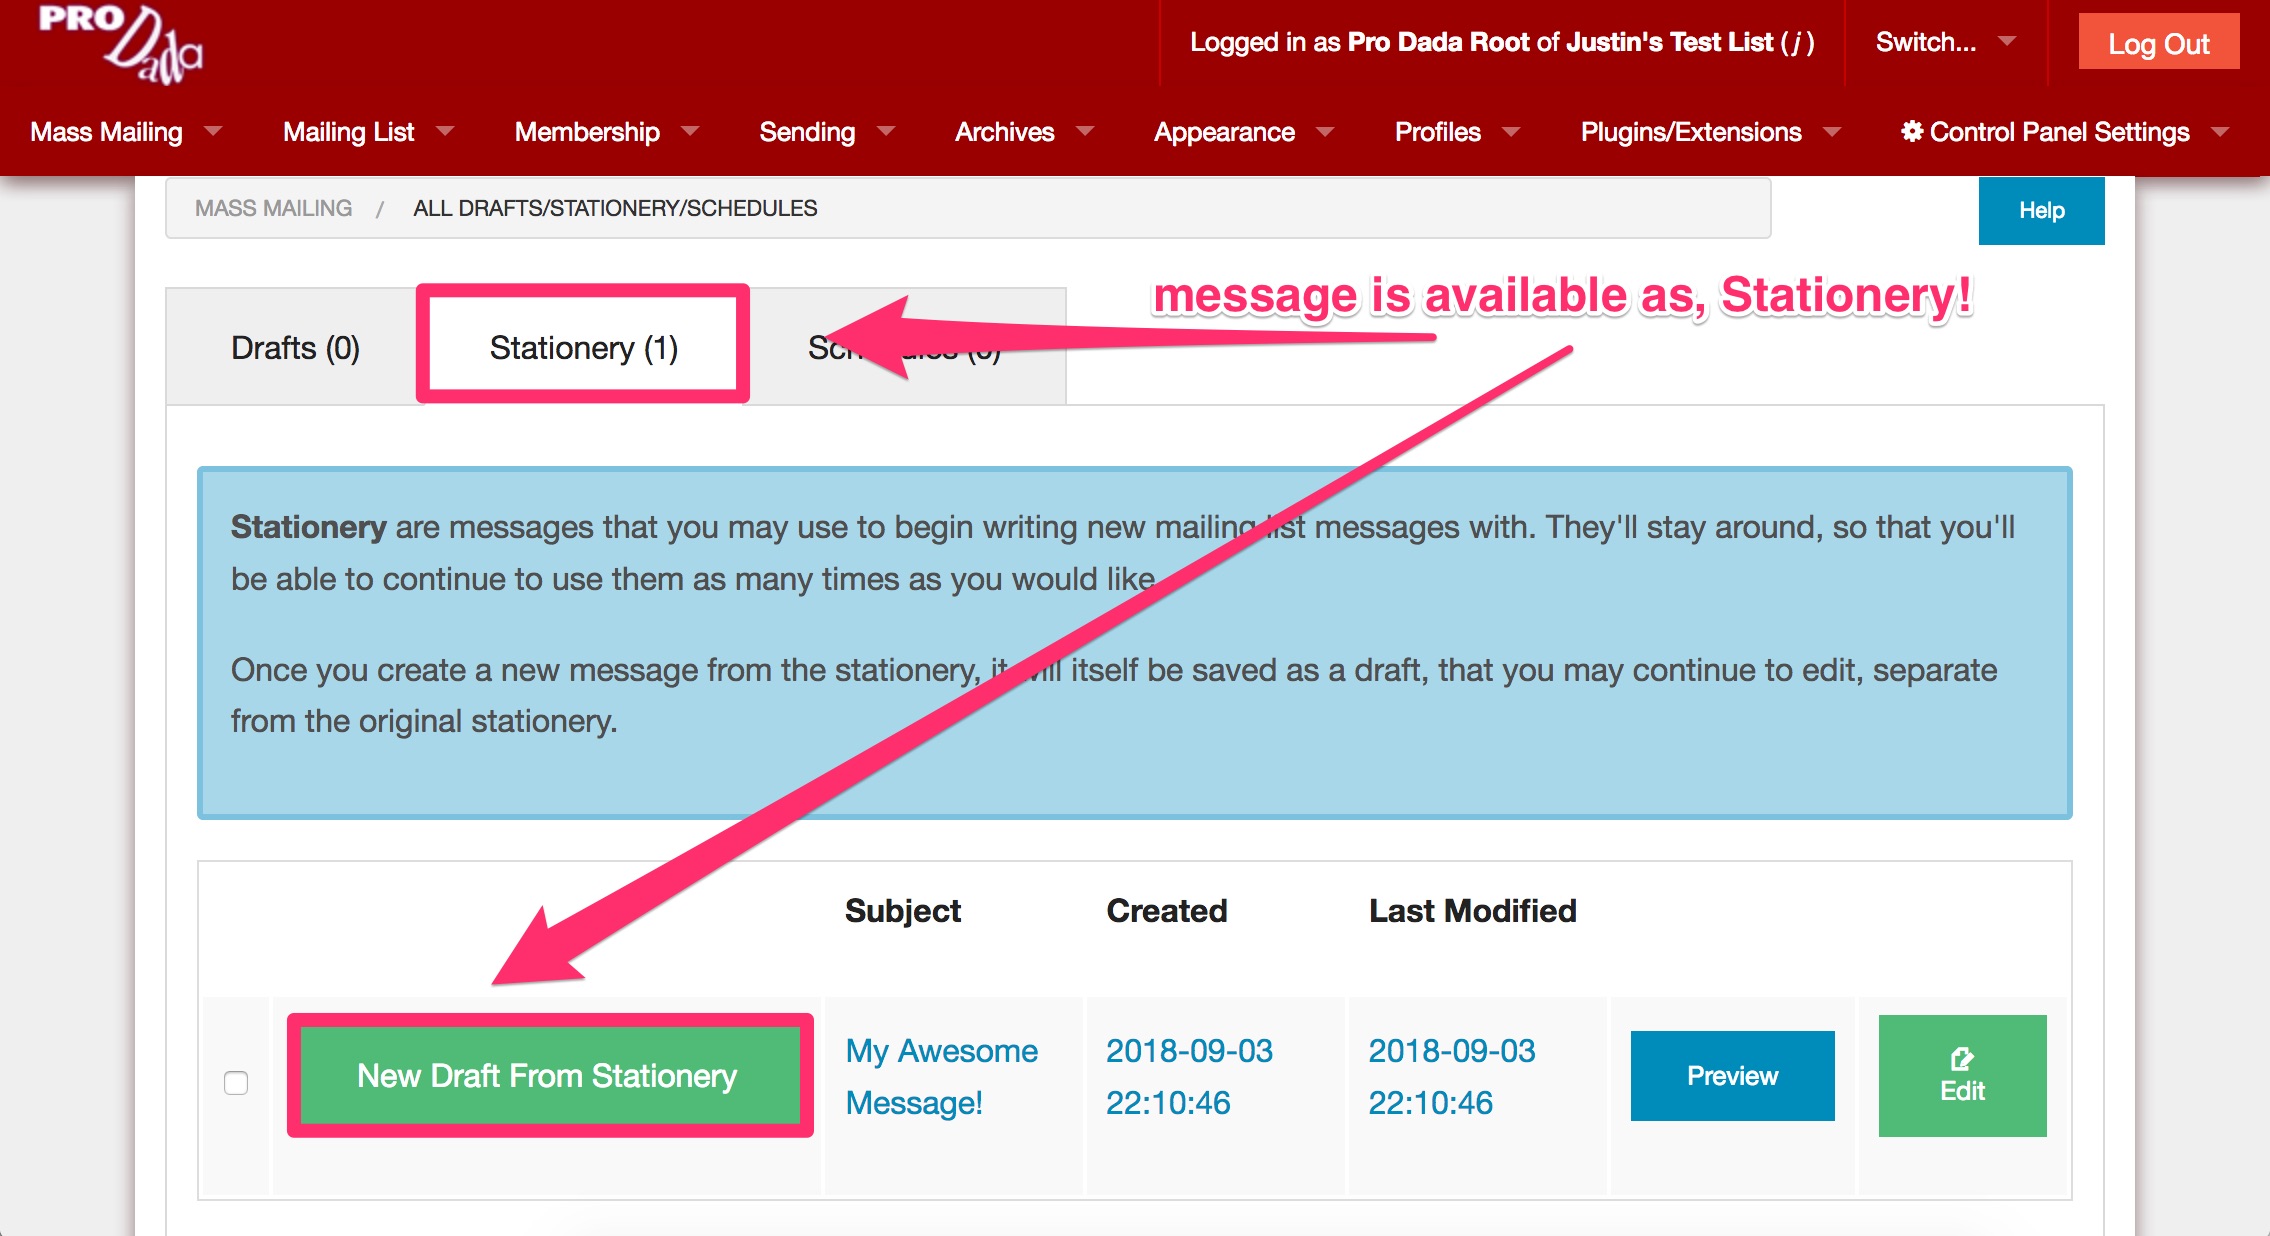
new stationery messages, which you can then use to create a new draft message from.

Here’s how:

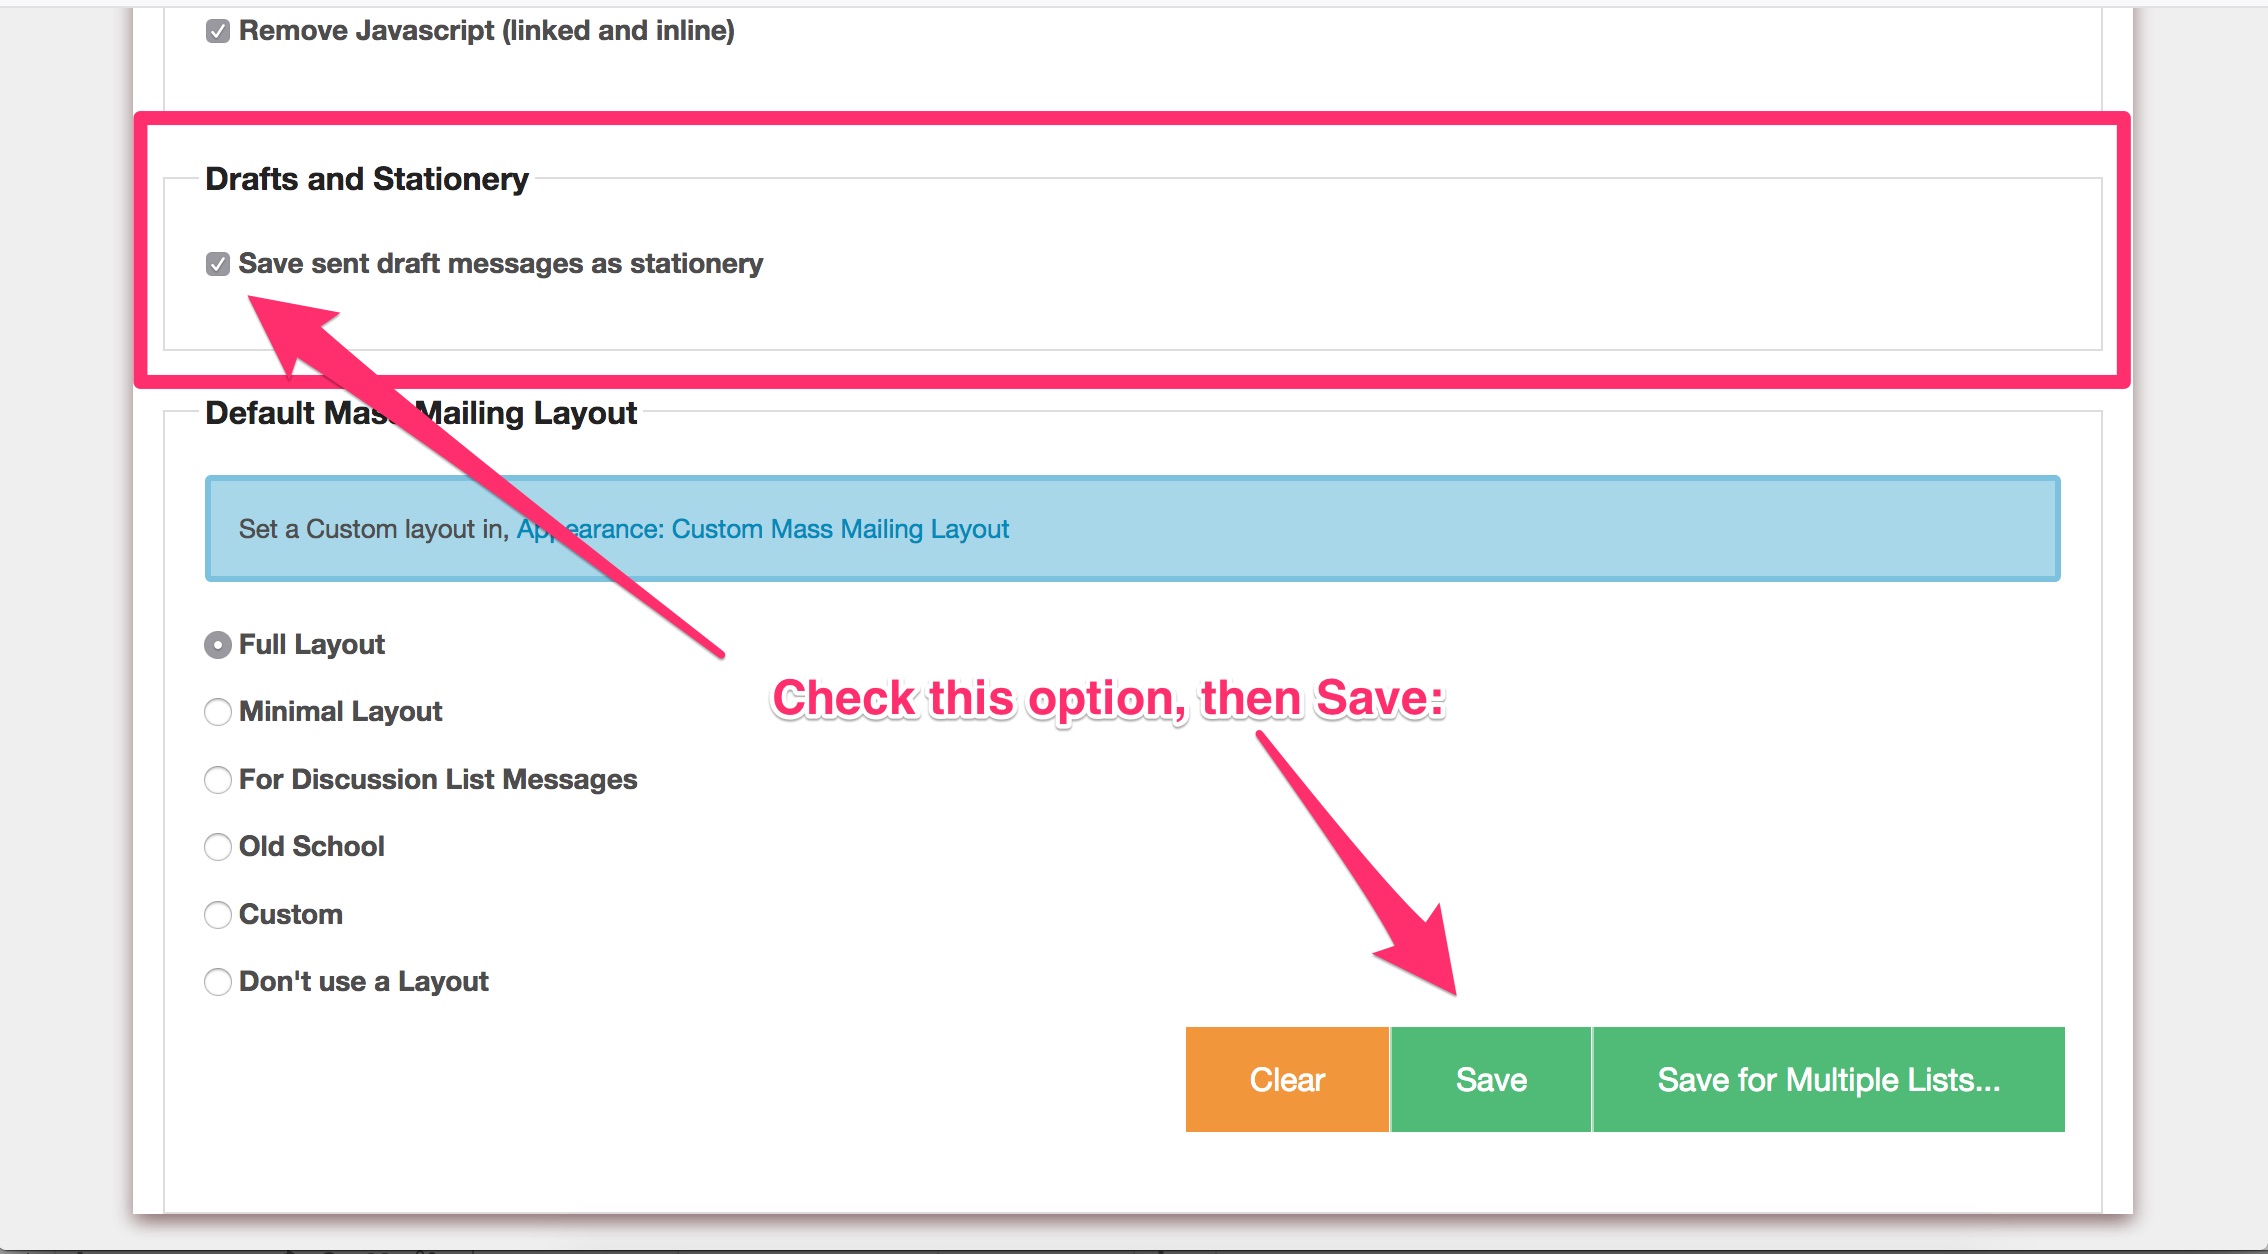
  • Once logged in, go to, Mass Mailing: Options.
  • Find the option labeled, Save sent draft messages as stationery.
  • Check that option to enabled it, then Save.

Drafts messages sent from the, Send a Message screen will now be saved as Stationery, able to be re-used for a future mass mailing message draft.

New Ignore Bounces Sublist

Discussion List Owners have reported that sometimes there’s one problem domain with important list members, who have an uncooperative mail server that seems to bounce back messages coming from the discussion mailing list. If the bounce handler is installed, eventually these members will be removed from the list, even though their address is valid. Ugh!

To counter this, Dada Mail can now ignore addresses and/or domains in a new, Ignore Bounces sublist. Here’s how to enable it:

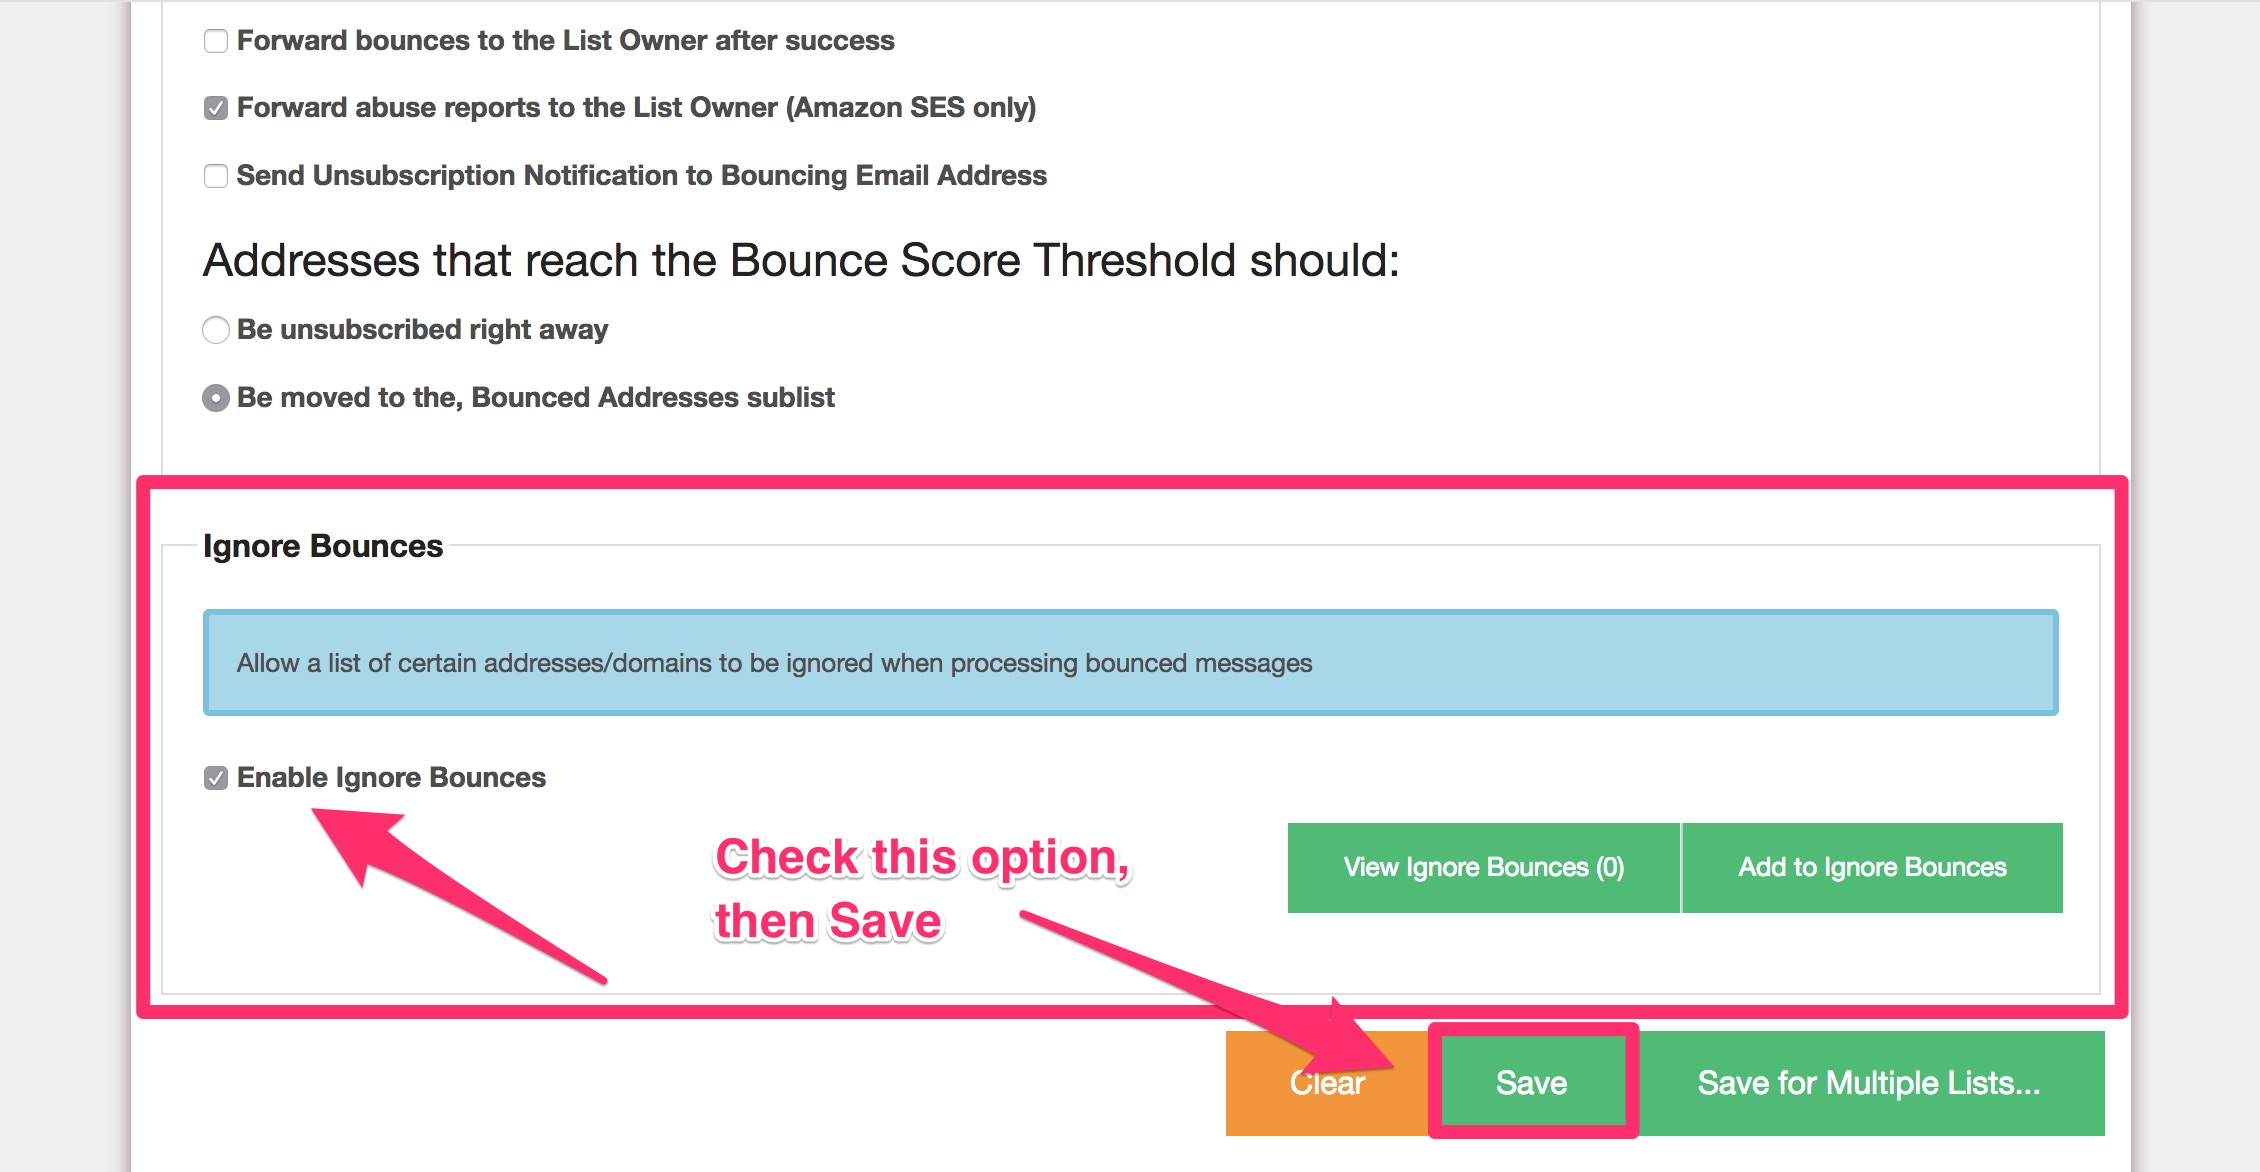
  • Navigate to, Plugins/Extensions: Bounce Handler (the Bounce Handler will need to be installed and configured).
  • Find the option labeled, Enable Ignore Bounces
  • Check this option, and Save.

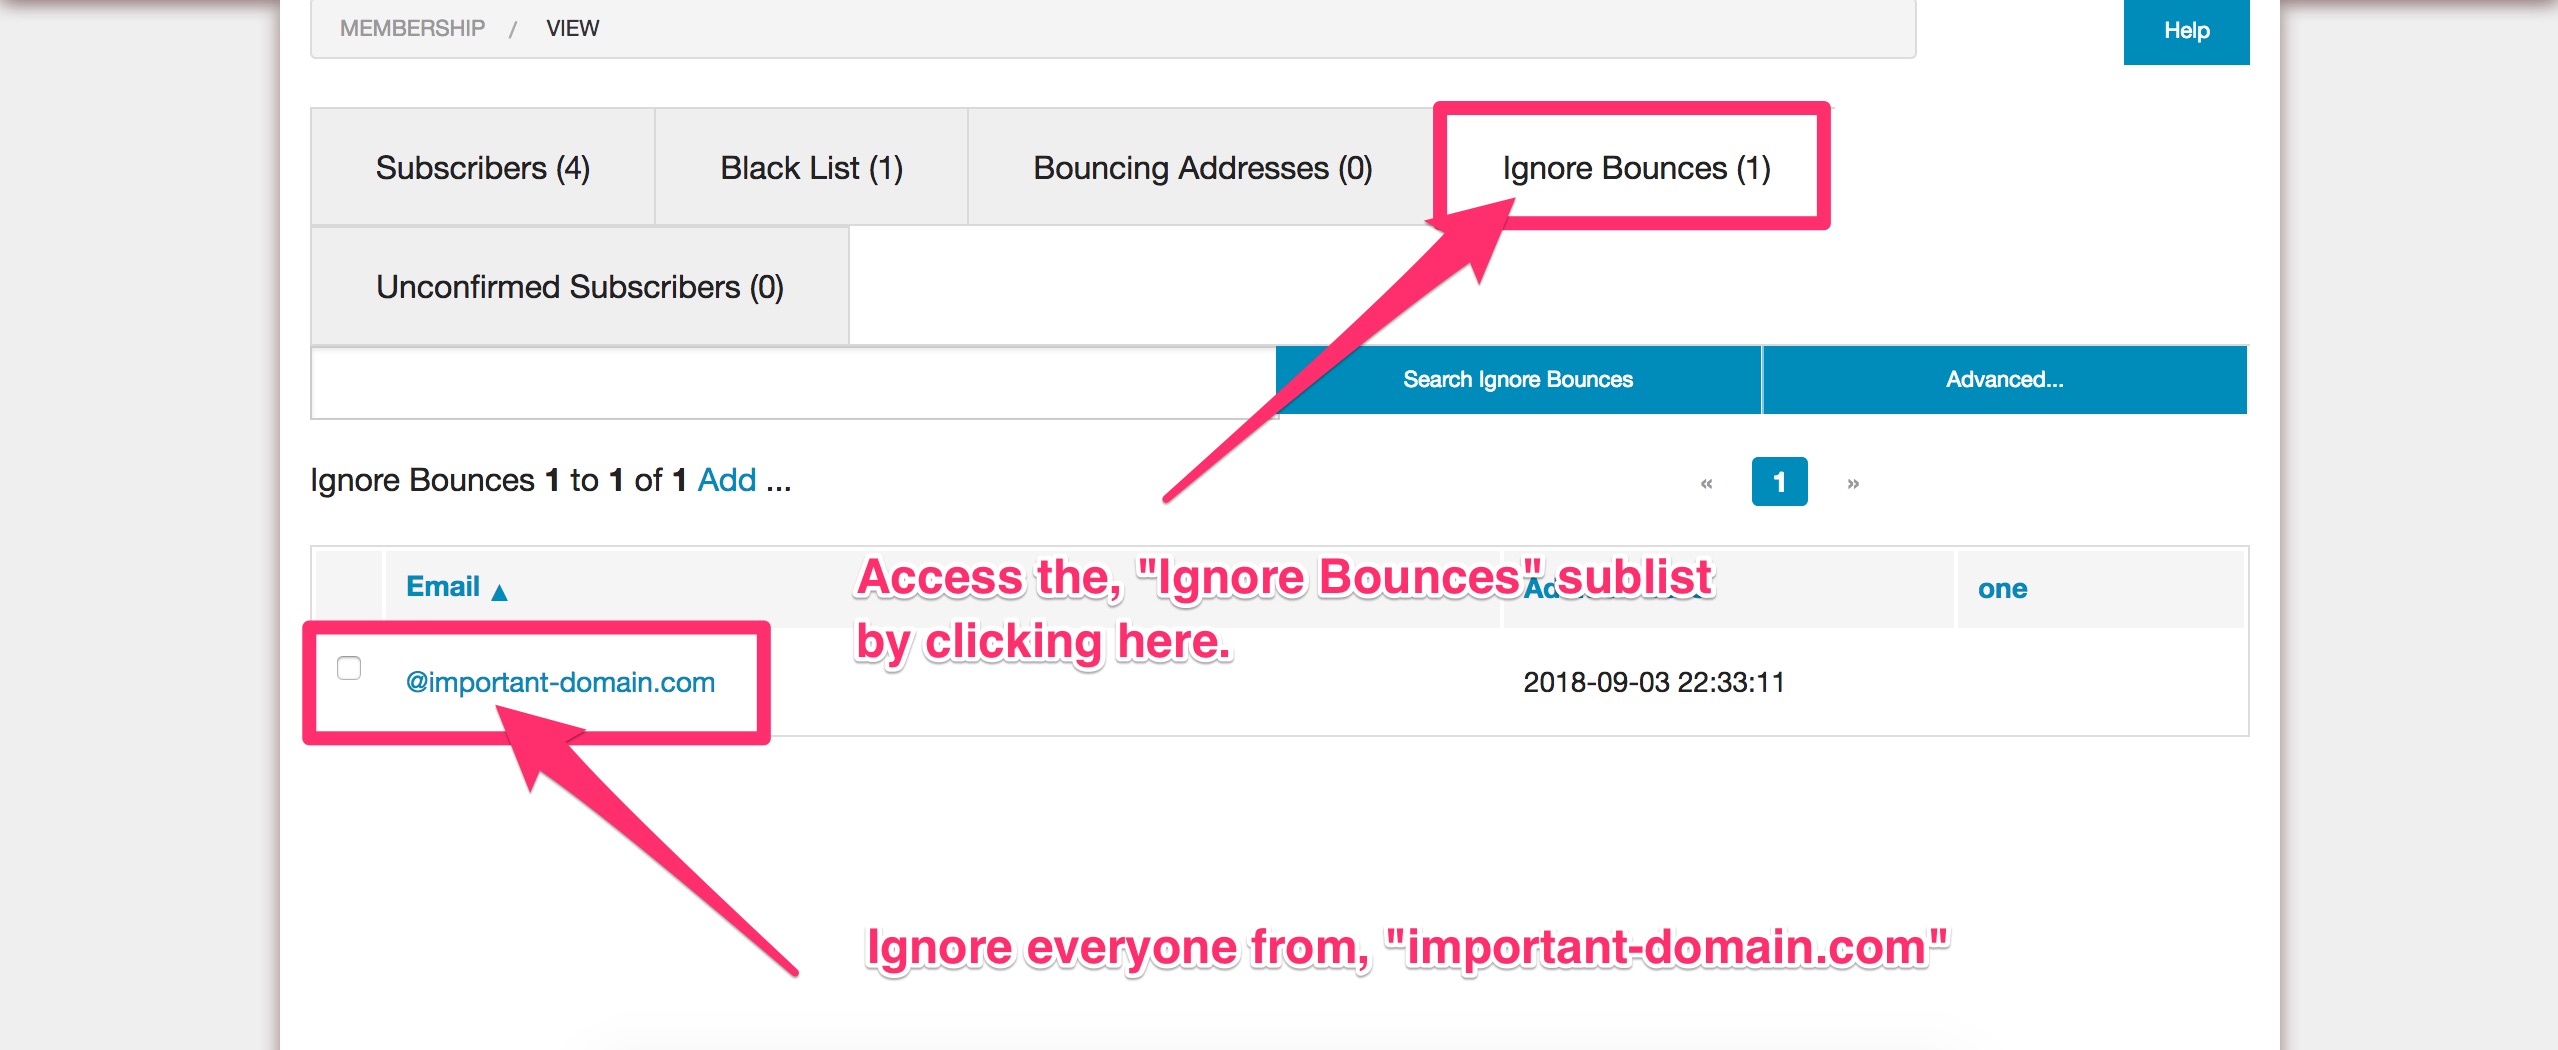
Now, when you visit the, Membership: View screen, a new tab will appear labeled, Ignore Bounces which will allow you to administrate this sublist like any other sublist:

The Ignore Bounces sublist works similar to the Black and White lists, where you can either enter in a specific address, or just part of an address. For example, adding @important-domain.com will direct Bounce Handler to ignore all addresses bouncing from from important-domain.com. Adding steve@ will ignore any email address with, steve in it, like steve@another-domain.com or steve@third-domain.com.

If these features sound awesome, give v11.2.0 a try! If you need help with installation or upgrading Dada Mail, check out our install/upgrade services!

And please, let us know how Dada Mail is working for you!


Getting Started with SparkPost Email Delivery Service and Dada Mail

SparkPost is a new Email Delivery Service. In this post, I’ll go over how to set up Dada Mail to utilize it. Using a third party email delivery service is a GREAT way to cost effectively support large mailing lists, without having to chose a different, and perhaps more costly website hosting account just to bump up your hourly email limitations. Instead, keep your current hosting setup for your website (and your Dada Mail!), but get more horsepower  in the email sending department by using a third party email sending service. We have a list of various third party email delivery services that we curate here. One advantage SparkPost has over Amazon SES is a much easier setup.

Before we get started, you may want to make sure you can connection to the outgoing SMTP server using either port 2525 or port 587. For example, my shared hosting account on Bluehost does NOT have these ports open. For Bluehost, I would have purchase a dedicated IP address to be able to use port 2525. Your own hosting account may be set up differently – double check what you’re able to do with your webhost.

Ok! Here we go:

Continue reading…


Easily Use Dada Mail with Google Analytics Campaign Tracking

Dada Mail v10.7.0 comes with new options in the Send a Message, and Send a Webpage screens, to help you easily create special query parameters that can then be understood by using Google Analytics. with them,  you can then keep track of visitors that originate from your mass mailings.

In this blog post, I’m going to assume you’re familiar with Google Analytics, and using its UTM query parameters to create custom campaigns. But, if you’re not, check out the  Google Analytics site, the docs on Custom Campaigns, the docs on Best Practices for Custom Campaigns, as well as Google’s own URL builder.

So, let’s get to it! We’ll need version 10.7.0 of Dada Mail to have this feature available, so if you haven’t already, install or upgrade to at least  v10.7.0.

First, log into your list control panel, and make sure you’re on the Send a Message screen. Find and click the tab labeled, Options.

Within that tab, click the tab labeled, Analytics:

This will reveal all the options for transforming the links in your message to work with Google Analytics and its Custom Campaigns:

Add UTM parameters to links with the following domains:

Check this option to enable the feature itself. When it’s disabled (which is the default), none of the links in your message will be touched.

Dada Mail can add the custom UTM parameters to every link in your message, or only to links that go to specific domains. If you leave the textbox underneath this option blank, all links will have custom UTM parameters added to them.

But, if you would like to only target specific domains, just list them in the textbox – separate each domain with a space:

In the example above, I’ve enabled adding the UTM parameters, and I’ve listed two domains to add them to, dadamailproject.com and, dadademo.com. Don’t list these domains with, “http://” or, “https://” – just the domain itself.

The rest of the options available are the actual UTM parameters you can set. There are five:
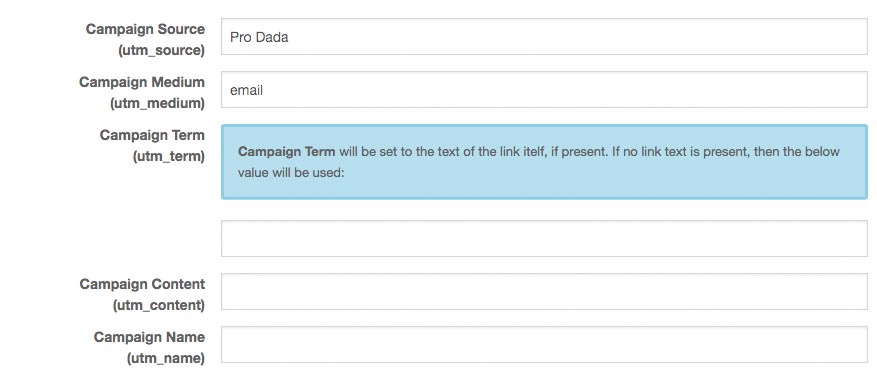
For a full description of what each of these for, see the docs I’ve linked above – start with this one which explains the custom parameters. For your convenience, we’ve set defaults for Campaign Source to the app’s name and Campaign Medium to email, so that right off the bat, any outgoing links you have you’ll know are coming from Pro Dada’s email messages!

Campaign Term is an interesting one, as we treat it a bit special than the others. You may set a default for ALL links in the textbox provided, but Dada Mail will also do its best to try to find the text associated with the actual link click.

For example, if in the source of your message, you have the following:

<a href="http://dadamailproject.com">Dada Mail Mailing List Manager</a>

Dada Mail will set the Campaign Term to, Dada Mail Mailing List Manager. Then, you’ll know that that specific link was clicked, and not the link you have with the same URL in it, that says:

<a href="http://dadamailproject.com">
    Download and Install Today!
</a>

This will report a Campaign Term of, Download and Install Today! You can then track which links work better in your mass mailings.

In fact, all these parameters can be overridden in two other different ways.

The first is to simply set the parameters yourself. If you use Google’s Campaign URL Builder for example, and use the URL it creates in your message, Dada Mail will observe those parameters, and will not override them. For example, let’s set the Campaign Term to, “Best Mailing List Manager” in the URL Builder:
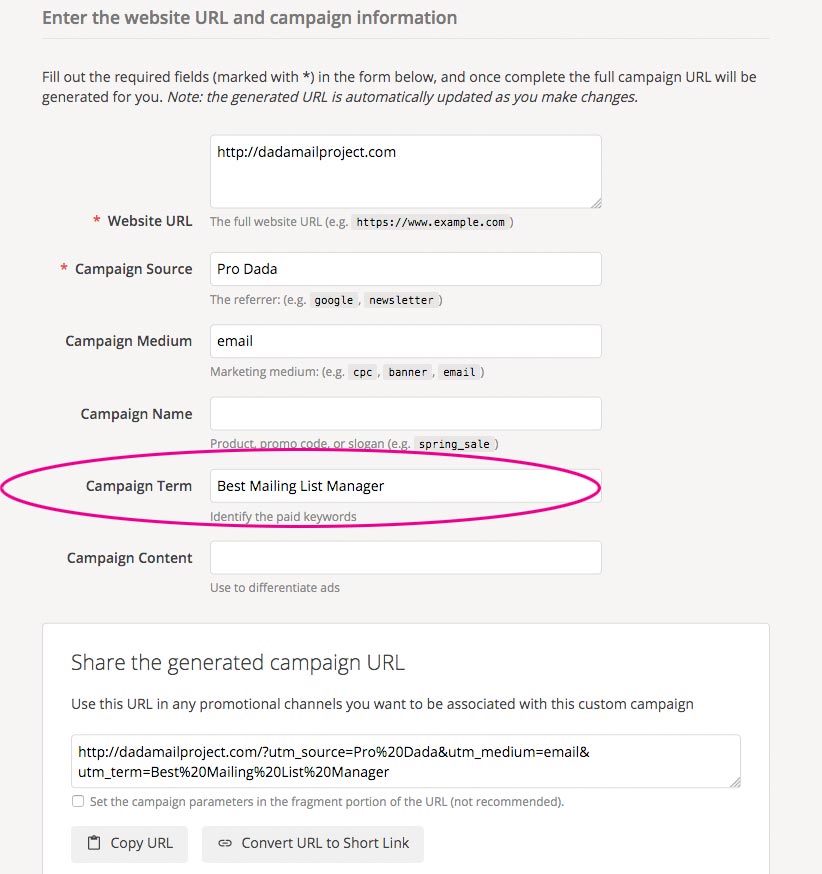
Here’s the URL it created for me:

http://dadamailproject.com/?utm_source=Pro%20Dada&utm_medium=email&utm_term=Best%20Mailing%20List%20Manager

If I then use this URL like so:

<a href="http://dadamailproject.com/?utm_source=Pro%20Dada&utm_medium=email&utm_term=Best%20Mailing%20List%20Manager>
    Download and Install Today!
</a>

Dada Mail will keep the Campaign Term, Best Mailing List Manager instead of using the text that’s within your anchor tag, Download and Install Today!, or with whatever you set in the Campaign Term in the Analytics Tag. Options!

Finally, you may set any of the UTM parameters using attributes inside the anchor tag itself So, for example, to set the Campaign Term in an attribute, I would use the following attribute: data-utm_term:

<a href="http://dadamailproject.com" data-utm_term="Give+them+the+goods">
    Download and Install Today!
</a>

Now, the Campaign term will be set by Dada Mail to, Give them the goods instead of, Download and Install Today!

Here’s the order of precedence to all this:

  • Any query parameters found in the link itself have the highest precedence.
  • Next, are the dada-utm_* attributes in the anchor tag, itself
  • Then, (for Campaign Term), it’s the actual text found wrapped inside the anchor tag
  • Finally, the parameters you set within the Send a Message/Send a Webpage screen will be used.

And that’s the new support for created the custom UTM parameters to be used in conjunction with platforms like Google Analytics. Give it a try, and let us know how it’s working for you. We’re looking forward on building upon this start of the feature and to add improvements over time!



Add Google reCAPTCHA on Dada Mail Subscription Forms

You’ve asked, we (finally!) answered: v10.2.0 of Dada Mail supports CAPTCHA on the initial signup form!

Although the app has supported CAPTCHA for many years for a whole bunch of things in the app, we never added support for the initial signup form. We were worried about the usability of forcing your potential subscribers to solve a CAPTCHA.

Why have we changed our minds?

Google’s latest reCAPTCHA system is a whole lot more usable to work with, and the threat of abuse on things like newsletter subscription forms is just not going away. So, why not make support at least an option?  Those who would like the subscription form to work as it always has still can. Everyone else can enjoy the enhanced security. Seems like a big win.

Another big change in Dada Mail’s CAPTCHA system is that we now only support the latest version of Google’s reCAPTCHA system (version 2). In the past, we also supported reCAPTCHA version 1, as well as a CAPTCHA system based on, Authen::Captcha.  To keep the code simple and bug-free for something so security-specific, we’ve removed these other choices.

Setting up Google reCAPTCHA in Dada Mail

Create a Site and Secret Key Pair

Sign up for the Google reCAPTCHA service at,

http://www.google.com/recaptcha/admin

and create a site and secret key pair for the site you have Dada Mail installed at, as outlined here:

https://developers.google.com/recaptcha/docs/start

Make sure you record both the site and secret key somewhere safe – we’ll be using them, later.

Configure Dada Mail to use Google ReCAPTCHA

Plugging in the site and secret keys, and telling Dada Mail to use Google reCAPTCHA is done in Dada Mail’s global configuration. The easiest way to work with that is through Dada Mail’s included web-based installer, so an install or upgrade would be the perfect time to set all this up. If you have v10.2.0 (or later) of Dada Mail installed, you can also drop back into the installer to make these configuration changes.

Once in the installer’s configure screen, look for the Advanced Options. This is where you can setup the plugins/extensions, as well as many of Dada Mail’s more advanced features. If you do not see these options, click the button labeled, Show/Hide Advanced Options…

Next, look for a checkbox labeled, Configure CAPTCHA Options. Check the box, and the CAPTCHA options will be revealed.

Check the box labeled, Add CAPTCHA on all subscription forms if it’s not already checked.

Now, you’ll need to plug in the site key and secret key in the textboxes labeled, reCAPTCHA Site key: and, reCAPTCHA Secret key:

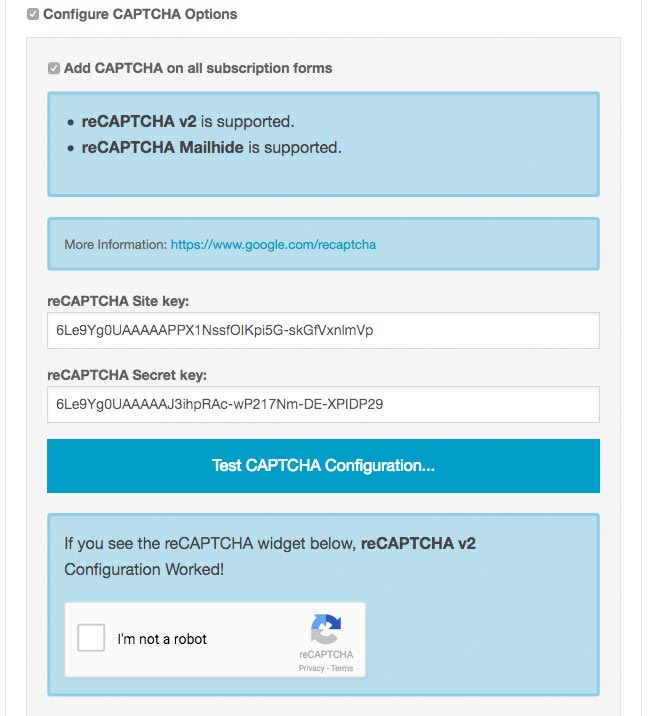
Once that’s all set up, you can test to make sure if everything works, but clicking the button labeled, Test CAPTCHA Configuration… If everything works correctly, you’ll be shown a working reCAPTCHA v2 widget!

google_recaptcha_v2

And you’re done! Complete the installation process, and enjoy a CAPTCHA-full Dada Mail.

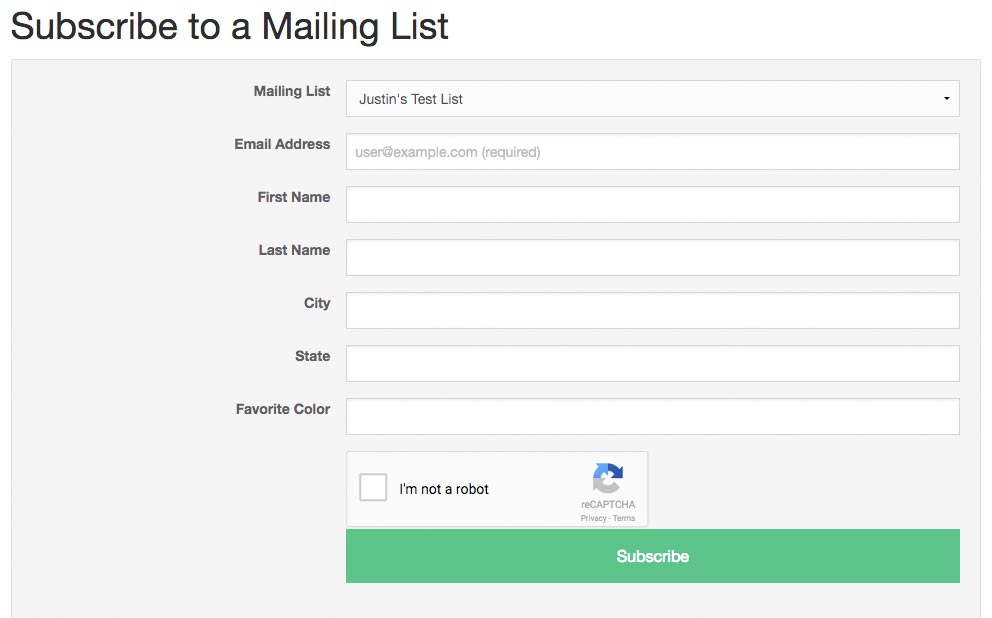
Here’s what my own subscription form now looks like, with the added reCAPTCHA widget,

google_recaptcha_v2_1

Just remember, if you have a subscription form that you’ve added directly to your website, and you have CAPTCHA now configured, those forms will have to be updated. The code available in the list control panel under, Appearance: Subscription Form HTML will do the trick.

Missing CPAN Module?

Dada Mail’s Google reCAPTCHA support requires the Google::reCAPTCHA Perl module, which you can install from CPAN in a few different ways.

Need More Help?

We offer installation services for Dada Mail, including setting up Google reCAPTCHA for your site. See all our installation services here.