New in v11.5.0: Send Test Mass Mailings to Multiple Recipients

Test sending out your mass mailing is a great idea to do, before you commit to sending out the message to your entire mailing list.

In past versions, Dada Mail could only send only send a test mass mailing to one email address at one time.

Starting with v11.5.0, Dada Mail can send a test mass mailing to multiple addresses at once.

By default, this list of test recipients can be created per draft message by typing in the email addresses in the same text box that previously only supported one email address. By default, up to ten email addresses may be added to this text box, and sent a test mass mailing.

Additionally, a Testers List may be enabled so that the same list of addresses can be sent a test mass mailing for all draft messages. This sublist can be administrated simnilarly to your main Subscribers list.

Here’s where to find all these new enhancements:

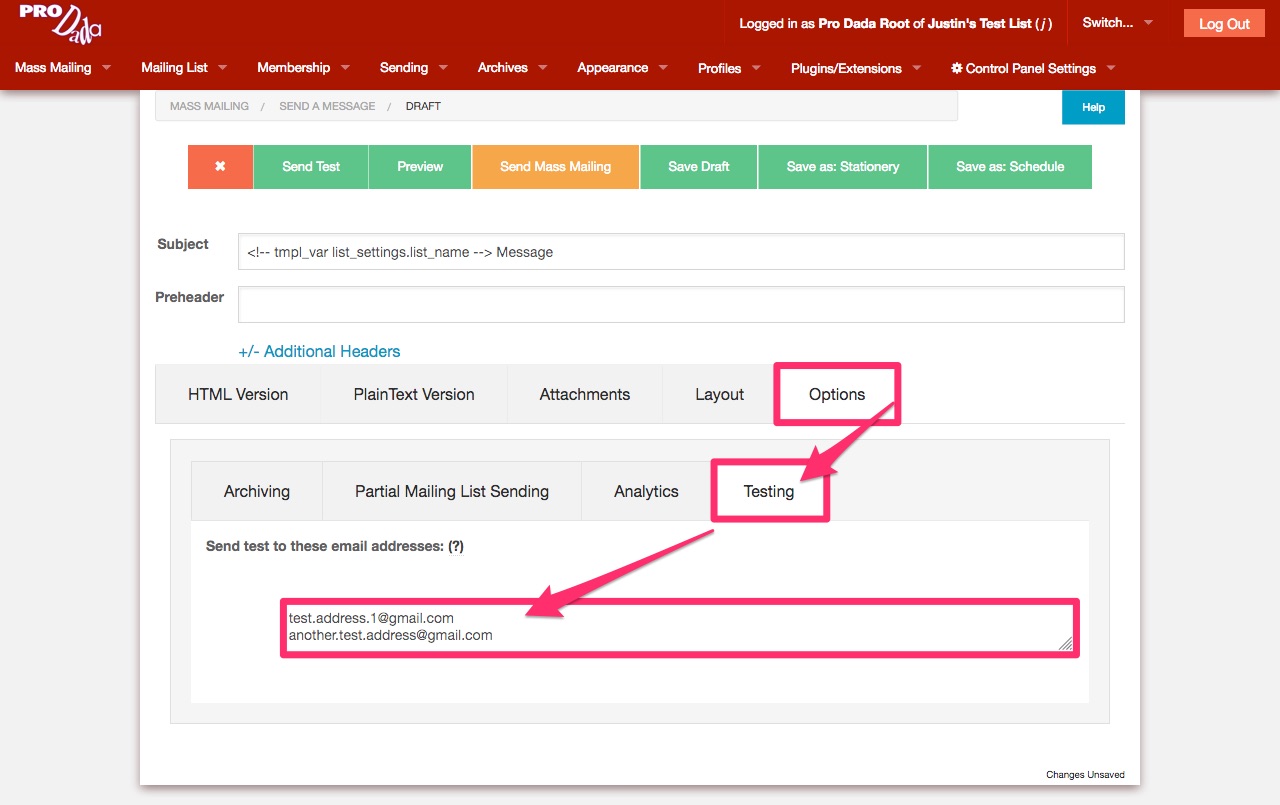
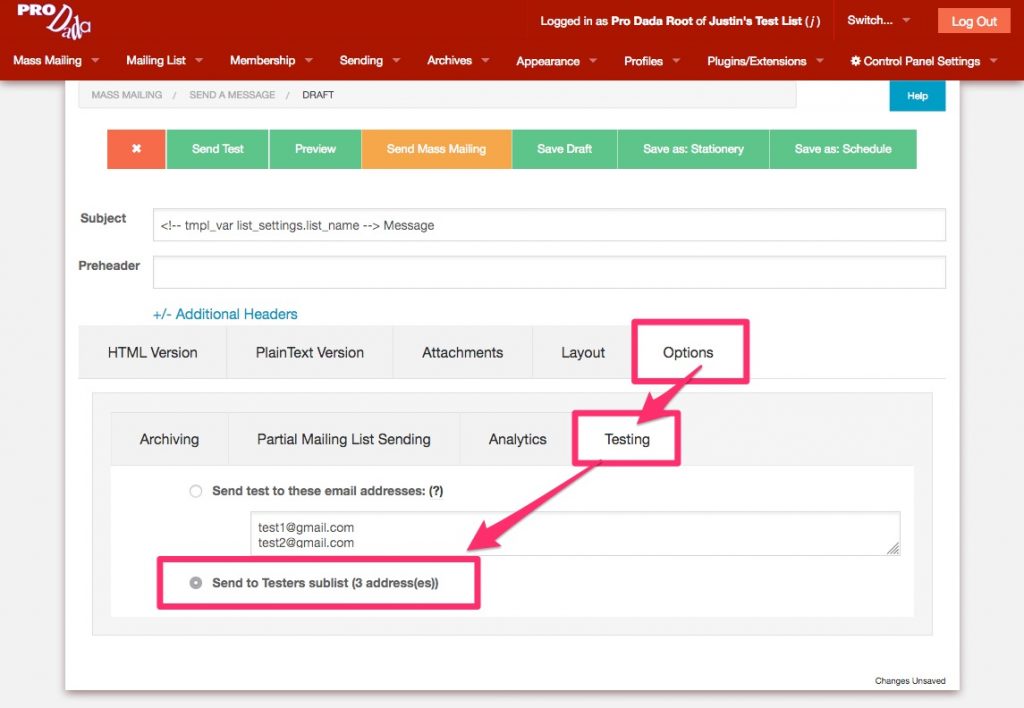
When drafting a new mass mailing, click on the, Options tab, then click on the, Testing tab. This is where you’ll find the text box to list the addresses you would like your test mass mailing to be sent to. By default, you can enter up to ten addresses (read on to find out how to change this default). Separate each address you enter in the text box by commas, spaces, and/or new lines.

When drafting a mass mailing, click on the Options tab, then the, Testing tab to find the textbox to enter in recipients to send a test mass mailing to.

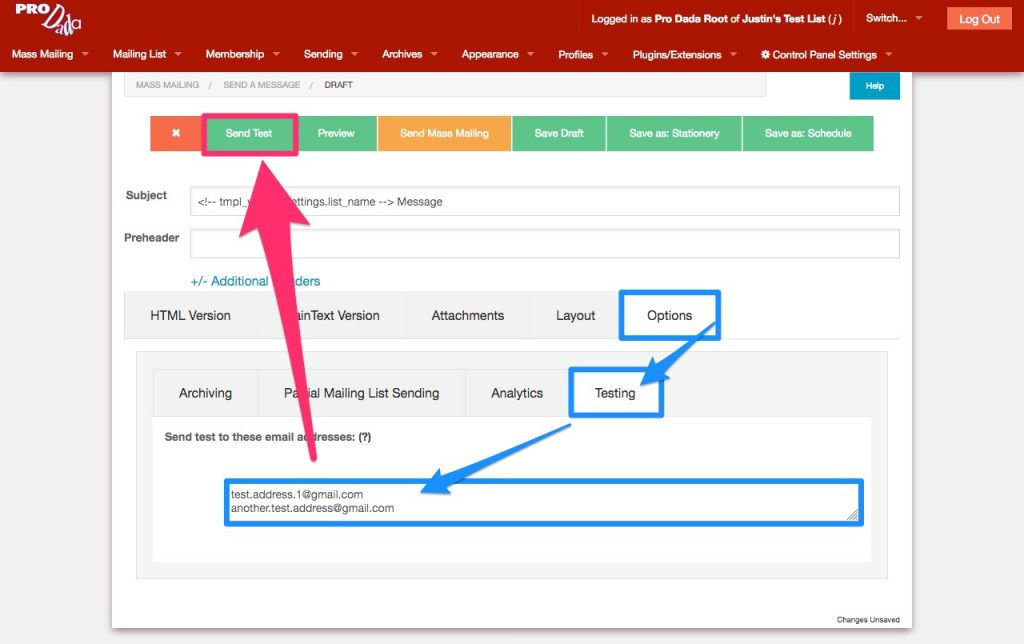
When you’re ready to send out a test mass mailing, click the button at the top of the screen labeled, Send Test.

Click, Send Test when you’re ready to send out your test mass mailing

The screen will refresh to show you the mass mailing monitor for your test mass mailing. A button will be shown at the top of the screen labeled, Return to Editing Draft.

Click the button labeled, Return to Editing Draft to get back to your draft message

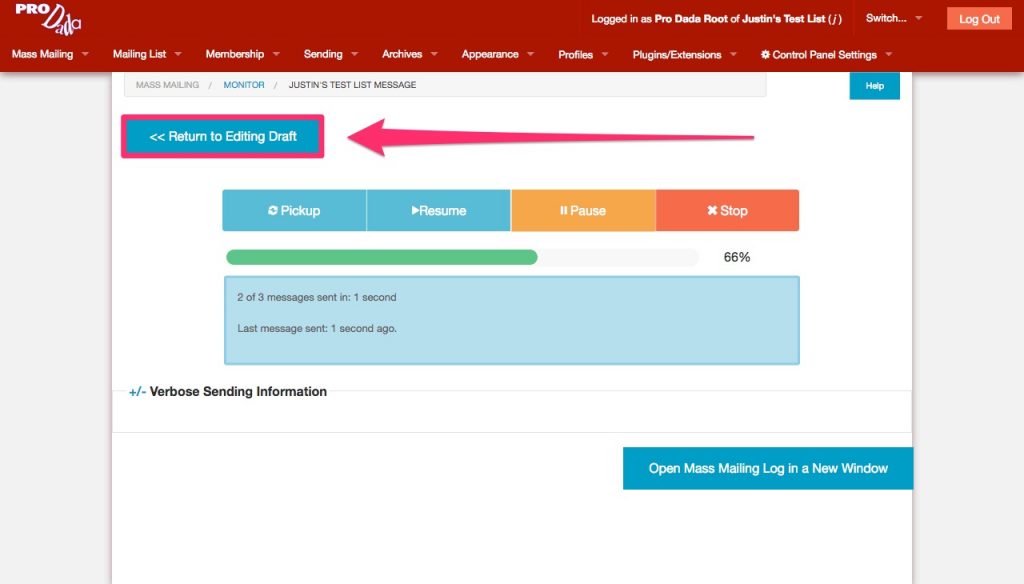
Click this button to return to your draft message, so that you can continue editing the message, or to send the mass mailing out for real. (Note: In previous versions of Dada Mail, you would never leave the draft editing screen, as only one email address would be sent the test mass mailing.)

To enable the Testers List, go to Membership: Options in the list control panel. Find the section labeled, Testers List to see the options available to you. Check the option labeled, [x] Activate Testers List to enable the Testers List.

Check, Activate Testers List, then click, Save

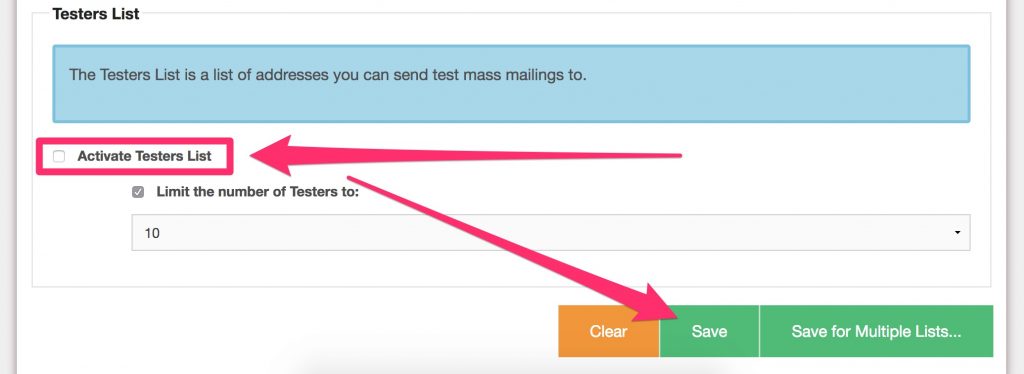
Options below this checkbox will allow you to specify if there’s a limit to how many addresses you may have in your Testers list as well as what that limit is. The limit set here will also affect how many addresses you can add to the text box in the drafts screen, per draft message.

Once enabled, the Testers list can be accessed in the list control panel under, Membership View. Click the tab labeled, “Testers” to see add/edit/remove addresses in this sublist.

And once enabled, you can toggle between using your Testers list and a unique list of addresses per draft message in the draft message itself. Revisit the Options: Testers tab(s) to now see the two options available. Select, Send to Testers sublist to send your test mass mailing to the Testers.

Toggle between using a unique list of test recipients for this draft, or use the Testers sublist

Sending a test message can be useful in a few different ways. With a test mass mailing, you can make sure that delivery is working to specific addresses, domains, and email services, and that the email message itself is displaying correctly on a spectrum of services and devices. This can also help you get a checkoff of the content an design of your mass mailing if you’re working within a team.

There are a few things that happen differently when sending out a test mass mailing. To start, none of the recipients of a test mass mailing will be able to unsubscribe through the test mass mailing. Also, test mass mailings will not be tracked for things like Opens, Clickthroughs, or Bounces.


Dada Mail’s New Unsubscription Options (v11.3.0)

v11.3.0 of Dada Mail introduces some very useful enhancements to Dada Mail’s unsubscription system. A healthy mailing list includes easy ways for people to remove themselves from your mailing list when they have decided they do not want to be a part of it anymore. Let’s look at the options currently available to you as the list owner, when you are running a public mailing list – but first, let’s talk about what needs to be in place for you to run a successful public mailing list:

Continue reading…


Dada Mail v11.2.0 Released

Dada Mail v11.2.0 is out the door! Being a feature-rich release, there’s a quite a few things to go over. Below will expand upon the changelog to help you discover the new features in Dada Mail.

No, “Send a Webpage” screen! (But don’t worry!)

Dada Mail v11.2.0 is the first release to remove the Send a Webpage screen since it was introduced many, many years ago. Please don’t worry though, ALL the features found within that screen have been folded into Dada Mail’s Send a Message screen. We’re hoping that this design change helps simplify how and where you can go from within the list control panel to create a message.

Look below the rich text editor for additional ways to create a message.

A mass mailing message can be created by:

  • writing or pasting content into the rich text editor
  • fetching the message from a specific URL
  • creating the message from a RSS/Atom feed

One small, but important change you’ll also discover is a simple check for any unsaved changes. If you do navigate away from the, Send a Message screen with any unsaved changes, a prompt will alert you about this, and give you a choice of canceling the navigation.

We’ve also changed the list control panels top menu:

Drafts/Stationery/Schedules now reads, All Drafts/Stationery/Schedules. This screen is where you would select the draft message you would like to work with. This screen is also the default screen you’ll see when you log into your list control panel.


We’re hoping these changes help simplify creating and working with multiple draft messages.

The All Drafts… has a few changes itself. The biggest one is the inclusion of a, Preview button, so you can see and compare draft messages, without having to go to the Send a Message screen!

(once clicked)

Both Send a Message and Send a Webpage aren’t listed. Instead a new menu item reads, + New Draft Message. Clicking on this menu item will take you to the Send a Message screen, and will always create a new draft message, rather than loading an already-existing draft message.

New Option: Save Sent Draft Messages as Stationery

Many times, people would like to re-use a previously sent message for a new mass mailing. Now,
Dada Mail has an option to save previously sent messages you’ve authored in the list control panel as
new stationery messages, which you can then use to create a new draft message from.

Here’s how:

  • Once logged in, go to, Mass Mailing: Options.
  • Find the option labeled, Save sent draft messages as stationery.
  • Check that option to enabled it, then Save.

Drafts messages sent from the, Send a Message screen will now be saved as Stationery, able to be re-used for a future mass mailing message draft.

New Ignore Bounces Sublist

Discussion List Owners have reported that sometimes there’s one problem domain with important list members, who have an uncooperative mail server that seems to bounce back messages coming from the discussion mailing list. If the bounce handler is installed, eventually these members will be removed from the list, even though their address is valid. Ugh!

To counter this, Dada Mail can now ignore addresses and/or domains in a new, Ignore Bounces sublist. Here’s how to enable it:

  • Navigate to, Plugins/Extensions: Bounce Handler (the Bounce Handler will need to be installed and configured).
  • Find the option labeled, Enable Ignore Bounces
  • Check this option, and Save.

Now, when you visit the, Membership: View screen, a new tab will appear labeled, Ignore Bounces which will allow you to administrate this sublist like any other sublist:

The Ignore Bounces sublist works similar to the Black and White lists, where you can either enter in a specific address, or just part of an address. For example, adding @important-domain.com will direct Bounce Handler to ignore all addresses bouncing from from important-domain.com. Adding steve@ will ignore any email address with, steve in it, like steve@another-domain.com or steve@third-domain.com.

If these features sound awesome, give v11.2.0 a try! If you need help with installation or upgrading Dada Mail, check out our install/upgrade services!

And please, let us know how Dada Mail is working for you!


Easily Use Dada Mail with Google Analytics Campaign Tracking

Dada Mail v10.7.0 comes with new options in the Send a Message, and Send a Webpage screens, to help you easily create special query parameters that can then be understood by using Google Analytics. with them,  you can then keep track of visitors that originate from your mass mailings.

In this blog post, I’m going to assume you’re familiar with Google Analytics, and using its UTM query parameters to create custom campaigns. But, if you’re not, check out the  Google Analytics site, the docs on Custom Campaigns, the docs on Best Practices for Custom Campaigns, as well as Google’s own URL builder.

So, let’s get to it! We’ll need version 10.7.0 of Dada Mail to have this feature available, so if you haven’t already, install or upgrade to at least  v10.7.0.

First, log into your list control panel, and make sure you’re on the Send a Message screen. Find and click the tab labeled, Options.

Within that tab, click the tab labeled, Analytics:

This will reveal all the options for transforming the links in your message to work with Google Analytics and its Custom Campaigns:

Add UTM parameters to links with the following domains:

Check this option to enable the feature itself. When it’s disabled (which is the default), none of the links in your message will be touched.

Dada Mail can add the custom UTM parameters to every link in your message, or only to links that go to specific domains. If you leave the textbox underneath this option blank, all links will have custom UTM parameters added to them.

But, if you would like to only target specific domains, just list them in the textbox – separate each domain with a space:

In the example above, I’ve enabled adding the UTM parameters, and I’ve listed two domains to add them to, dadamailproject.com and, dadademo.com. Don’t list these domains with, “http://” or, “https://” – just the domain itself.

The rest of the options available are the actual UTM parameters you can set. There are five:

For a full description of what each of these for, see the docs I’ve linked above – start with this one which explains the custom parameters. For your convenience, we’ve set defaults for Campaign Source to the app’s name and Campaign Medium to email, so that right off the bat, any outgoing links you have you’ll know are coming from Pro Dada’s email messages!

Campaign Term is an interesting one, as we treat it a bit special than the others. You may set a default for ALL links in the textbox provided, but Dada Mail will also do its best to try to find the text associated with the actual link click.

For example, if in the source of your message, you have the following:

<a href="http://dadamailproject.com">Dada Mail Mailing List Manager</a>

Dada Mail will set the Campaign Term to, Dada Mail Mailing List Manager. Then, you’ll know that that specific link was clicked, and not the link you have with the same URL in it, that says:

<a href="http://dadamailproject.com">
    Download and Install Today!
</a>

This will report a Campaign Term of, Download and Install Today! You can then track which links work better in your mass mailings.

In fact, all these parameters can be overridden in two other different ways.

The first is to simply set the parameters yourself. If you use Google’s Campaign URL Builder for example, and use the URL it creates in your message, Dada Mail will observe those parameters, and will not override them. For example, let’s set the Campaign Term to, “Best Mailing List Manager” in the URL Builder:

Here’s the URL it created for me:

http://dadamailproject.com/?utm_source=Pro%20Dada&utm_medium=email&utm_term=Best%20Mailing%20List%20Manager

If I then use this URL like so:

<a href="http://dadamailproject.com/?utm_source=Pro%20Dada&utm_medium=email&utm_term=Best%20Mailing%20List%20Manager>
    Download and Install Today!
</a>

Dada Mail will keep the Campaign Term, Best Mailing List Manager instead of using the text that’s within your anchor tag, Download and Install Today!, or with whatever you set in the Campaign Term in the Analytics Tag. Options!

Finally, you may set any of the UTM parameters using attributes inside the anchor tag itself So, for example, to set the Campaign Term in an attribute, I would use the following attribute: data-utm_term:

<a href="http://dadamailproject.com" data-utm_term="Give+them+the+goods">
    Download and Install Today!
</a>

Now, the Campaign term will be set by Dada Mail to, Give them the goods instead of, Download and Install Today!

Here’s the order of precedence to all this:

  • Any query parameters found in the link itself have the highest precedence.
  • Next, are the dada-utm_* attributes in the anchor tag, itself
  • Then, (for Campaign Term), it’s the actual text found wrapped inside the anchor tag
  • Finally, the parameters you set within the Send a Message/Send a Webpage screen will be used.

And that’s the new support for created the custom UTM parameters to be used in conjunction with platforms like Google Analytics. Give it a try, and let us know how it’s working for you. We’re looking forward on building upon this start of the feature and to add improvements over time!


Dada Mail v9.5.0 Released

Dada Mail v9.5.0 has been released – download and install using the instructions here. Changelog is below:

Features

StopForumSpam Integration

The StopForumSpam service (http://stopforumspam.com/) keeps a database of email addresses, locations, and usernames known to be used for abuse attempts on web apps like forums, blogs, and mailing lists.

Dada Mail now supports looking up this information when a user goes through the subscription process. If the IP address or email address of the user is returned by the StopForumSpam service as being known to be abusive, the first step of the subscription process fails.

This new feature can help stop your mailing list from being abused, curbs the wasting of server resources, and keeps your mailing list cleaner. StopForumSpam integration should definitely be seen as a security enhancement, as these users being marked as abusive are possibly part of a botnet, trying to find vectors for attack.

This integration of StopForumSpam is currently enabled by default, and requires the LWP Perl CPAN library – if you can send a webpage using Dada Mail, you most likley have this library installed!

Options to enable/disable StopForumSpam integration can be found in the list control panel under Mailing List – Options. Look for the checkbox labeled, Enable StopForumSpam Protection.

If WWW::StopForumSpam needs to be installed, a notification will be shown below this option to alert you.

Viewing the Unconfirmed Subscribers sublist

Dada Mail keeps track of subscribers that have started the subscription process, but haven’t yet confirmed their subscription by clicking the confirmation link that’s sent to them via email. Internally, this sublist type is called, sub_confirm_list (catchy name, huh?). It’s used primarily to make sure the same address isn’t repeatedly submitted to be subscribed again and again by some automated process. Curbing abuse is a big part of web apps like Dada Mail!

We’ve now added the ability to view and interact with this sublist. In the, Membership – View screen, you will see a new tab labeled, Unconfirmed Subscribers. You may view, search, delete, and export addresses from this sublist. You may also resend the subscription confirmation email message: look for the button to the left of the email address. Pressing the button will resend the confirmation email message.

This sublist is tightly coupled with the subscription confirmation process itself. Dada Mail’s subscription confirmation system works with a unqiue token embedded in the confirmation email that corresponds with records in its database. These records do expire after a while (60 days by default). When these tokens expire, addresses in this sublist will also automatically be removed, keeping your mailing list tidy, and your database trimmed and fast, without any additional work by you.

Viewing this tab can be enabled/disabled in the list control panel under, Membership – Options. Look for the checkbox labeled, Show “Unconfirmed Subscribers” sublist.

New Subscriber Export Options

In previous versions, Dada Mail could export your Subscribers (as well as other sublists), but the data it exports is not customizable. It would include the added/subscribed date (timestamp), the email address itself, profile fields, as well as the delivery preferences (if that option is enabled). Some users have problems then utilizing this information as-is, since some of the information is not needed. Although this exported informaton is in CSV format, which you can open the exported file into a spreadsheet app, and do more manipulation, but many users were having trouble with this cumbersome extra step.

Now, Dada Mail also allows you to specify what data you would like exported:

  • Email Address (always exported)
  • Date Added
  • Profile Fields
  • Delivery Preferences (if enabled)

Among other things, this allows Dada Mail’s exported data to be easily read and imported back into Dada Mail itself – something it couldn’t do (embarrassingly) before!

Using this new functionality is simple: instead of exporting the data right away, after you click the Export button, a modal menu will open up, allowing you to choose what data you would like the exported data to hold.

Email Parsing Engine Advanced Tuning Options

Dada Mail now allows you to easily tune the underlying email parsing engine (called, MIME::Tools), so that you can either have a faster parser that’s more memory intensive (the default), or a somewhat slower parser that uses less memory.

We’ll be experimenting with the latter, as it should help with working with large, complex email messages with large attachments, as well as running Dada Mail as a long-running process.

More information on how to change these options are available at,

http://dadamailproject.com/d/install_dada_mail-advanced_configuration.pod.html#Configure-Email-Parsing-Engine


v9.4.0 Beta 1 is out – Rate Limiting!

Hello everyone, v9.4.0 Beta 1 is out.

Download and Install:

http://dadamailproject.com/support/documentation-9_4_0-beta1/install_dada_mail.pod.html

(Pro Dada versions are available)

This version has the new Rate Limiting feature built in. Seems to work really well! Now that it’s a part of the app, seems a little naked to run without it. Rate Limiting is currently enabled by default, and also has settings that can be customized in the installer. I’d love to get some more real-world feedback in seeing if the feature is working at all/as intended. I’m running it myself and seems to work well. It’s one of those, “Behind the scenes” features though, so nothing out of the ordinary seems to be different, unless something is terribly wrong!

Here’s what you need to know:

http://dadamailproject.com/support/documentation-9_4_0-beta1/install_dada_mail-advanced_configuration.pod.html#Rate-Limiting

Rate Limiting

When enabled, rate limiting keeps track of the requests of certain features in Dada Mail – features like trying to log into the list control panel, or subscribing to a mailing list. Dada Mail keeps track of these requests by IP Address and can be configured to have a maximum amount of requests per timeframe. If more than the maximum amount of requests are made within the timeframe, the rate limit is said to be exceeded, and further requests will be denied.

This feature is especially important in any feature that involves filling out a form, then having that feature send out an email, like a subscription confirmation. Potentially nefarious bots may be filling out your subscription form quite blindly, with various bogus email addresses, causing all this unneeded email to be sent, then bounced back. If you’re using a third party email sending service, like Amazon SES, this out of control behavior could potentially lead to problems with you not following their Terms of Service.

Although rate limiting in Dada Mail was first implemented for the above scenario, it’s used in many other places:

• Running the Cronjob Schedule

• Subscription by the classic subscription form

• Subscription via the RESTful API

• Subscription and Unsubscription Confirmation via the token URL (or any URL with a token in it)

• Logging in and out

• Encrypting a password

• Requesting to download a file attachment

• Profile activation/registering/resetting password/login and out

• Accessing the list control panel login screen

Enable Rate Limiting

Check this option to enable Rate Limiting. Enabled by default

Timeframe (in minutes):

Timeframe is the amount of time a number of requests for a certain feature/function can be made

Max Hits

Max Hits are the amount of requests for a certain feature/function that may be done in the Timeframe set above.

If more requests than the Max Hits happens within the Timeframe, the feature/function will be inaccessible, until the number of requests is below the Max Hits threshold. Any other feature mentioned will still be available to the user, and any other users of the app will not be affected (unless of course they’re being tied to that same IP Address)

Config Variable:

$RATE_LIMITING .

That’s it! Give it a try,