v11.11.x Features: Scheduled Mailings Enhancements

Dada Mail v11.11.x is packed with new features. In this blog post, we’re going to look at the enhancements to scheduled mailings.

Scheduled Mailings allows you to author a mass mailing to be sent out at a later date – either as a one-time mass mailing, or a mass mailing that’s repeated on a ongoing schedule.

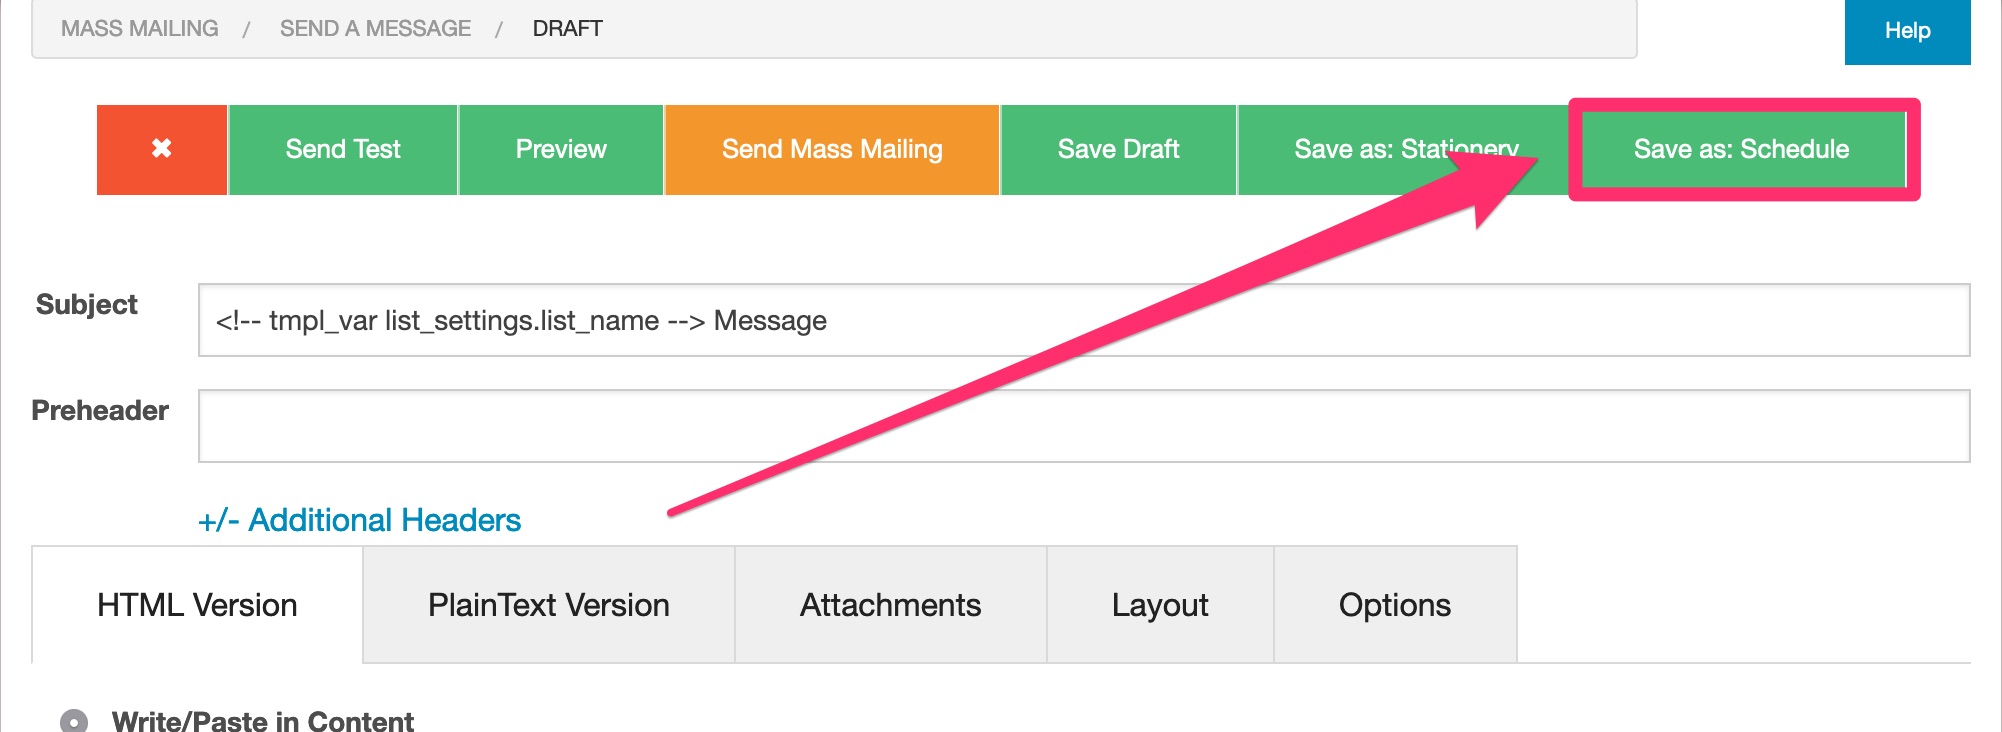
There’s a few ways you can create a scheduled mass mailing, including turning any draft message into a scheduled mass mailing. When your authoring your draft message, look for the button on the top of the screen labeled, Save as: Schedule.

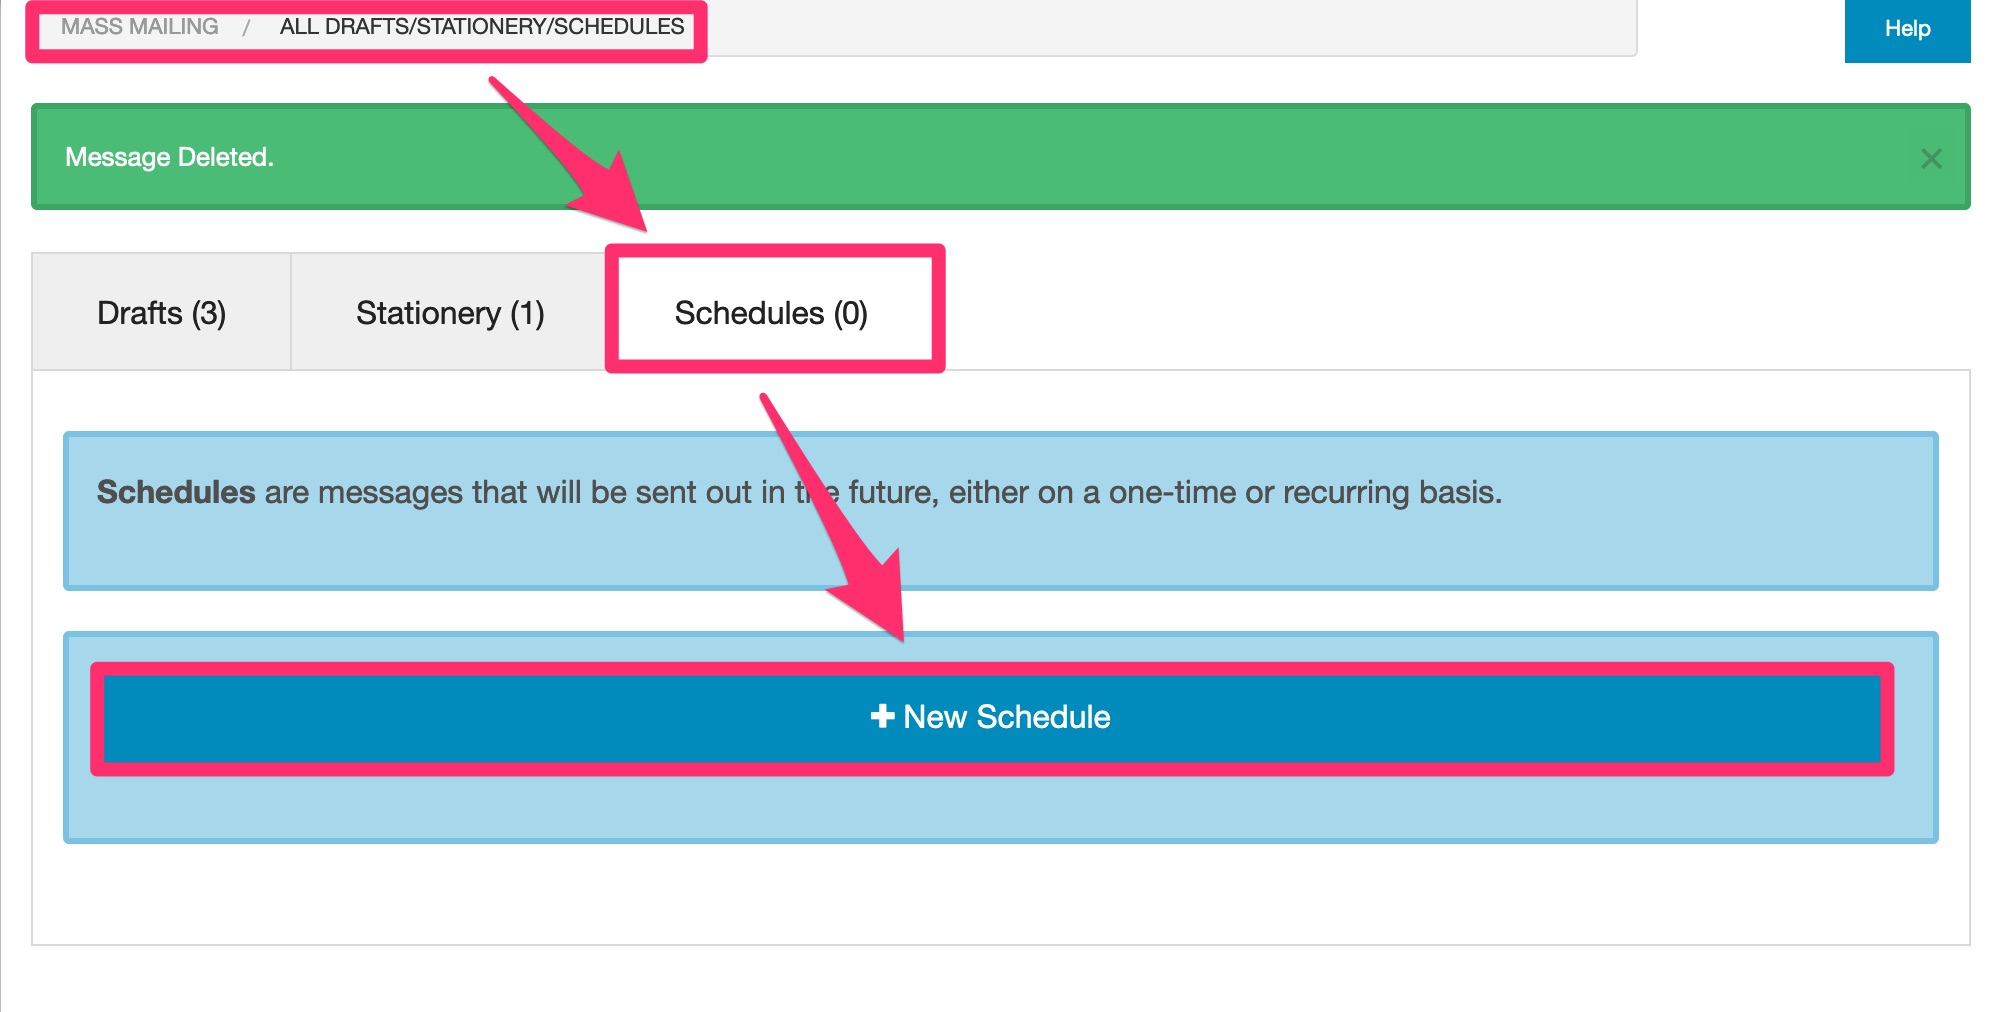
You can also create a Schedule Mailing from anew. Under, Mass Mailing All Drafts/Stationery/Schedules, click on the tab labeled, Schedules, then click on the button labeled, + New Schedule,

Whichever way you create a scheduled mailing, the scheduled mailing authoring screen looks a lot like the screen to create and then send a draft message, except for the additional options above:

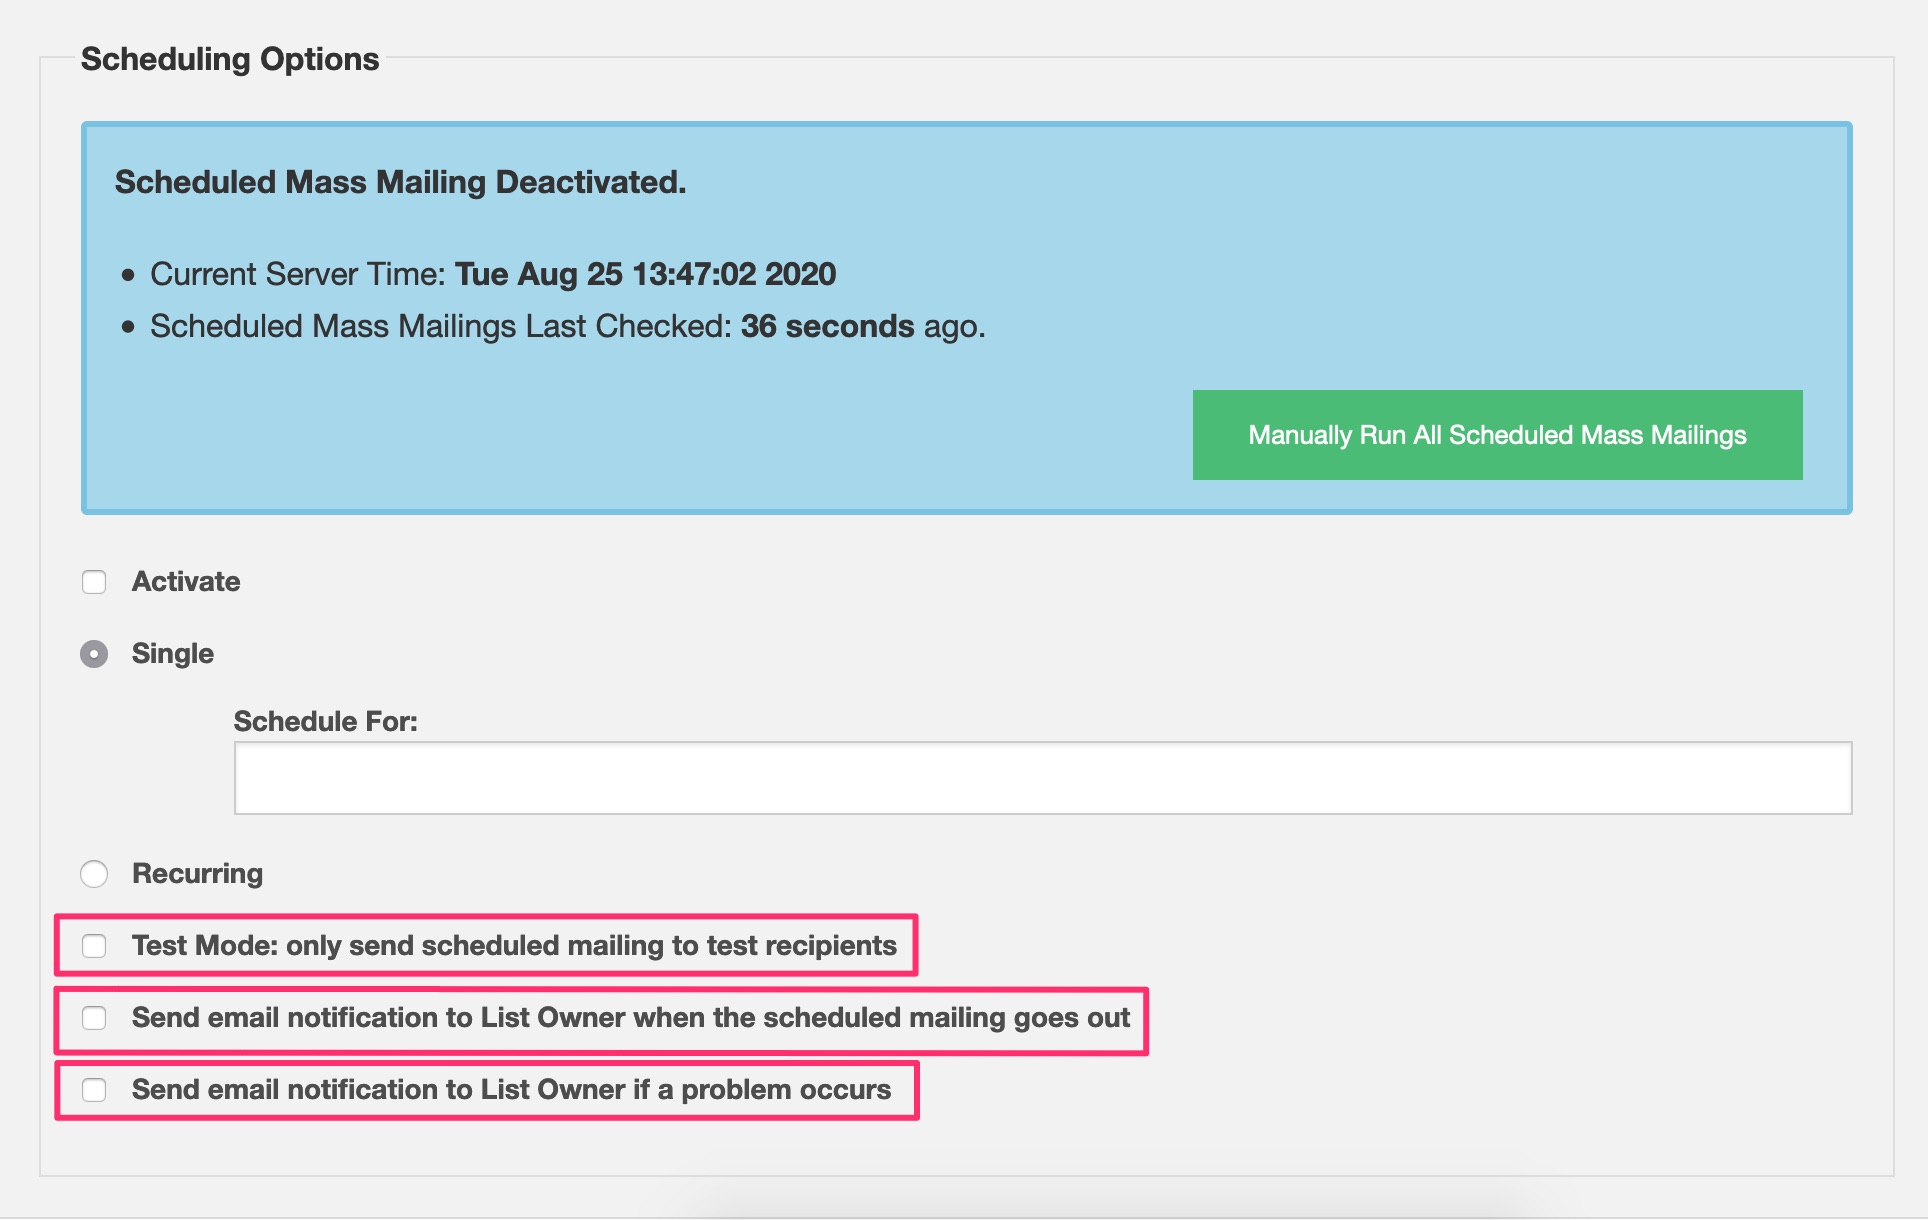
In this blog post, we’re going to talk about the last three (new!) options and what they do.

Test Mode: only send a schedule mailing to test recipients

Dada Mail already allows you to test a scheduled message – just click the button on top labeled, Send Test,

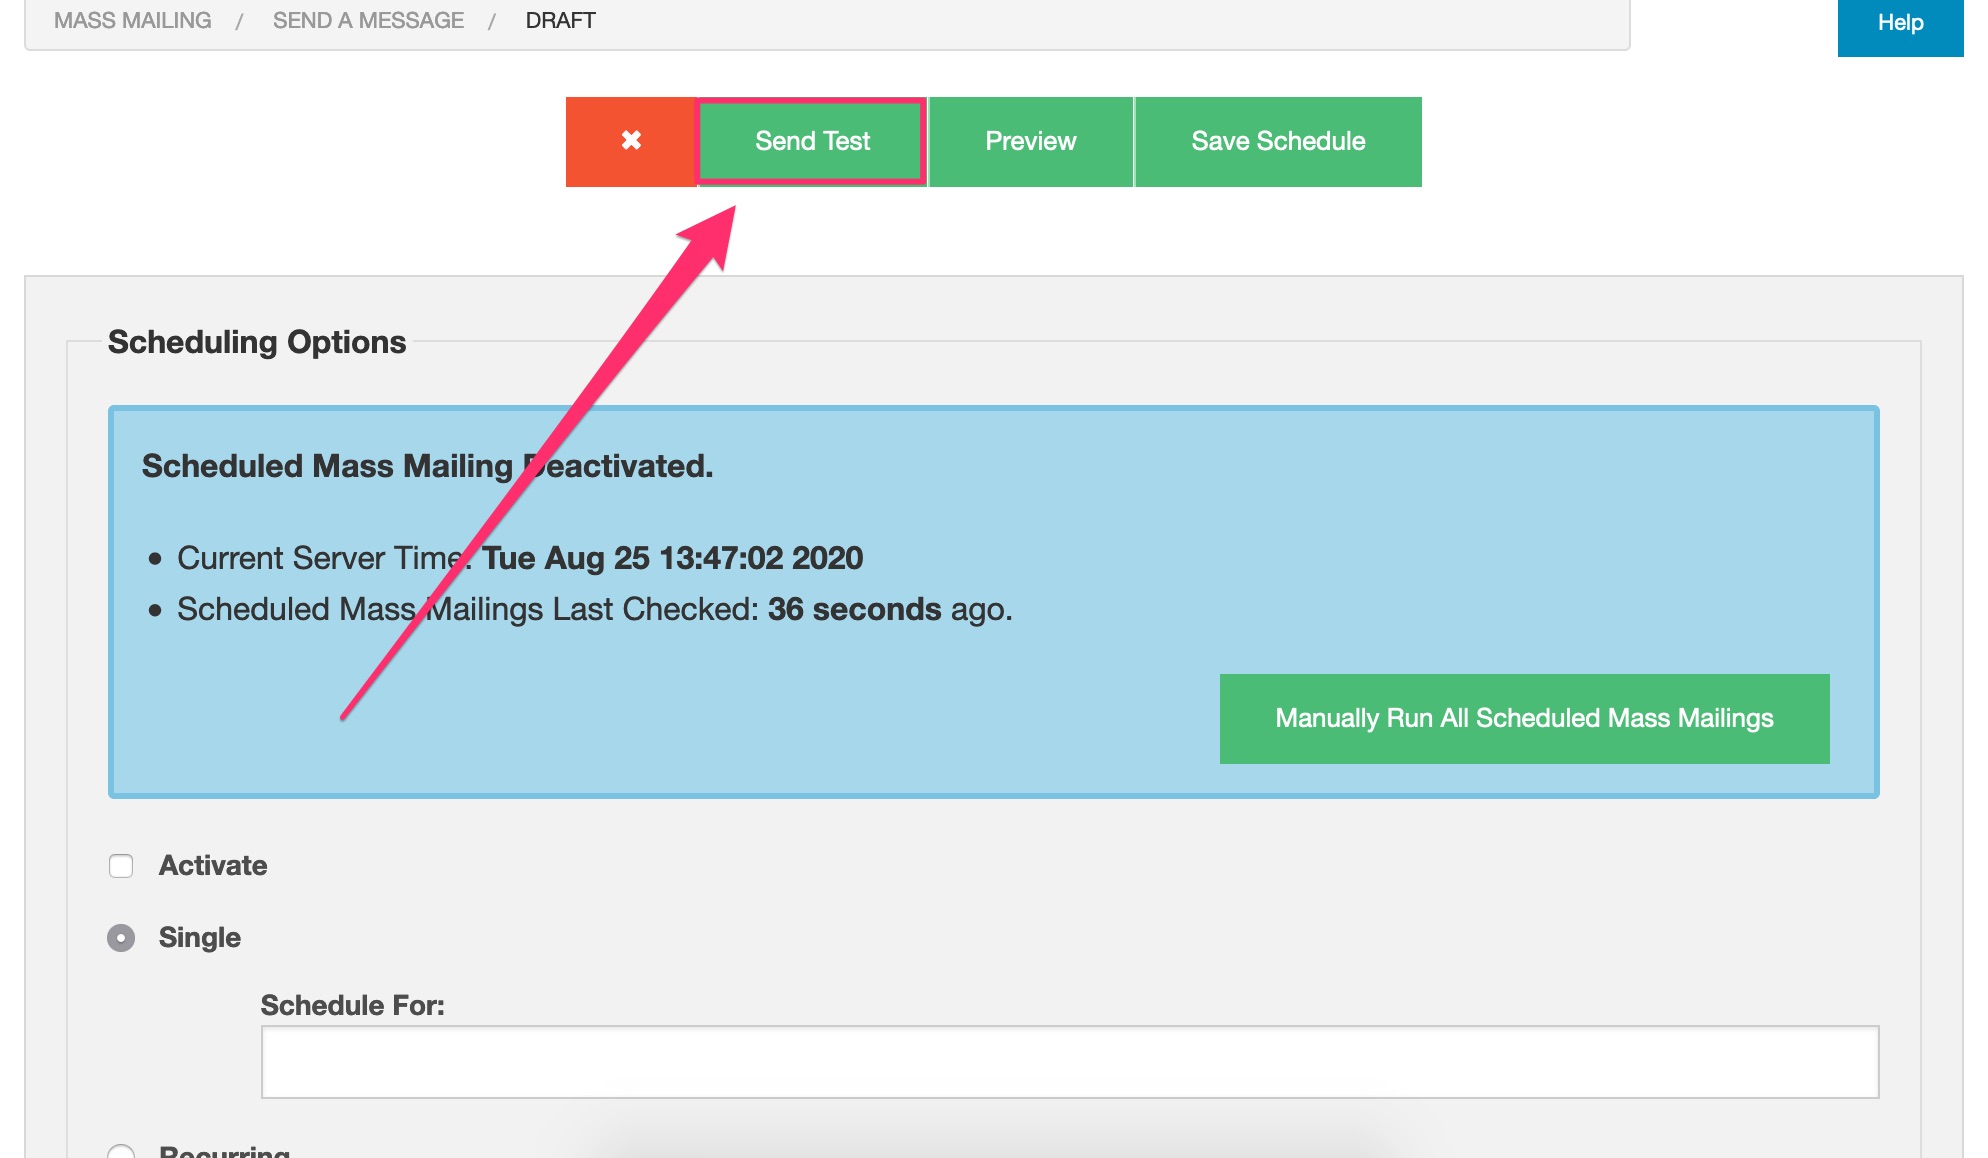
A test mass mailing message will be sent out immediately.

This new option, when enabled, does something a little different. Instead of sending a test message right away, the scheduled mailing will only go to test recipients when the schedule itself is set to go out, thereby allowing you to make sure the scheduling is working, and not just test to see if a message can be sent out/looks good in your mail reader.

So, if you’re schedule is set to be sent next Wednesday, that’s when your test recipients – and not your mailing list subscribers, will receive the scheduled mailing. This can be useful to make sure that (for example), your recurring schedule is firing off correctly. One reason a schedule is not being fired off correctly is if the cronjob for Dada Mail has not been set, and that’s the first thing I would do when debugging a problem like this.

Test recipients can be set in the authoring screen. Click the, Options tab, then the, Testing tab. Dada Mail should give you the option to either list addresses you would like send a test message, or to use the Testers sublist, the latter of which can be reused for multiple drafts/schedules.

Curious about the different ways to send a test message? See our blog post about Test recipients: New in v11.5.0: Send Test Mass Mailings to Multiple Recipients.

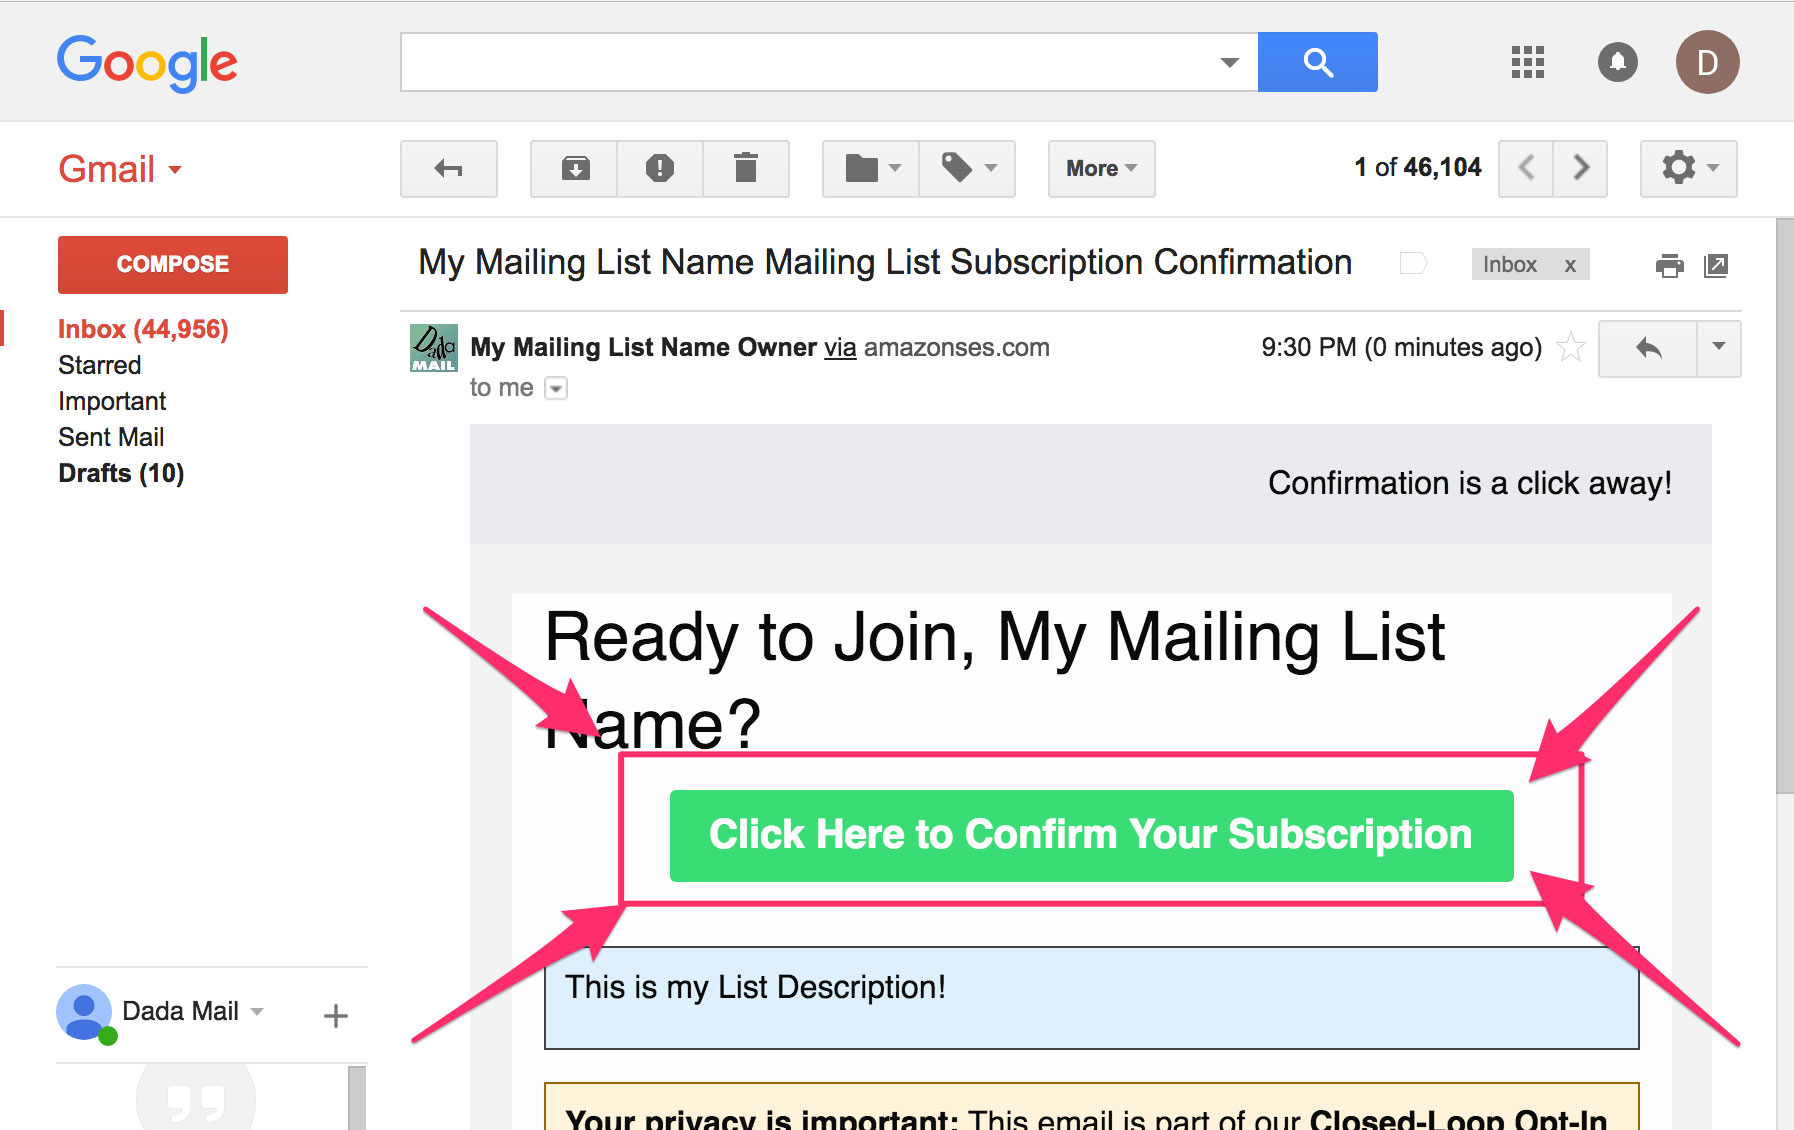
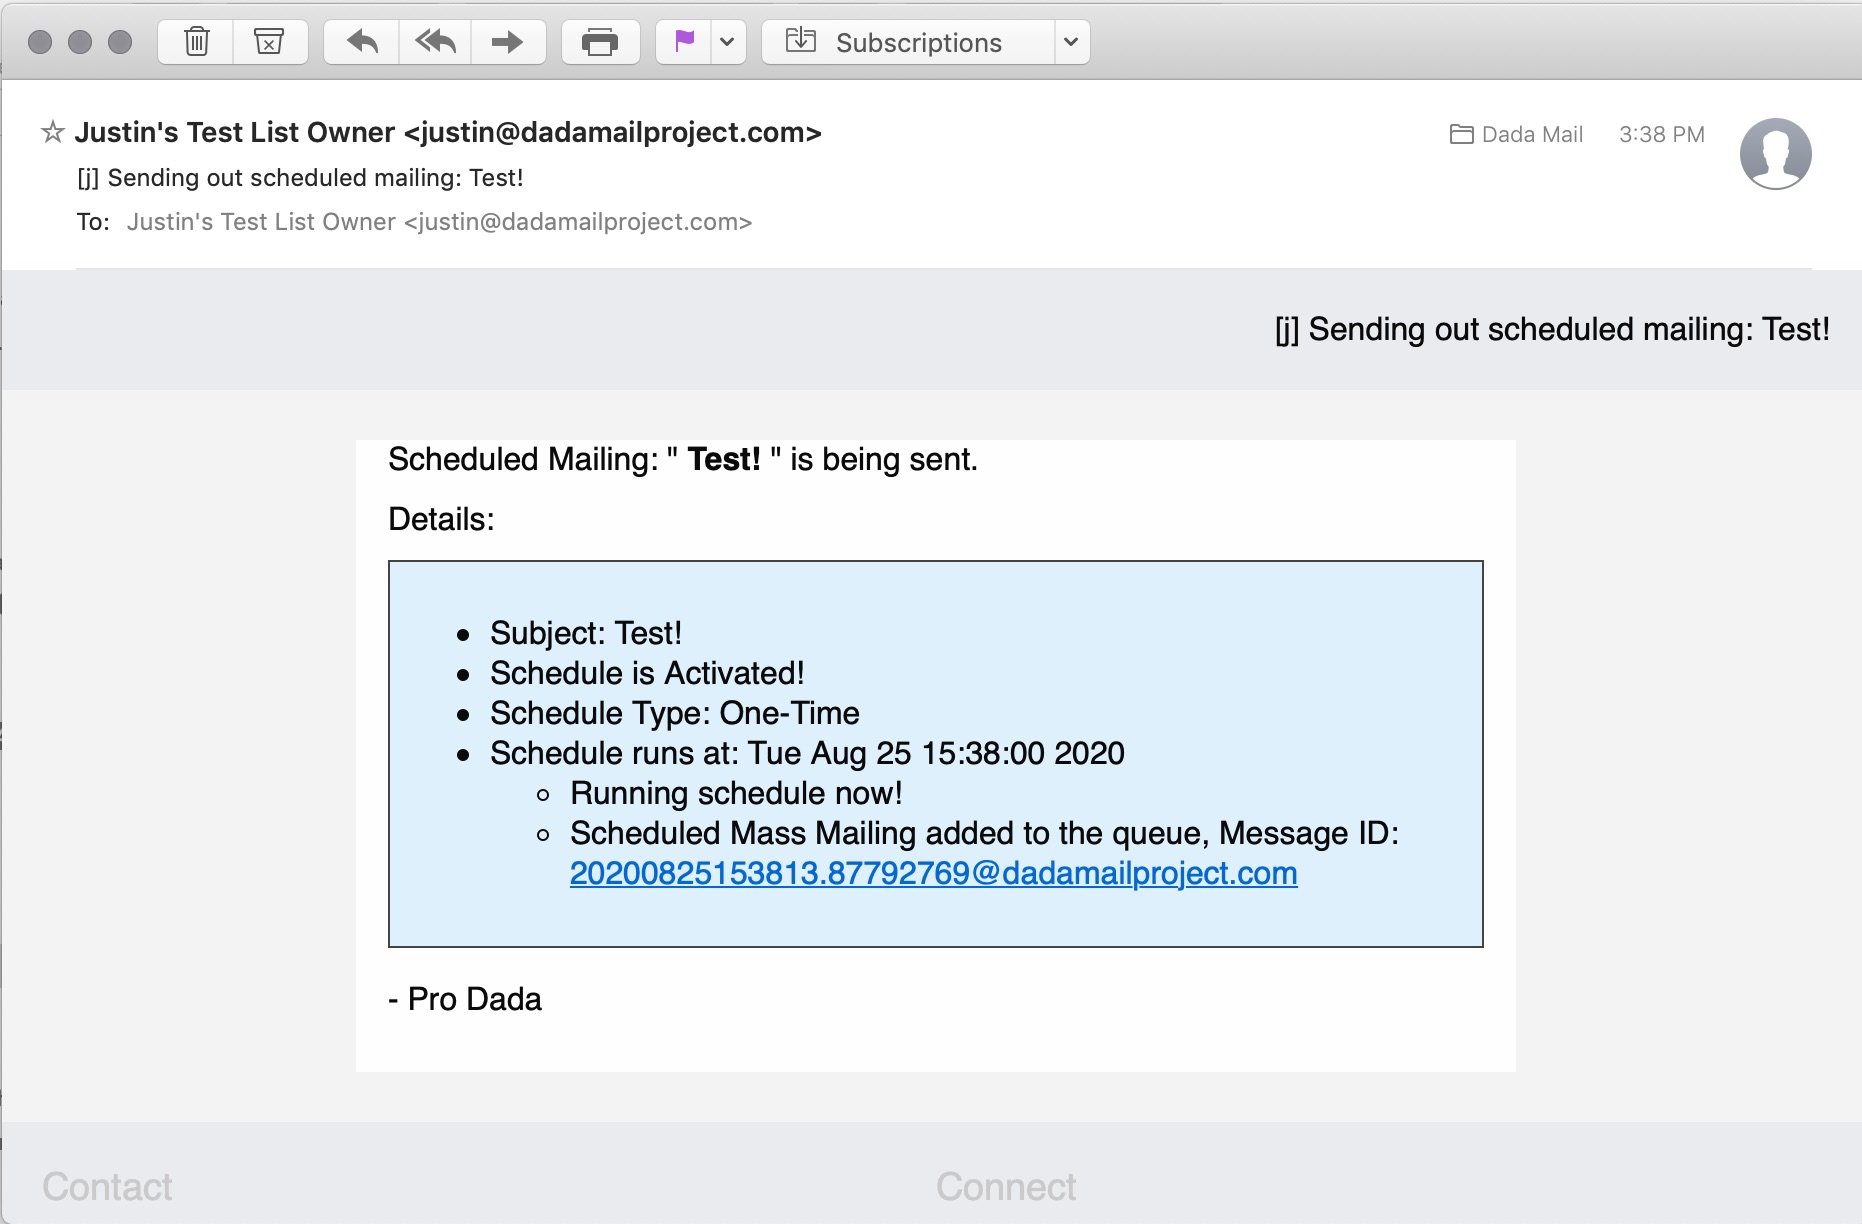
Send email notification to List Owner when the scheduled mailing goes out

When enabled, this option tells Dada Mail to send a notification email directly to the email stating, “Hey! That scheduled mass mailing you set up? It’s sending!“. This can help confirm that everything is running properly. Here’s what that email looks like,

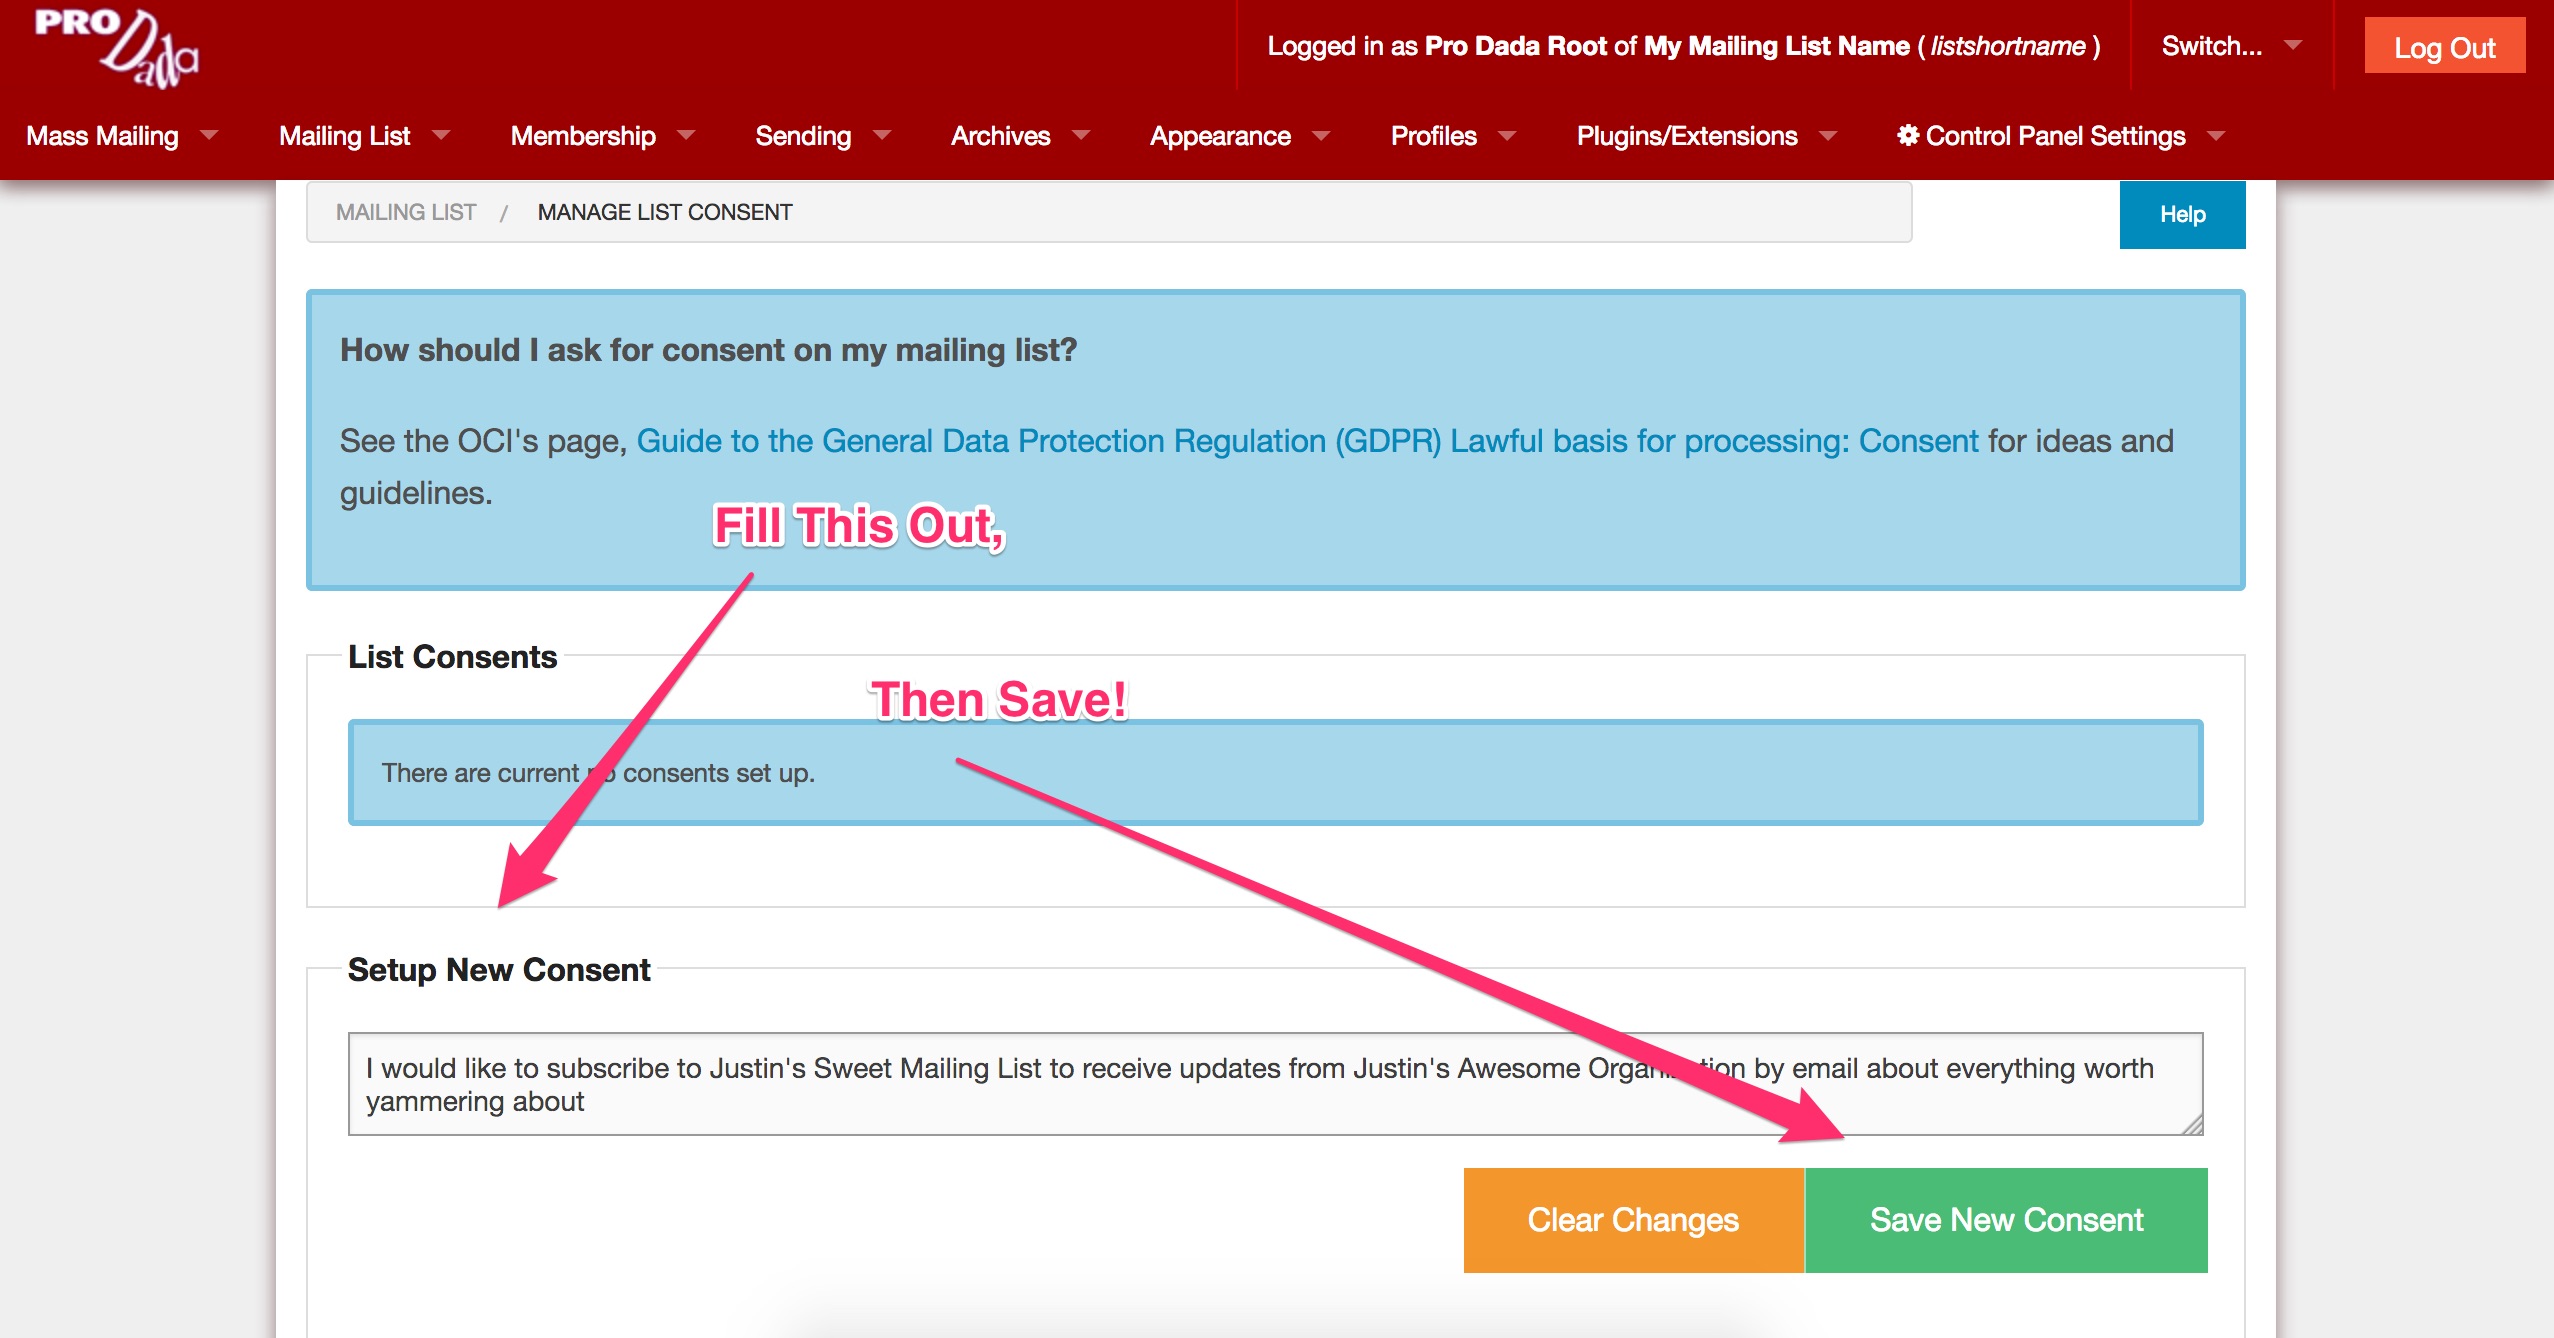
Send email notification to List Owner if a problem occurs

Just like the, “success” email notification, this option will send out an email notification if a scheduled mass mailing didn’t send out correctly. Hopefully, that email notification will also give clues as to why things didn’t get sent out. Here’s one example:

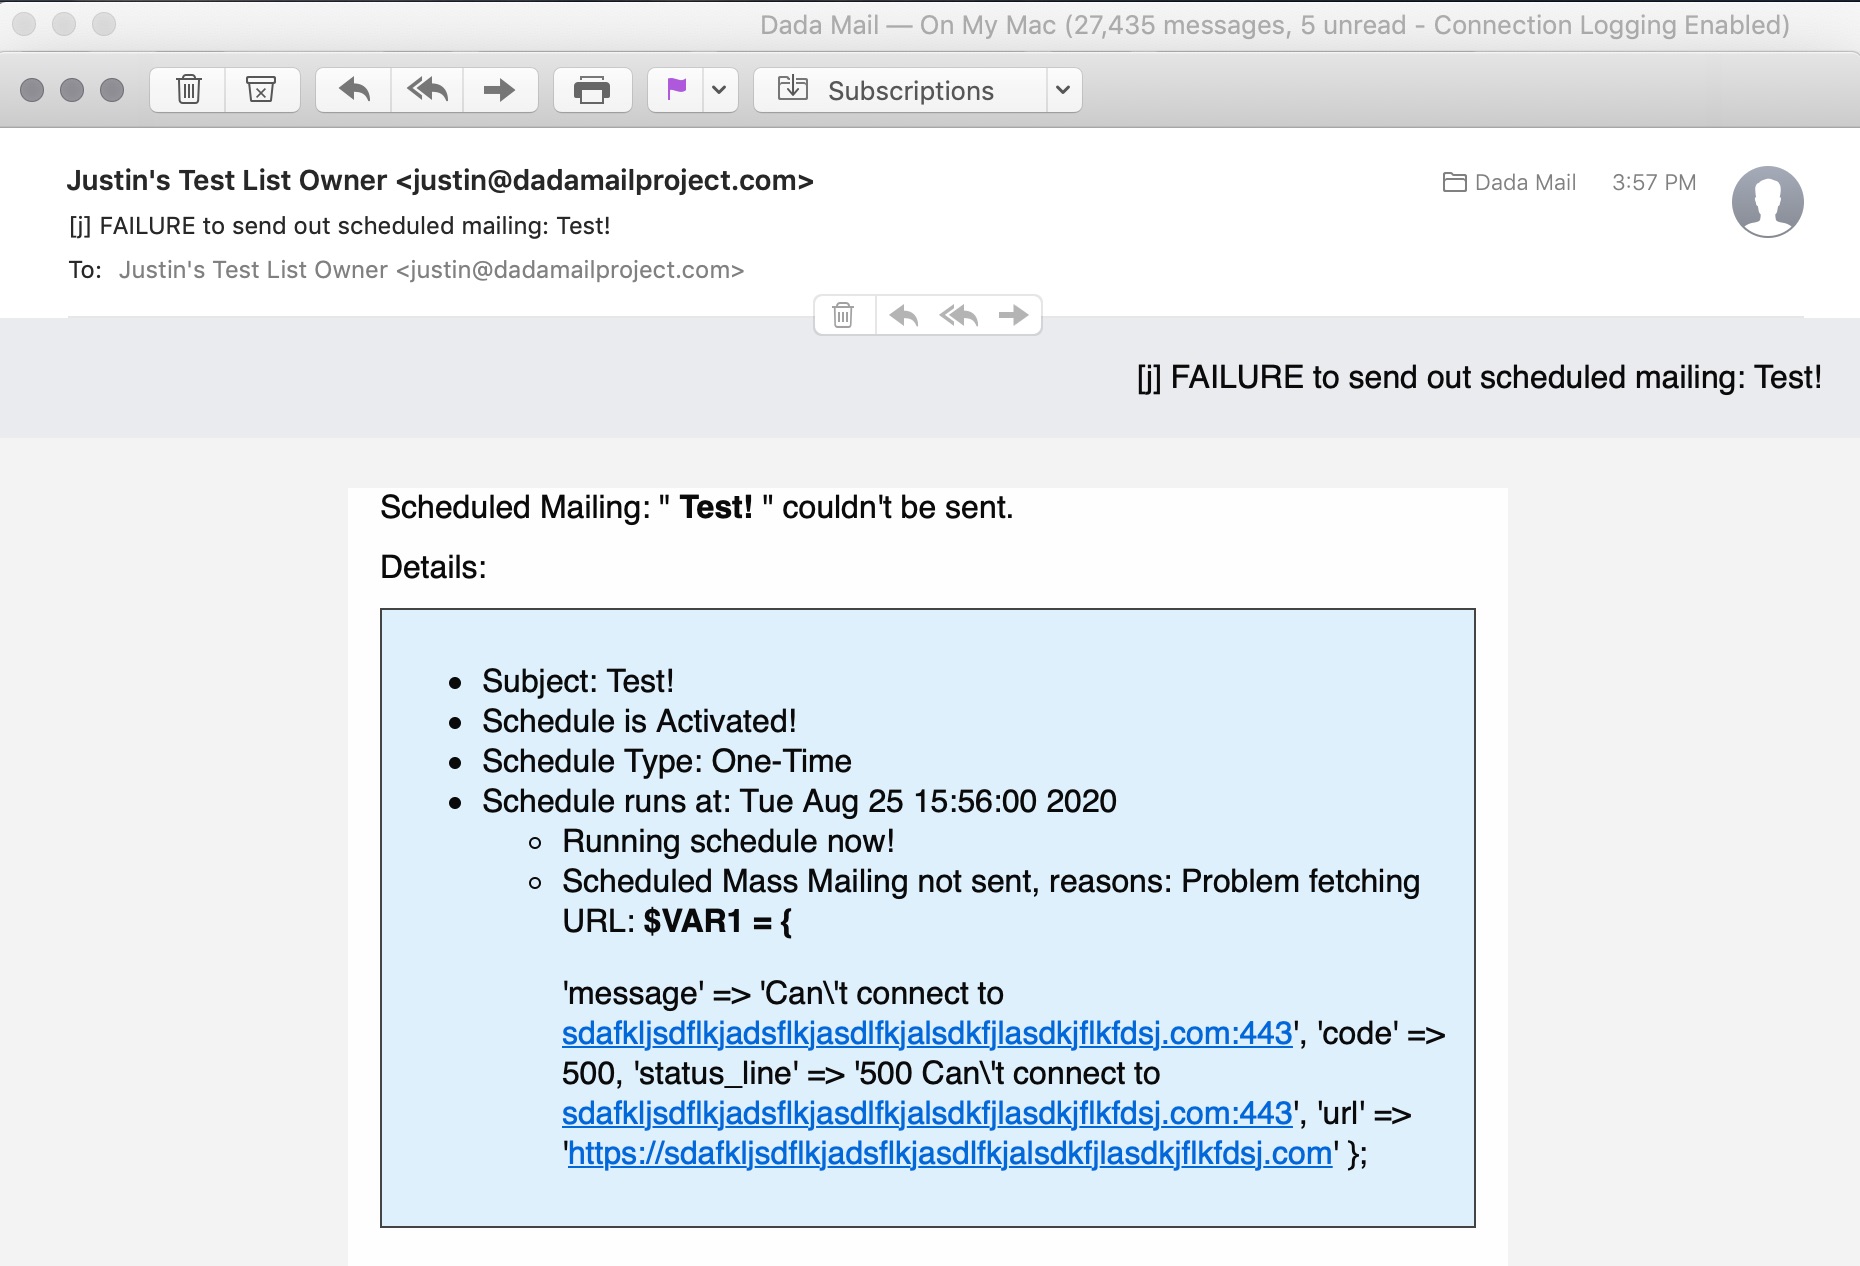
In this example, it’s the URL we’ve set to fetch the content of the HTML message (https://sdafkljsdflkjadsflkjasdlfkjalsdkfjlasdkjflkfdsj.com). It seems Dada Mail is having trouble fetching it (surprising, for sure!).

URLs in scheduled mass mailings can be useful, as the content fetched from the URL can change/be dynamic, so every time you send say, a recurring mass mailing, your message will also be unique. To build on that, Dada Mail can also send out a message based on an RSS feed, and also only if the content differs from the last message sent in the schedule.

See our blog post: Use Dada Mail to create a mass mailing from a blog feed, then send it on a recurring schedule, to see a walk through on how this works.

So that’s some of the new features found for scheduled mailings. In future blog posts, we’ll go over some other features that make their debut in v11.11.x of Dada Mail.


Important Information on Amazon SES and Dada Mail

Long story short: Upgrade! Amazon AWS is deprecated support for an important part of Amazon SES that Dada Mail relies on. v11.10.3 of Dada Mail and later adds the support for what’s now needed.

v11.10.3 of Dada Mail has just come out, and with it is support for something called Amazon AWS Signature Version 4. Long story short, it’s a way to sign/authenticate the email messages Dada Mail sends to Amazon SES, so that it knows that you’re allowed to send out messages. Technical information can be found here. Up until v11.10.3, Dada Mail only supported Signature Version 3 (and below). On September 30th, 2020 Amazon AWS will deprecate the support for Version 3 and below, and you’ll have to use Version 4.

If you’re running Dada Mail and utilizing Amazon SES, what are your options to continue to use the service?

Upgrade

The best thing to do is upgrade to the most recent version of Dada Mail – anything at or above version 11.10.3 will have the needed support to properly use Amazon SES moving forward. If you don’t know how, or don’t want to upgrade yourself, we do have services to do the upgrade for you. If you would like to do it yourself, we have docs on how to do that, too. Once you’ve done the upgrade, there’s nothing extra you’ll have to do to continue using Amazon SES moving forward.

Switch to the SMTP Gateway

With the deprecation of Signature Version 3, the API for Amazon SES won’t work in any version of Dada Mail prior to v11.10.3. But, you could still using the SMTP Gateway that Amazon SES provides. Before trying this, make sure that the correct ports are opened for outgoing communication (587 is recommended, but port 25 may also be used).

Patch Your Own Copy of Dada Mail

We’ll label this as a hack, mostly because it’s not been tested all that much, but should work, regardless. Just make sure that the version of Dada Mail you’re running is reasonably new – anything from v9 – v11 should have a good chance that this should be successful.

To do this hack, you’ll need to copy over two files from the most recent version of Dada Mail, to your running copy of Dada Mail. Here they are:

It’s VERY important to preserve the file path location. “Signature4.pm” doesn’t exist in any version of Dada Mail prior to v11.10.3, so it’s parent directory, “AWS” and the file itself will need to be created. “SES.pm” does exist in older versions of Dada Mail, and you’ll want to overwrite what’s in there.

If you’re stuck with not being able to upgrade, and cannot get this hack to work, contact us and we can apply this patch for a nominal cost.

Questions? Reply to this blog post, or post onto our support forum.

Happy Sending!


Use Third Party Email Template/Layouts in Dada Mail

Can you use a third party email layout with Dada Mail? Absolutely! So long as you have HTML for Dada Mail to send, it’ll send it!

In this walk through, I’ll be using a template created by stripo.email (no affiliation). Stripo allows you to export the HTML for your email message – look for the, Export button,

then choose, HTML

Once you have the HTML, you’ll want to open it up in a Text Editor, and replace the unsubscribe link, with what Dada Mail uses. Here’s the template tag that Dada Mail uses as a placeholder for its unsubscribe link:

<!-- tmpl_var list_unsubscribe_link -->

In my template, I found the link for, “Unsubscribe” and placed this tag in the, href="" parameter.

Log into your list control panel, and create a new draft message.

Under the, HTML Version tab, paste the source of your message into the source of the Rich Text Editor – (click the, Source button to reveal the source!)

Since this email message is fully-formed, it doesn’t need a layout of its own. Click the, Layout tab and select: Don’t Use a Layout

Almost done! Preview the message by clicking the, Preview button and make sure everything looks good, before sending things out:

Looks good! One thing to double-check is if the, Unsubscribe link is properly set. You’ll know this if the Unsubscribe link shows this when hovered over (don’t click it!)

http://your-domain.com/dada/mail.cgi/t/CONFIRMATION_TOKEN/

Dada Mail will add its own unsubscribe link + text, if it can’t find one in your message. So, if one is added by Dada Mail, it may be because the one you tried to add didn’t work correctly.

And that’s all there is to it!

Some tips:

Make sure css is already inlined. Dada Mail won’t do this for you, when you pick, “Don’t use a layout” in the Layout Options. There’s online inliners to help you (example). Just paste the HTML you’re using in these tools, inline it, copy the results, then paste those results into Dada Mail.

If you’re going to use an outside template/layout often, consider disabling the rich text/WYSIWYG editor. This will speed up pasting in the message itself. In the list control panel, go to: Control Panel Settings: Options. Under:  WYSIWYG Editor Options, Select: Don’t use a WYSIWYG Editor.


New Community Support Forum!

Support Forum for Dada Mail are back! We’re going to roll these out slowly (beta!) to see how well they’re working:

http://forum.dadamailproject.com/

The purpose of these forums are for Dada Mail users to help each other in getting the most out of the app. Post away!


Consent and Mailing List Subscriptions in Dada Mail

With the GDPR finally active, many people have questions about “consent” and how it relates to public mailing list subscriptions. This article is to try to help out those who are confused, and give a little bit of guidance on how you can set up your mailing list correctly to make sure your subscribers have granted their consent when being a part of your mailing list. We’ll highlight some of the tools at your disposal to help build trust with your subscribers when it comes to asking for their consent to use their personal information, like their email address, for your mailing list.

We’re going to use this doc. put out by the UK’s ICO as the basis for this article:

Closed-Loop Opt-In Subscription

This is what the subscription confirmation button looks like embedded in an email message when it’s received by a user.

The original form of consent used in Dada Mail since version 1 is still with us today. That is Closed-Loop Opt-In Subscription – a fancy way of saying that after user fills out a form to subscribe, they will have to then click a link in an email message they receive to confirm their subscription to the mailing list.
The main reason to have this done is to make sure that the user who filled out the information into the subscription form is also the same user that has access to the email account the information will be tied to.
If you can’t check the email account, you can’t subscribe the email address to a mailing list. Simple and effective,  Closed-Loop Opt-In also stops a lot of abusive things that happen on a mailing list, like a ‘bot subscribing bogus addresses through your subscription form.

Collecting Additional Consent

If there is something specific that you would like to do with the data you collect during a subscription request, Dada Mail has an additional mechanism in place to ask, record, and report this consent.
To be thorough, we do suggest collecting this consent specifically for asking a user to grant the consent to be a part of your mailing list! This means, at minimum, you’ll have one List Consent set up that says something like,
I would like to subscribe to [YOUR MAILING LIST NAME] to receive updates from [YOUR ORGANIZATION’S NAME] by email about [A SPECIFIC TOPIC]
In Dada Mail, this is simply called, List Consents. Here’s how to work with them:
Log into your mailing list – make sure to use your Pro Dada Root Password, as this screen is, by default, only available to those who use that password (the List Password won’t show this screen!)
Once logged on, navigate to, Mailing List: List Consents
This screen will allow you to add as many explicit, and separate different points of consents you would like the users of your mailing list to give you.
Find the form labeled, Create a New Consent
Fill out the textbox with the new point of consent and click, Save New Consent.
That’s it! You’re done!
The List Consents you have set up will now show up on your mailing list subscription form, next to checkboxes (unchecked) a user will have to explicitly check in order to then join your mailing list.
When a user requests a subscription for your mailing list, the request will be recorded, along with exactly which List Consents the user has agreed to.
Once a user has joined your mailing list, this data can be seen being reported from within the list control panel. Log back in (if you aren’t logged in still), and navigate to: Membership: View.
Search/Select an address you would like to see the report about.
Once on the individual user’s screen, click the, Subscriber History tab.
Data about their subscription will be shown.
This data can be exported via CSV – click the button in this same tab labeled, Export Subscriber Activity (.csv)

How Should You Construct A List Consent?

All my points about this are going to be from the ICO doc, linked about (and here). Here’s some things to include:
  • The name of your organization
  • Why you want the data (example: join your mailing list)
  • What you will do with it  (example: email updates/news/announcements, etc)

Dada Mail’s subscription forms also lists the fact:

  • that individuals can withdraw consent at any time.
as well as a link to the privacy policy for the mailing list – so that’s already covered.

Will I Need Additional List Consents?

Are you doing anything else with the information you’re collecting? If so, yes! You will have to explicitly ask your user to grant you that consent. Remember to list why your want the data, and what you will do with it, as well as any third-party involved with the user of the data. There’s a good chance that all you’re using a mailing list’s data for is (get ready) for the mailing list, which makes your life easy.

This goes the other way, too. Did you NOT ask for explicit consent to use a person’s information in a specific way?! Then guess what, you can’t use it in a way they haven’t given their consent to. That’s it! That’s the whole idea around this mechanism of asking for a user’s consent on the use of their data.

Stick with your end of the bargain! This is a dead-easy way to gain the trust of your users. This trust is critical in developing a positive relationship with your users!

Revoking Consent As a User

This one is an easy concept: a subscriber removes consent by unsubscribing from a mailing list. When that happens, the personal information (including the email address) won’t be used for anything when it comes to the mailing list itself. The user can still be a part of the mailing list again, but they must again provide their explicit consent to do so.
Unsubscribing is very easy to do in Dada Mail. For public mailing lists, a working unsubscription link is required to be in place in all mailing list messages sent out by the app itself. If one isn’t found, Dada Mail will put one in on your behalf.
Unsubscribing is also available from within a user’s profile.
Data about the unsubscription and removal of the consent for this mailing list will also be recorded.

More Information

For a Deep Dive on Dada Mail and GDPR Compliance, see this doc:

Configuring your Dada Mail install to work over https

Many website owners are moving their site’s configuration from http to https connections. Sometimes this is done automatically by their hosting providers

When they do so, they find that their Dada Mail installs seem to become broken: images don’t show up, and no styles are applied. What to do?

Thankfully, the fix is simple: all you’ll need to do is change your Dada Mail’s global configuration from your old http address, to your new https address. Here’s how to do that:

Login into your hosting account via ssh/FTP/web-based file manager – something that will allow you to make changes to your site’s files/directories, then navigate to where you’ve set up your, “dada” directory:

  • Rename the, “dada/installer-a.bunch.of.letters.and.numbers” directory back to, “dada/installer”
  • Change the file permission of the, “dada/installer/install.cgi” script back to, “755”
  • Visit the “install.cgi” script in your browser
  • Use the option to Upgrade

Once in the installer, we’ll want to look at two configuration variables specifically:

  • Pro Dada Program URL
  •  URL to the Support Files Directory

Simply change these variables from their http version to their https version, click, “Configure Dada Mail/Pro Dada”, finishing the installation processs – and you’re done!

You may also want to double-check that the cronjob set is using the https address as well and change it manually there as well.

And that’s it! You’ve changed your Dada Mail/Pro Dada install from using an http connection to a https connection.


Dada Mail v10.5.0 Beta 1 Released: Rich File Manager Support!

10.5.0 Beta 1 is out! Give it a try, and give back and feedback you may have:

Download and Install (Pro Dada version is available, too)

http://dadamailproject.com/support/documentation-10_5_0-beta1/install_dada_mail.pod.html

Changes:

http://dadamailproject.com/support/documentation-10_5_0-beta1/changes_10_x.pod.html#Beta

Rich Filemanager Support

Dada Mail has come shipped with multiple file managers: KCFinder, and Core5 Filemanger. We’re adding a new filemanager called, Rich Filemanager (https://github.com/servocoder/RichFilemanager) which will be set as the default.

Rich Filemanager is an update of Core 5 Filemanager, which has shown a slowdown of development and is listed as, “deprecated” by its developer.

Rich Filemanager comes with some pretty great features and enhancments over Core 5 Filemanager:

  • Drag-and-drop support
  • Clipboard feature: copy, cut, paste, clear
  • Multiple & chunked uploads support – based on jQuery-File-Upload
  • New design of multiple upload window; New upload controls for each previewed file (start, abort, resume, delete, etc.)
  • Online text / code editor – based on codeMirror
  • Online PDF & OpenOffice documents viewer – based on viewerJS
  • Online MS Office documents viewer – based on Google Docs Viewer
  • Extended list of previewed file types via ViewerJS

and more.

We are not yet removing support either of the two current file managers, so if you’re happy with them, keep using them!


Use Amazon SES with Dada Mail for Inexpensive and Very Effective Email Marketing


Sending using Amazon SES for huge daily quotas, and fast delivery!

Dada Mail loves Amazon SES! Coupled with Dada Mail, Amazon’s Simple Email Service gives you the horsepower you need, and the deliverability you desire at a price point that rivals any mailing list service, while also keep your freedom to switch to perhaps a better option in the future, without having to move to an entirely new system.

Here’s some things to keep in mind when thinking about using Amazon SES with Dada Mail:

There’s no monthly fee for Amazon SES: it’s pay as you go! This is an enormous amount of flexibility, as it doesn’t bound you to an inflexible monthly service plan. Want to send 5 mass mailing campaigns one month, and NONE the next? You won’t be charged extra for going over your service plan on the first month, and you won’t waste money on not using the service plan, the next.  This is a huge cost saving source, that can be hidden from you when looking at monthly plans.

Amazon SES is very inexpensive: $0.10 per 1,000 individual messages you send. Sending out to a mailing list of $10,000 would cost just one dollar.

Deliverability is awesome, even on shared hosting accounts. Shared hosting accounts are a cheap and easy way to host your own website, and it’s also an easy way to self-host your own copy of Dada Mail. But, sometimes email sending falls a little flat, for two reasons. The first is that you probably have some sort of hourly email limitation between (say) 150 and 750 messages you can send an hour. That may be fine for individual email accounts sending one message to one recipient as a time, but it leaves much to be desired, when you start growing your mailing list from hundreds to thousands of addresses.

Using Amazon SES, you can instead take advantage of SES’s huge daily sending quotas (in the tens of thousands), and fast sending times to really supercharge your mailing list. Even if you have the cheapest Bluehost/cPanel-based shared hosting account, you can expect mass mailing times to be around 10,000 messages an hour. If you have a better upstream connection, Amazon SES will start you at a high limit of, 50,000+ messages that can be theoretically sent out!

If you don’t like, you can switch to a different service, and still use your own Dada Mail as before: Maybe SES isn’t for you? You can switch back to just using your own mail server easily, without having to shop for a new mailing list manager or service. Dada Mail supports sending via your local mail, SMTP, and Amazon SES.

We provide setting up Amazon SES as part of our installation services – visit our installation request page and see all the options we provide.

If you’d like to set up Amazon SES yourself, our documentation for SES provides walkthroughs on setting up Dada Mail to use either the Amazon SES API or SMTP gateway.