New Community Support Forum!

Support Forum for Dada Mail are back! We’re going to roll these out slowly (beta!) to see how well they’re working:

http://forum.dadamailproject.com/

The purpose of these forums are for Dada Mail users to help each other in getting the most out of the app. Post away!


Consent and Mailing List Subscriptions in Dada Mail

With the GDPR finally active, many people have questions about “consent” and how it relates to public mailing list subscriptions. This article is to try to help out those who are confused, and give a little bit of guidance on how you can set up your mailing list correctly to make sure your subscribers have granted their consent when being a part of your mailing list. We’ll highlight some of the tools at your disposal to help build trust with your subscribers when it comes to asking for their consent to use their personal information, like their email address, for your mailing list.

We’re going to use this doc. put out by the UK’s ICO as the basis for this article:

Closed-Loop Opt-In Subscription

This is what the subscription confirmation button looks like embedded in an email message when it’s received by a user.

The original form of consent used in Dada Mail since version 1 is still with us today. That is Closed-Loop Opt-In Subscription – a fancy way of saying that after user fills out a form to subscribe, they will have to then click a link in an email message they receive to confirm their subscription to the mailing list.
The main reason to have this done is to make sure that the user who filled out the information into the subscription form is also the same user that has access to the email account the information will be tied to.
If you can’t check the email account, you can’t subscribe the email address to a mailing list. Simple and effective,  Closed-Loop Opt-In also stops a lot of abusive things that happen on a mailing list, like a ‘bot subscribing bogus addresses through your subscription form.

Collecting Additional Consent

If there is something specific that you would like to do with the data you collect during a subscription request, Dada Mail has an additional mechanism in place to ask, record, and report this consent.
To be thorough, we do suggest collecting this consent specifically for asking a user to grant the consent to be a part of your mailing list! This means, at minimum, you’ll have one List Consent set up that says something like,
I would like to subscribe to [YOUR MAILING LIST NAME] to receive updates from [YOUR ORGANIZATION’S NAME] by email about [A SPECIFIC TOPIC]
In Dada Mail, this is simply called, List Consents. Here’s how to work with them:
Log into your mailing list – make sure to use your Pro Dada Root Password, as this screen is, by default, only available to those who use that password (the List Password won’t show this screen!)
Once logged on, navigate to, Mailing List: List Consents
This screen will allow you to add as many explicit, and separate different points of consents you would like the users of your mailing list to give you.
Find the form labeled, Create a New Consent
Fill out the textbox with the new point of consent and click, Save New Consent.
That’s it! You’re done!
The List Consents you have set up will now show up on your mailing list subscription form, next to checkboxes (unchecked) a user will have to explicitly check in order to then join your mailing list.
When a user requests a subscription for your mailing list, the request will be recorded, along with exactly which List Consents the user has agreed to.
Once a user has joined your mailing list, this data can be seen being reported from within the list control panel. Log back in (if you aren’t logged in still), and navigate to: Membership: View.
Search/Select an address you would like to see the report about.
Once on the individual user’s screen, click the, Subscriber History tab.
Data about their subscription will be shown.
This data can be exported via CSV – click the button in this same tab labeled, Export Subscriber Activity (.csv)

How Should You Construct A List Consent?

All my points about this are going to be from the ICO doc, linked about (and here). Here’s some things to include:
  • The name of your organization
  • Why you want the data (example: join your mailing list)
  • What you will do with it  (example: email updates/news/announcements, etc)

Dada Mail’s subscription forms also lists the fact:

  • that individuals can withdraw consent at any time.
as well as a link to the privacy policy for the mailing list – so that’s already covered.

Will I Need Additional List Consents?

Are you doing anything else with the information you’re collecting? If so, yes! You will have to explicitly ask your user to grant you that consent. Remember to list why your want the data, and what you will do with it, as well as any third-party involved with the user of the data. There’s a good chance that all you’re using a mailing list’s data for is (get ready) for the mailing list, which makes your life easy.

This goes the other way, too. Did you NOT ask for explicit consent to use a person’s information in a specific way?! Then guess what, you can’t use it in a way they haven’t given their consent to. That’s it! That’s the whole idea around this mechanism of asking for a user’s consent on the use of their data.

Stick with your end of the bargain! This is a dead-easy way to gain the trust of your users. This trust is critical in developing a positive relationship with your users!

Revoking Consent As a User

This one is an easy concept: a subscriber removes consent by unsubscribing from a mailing list. When that happens, the personal information (including the email address) won’t be used for anything when it comes to the mailing list itself. The user can still be a part of the mailing list again, but they must again provide their explicit consent to do so.
Unsubscribing is very easy to do in Dada Mail. For public mailing lists, a working unsubscription link is required to be in place in all mailing list messages sent out by the app itself. If one isn’t found, Dada Mail will put one in on your behalf.
Unsubscribing is also available from within a user’s profile.
Data about the unsubscription and removal of the consent for this mailing list will also be recorded.

More Information

For a Deep Dive on Dada Mail and GDPR Compliance, see this doc:

Getting Started with SparkPost Email Delivery Service and Dada Mail

SparkPost is a new Email Delivery Service. In this post, I’ll go over how to set up Dada Mail to utilize it. Using a third party email delivery service is a GREAT way to cost effectively support large mailing lists, without having to chose a different, and perhaps more costly website hosting account just to bump up your hourly email limitations. Instead, keep your current hosting setup for your website (and your Dada Mail!), but get more horsepower  in the email sending department by using a third party email sending service. We have a list of various third party email delivery services that we curate here. One advantage SparkPost has over Amazon SES is a much easier setup.

Before we get started, you may want to make sure you can connection to the outgoing SMTP server using either port 2525 or port 587. For example, my shared hosting account on Bluehost does NOT have these ports open. For Bluehost, I would have purchase a dedicated IP address to be able to use port 2525. Your own hosting account may be set up differently – double check what you’re able to do with your webhost.

Ok! Here we go:

Continue reading…


Easily Use Dada Mail with Google Analytics Campaign Tracking

Dada Mail v10.7.0 comes with new options in the Send a Message, and Send a Webpage screens, to help you easily create special query parameters that can then be understood by using Google Analytics. with them,  you can then keep track of visitors that originate from your mass mailings.

In this blog post, I’m going to assume you’re familiar with Google Analytics, and using its UTM query parameters to create custom campaigns. But, if you’re not, check out the  Google Analytics site, the docs on Custom Campaigns, the docs on Best Practices for Custom Campaigns, as well as Google’s own URL builder.

So, let’s get to it! We’ll need version 10.7.0 of Dada Mail to have this feature available, so if you haven’t already, install or upgrade to at least  v10.7.0.

First, log into your list control panel, and make sure you’re on the Send a Message screen. Find and click the tab labeled, Options.

Within that tab, click the tab labeled, Analytics:

This will reveal all the options for transforming the links in your message to work with Google Analytics and its Custom Campaigns:

Add UTM parameters to links with the following domains:

Check this option to enable the feature itself. When it’s disabled (which is the default), none of the links in your message will be touched.

Dada Mail can add the custom UTM parameters to every link in your message, or only to links that go to specific domains. If you leave the textbox underneath this option blank, all links will have custom UTM parameters added to them.

But, if you would like to only target specific domains, just list them in the textbox – separate each domain with a space:

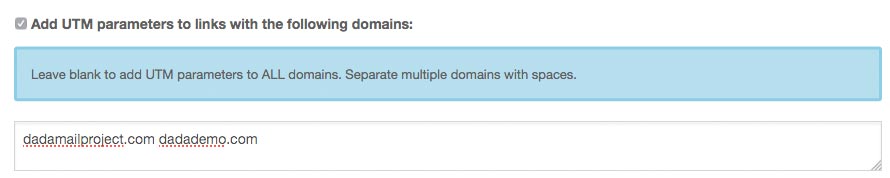
In the example above, I’ve enabled adding the UTM parameters, and I’ve listed two domains to add them to, dadamailproject.com and, dadademo.com. Don’t list these domains with, “http://” or, “https://” – just the domain itself.

The rest of the options available are the actual UTM parameters you can set. There are five:

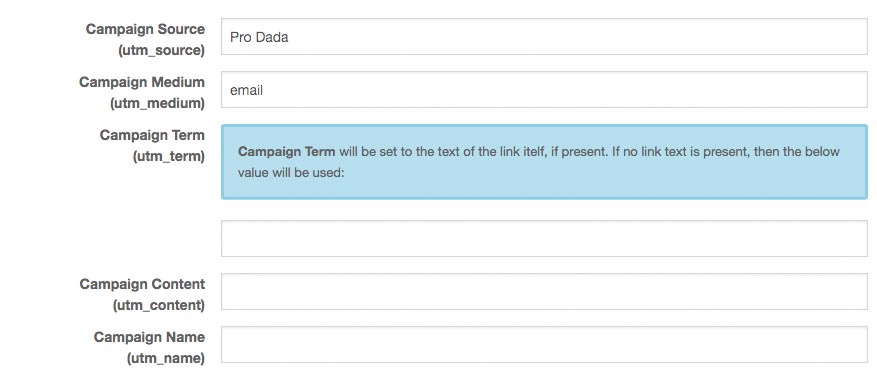
For a full description of what each of these for, see the docs I’ve linked above – start with this one which explains the custom parameters. For your convenience, we’ve set defaults for Campaign Source to the app’s name and Campaign Medium to email, so that right off the bat, any outgoing links you have you’ll know are coming from Pro Dada’s email messages!

Campaign Term is an interesting one, as we treat it a bit special than the others. You may set a default for ALL links in the textbox provided, but Dada Mail will also do its best to try to find the text associated with the actual link click.

For example, if in the source of your message, you have the following:

<a href="http://dadamailproject.com">Dada Mail Mailing List Manager</a>

Dada Mail will set the Campaign Term to, Dada Mail Mailing List Manager. Then, you’ll know that that specific link was clicked, and not the link you have with the same URL in it, that says:

<a href="http://dadamailproject.com">
    Download and Install Today!
</a>

This will report a Campaign Term of, Download and Install Today! You can then track which links work better in your mass mailings.

In fact, all these parameters can be overridden in two other different ways.

The first is to simply set the parameters yourself. If you use Google’s Campaign URL Builder for example, and use the URL it creates in your message, Dada Mail will observe those parameters, and will not override them. For example, let’s set the Campaign Term to, “Best Mailing List Manager” in the URL Builder:

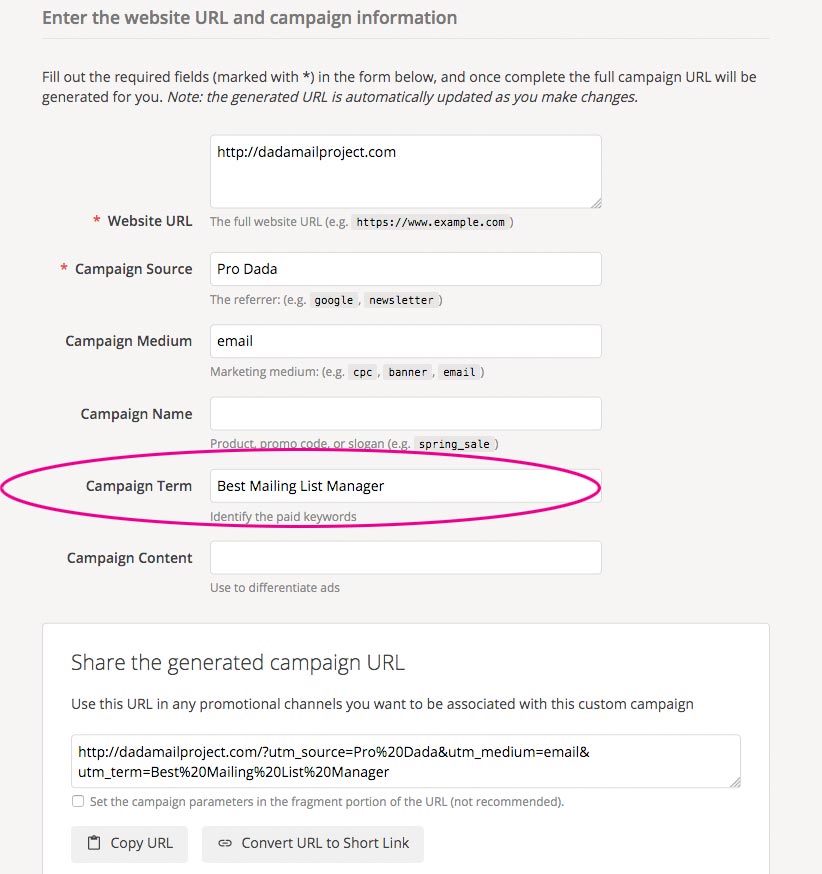
Here’s the URL it created for me:

http://dadamailproject.com/?utm_source=Pro%20Dada&utm_medium=email&utm_term=Best%20Mailing%20List%20Manager

If I then use this URL like so:

<a href="http://dadamailproject.com/?utm_source=Pro%20Dada&utm_medium=email&utm_term=Best%20Mailing%20List%20Manager>
    Download and Install Today!
</a>

Dada Mail will keep the Campaign Term, Best Mailing List Manager instead of using the text that’s within your anchor tag, Download and Install Today!, or with whatever you set in the Campaign Term in the Analytics Tag. Options!

Finally, you may set any of the UTM parameters using attributes inside the anchor tag itself So, for example, to set the Campaign Term in an attribute, I would use the following attribute: data-utm_term:

<a href="http://dadamailproject.com" data-utm_term="Give+them+the+goods">
    Download and Install Today!
</a>

Now, the Campaign term will be set by Dada Mail to, Give them the goods instead of, Download and Install Today!

Here’s the order of precedence to all this:

  • Any query parameters found in the link itself have the highest precedence.
  • Next, are the dada-utm_* attributes in the anchor tag, itself
  • Then, (for Campaign Term), it’s the actual text found wrapped inside the anchor tag
  • Finally, the parameters you set within the Send a Message/Send a Webpage screen will be used.

And that’s the new support for created the custom UTM parameters to be used in conjunction with platforms like Google Analytics. Give it a try, and let us know how it’s working for you. We’re looking forward on building upon this start of the feature and to add improvements over time!


Configuring your Dada Mail install to work over https

Many website owners are moving their site’s configuration from http to https connections. Sometimes this is done automatically by their hosting providers

When they do so, they find that their Dada Mail installs seem to become broken: images don’t show up, and no styles are applied. What to do?

Thankfully, the fix is simple: all you’ll need to do is change your Dada Mail’s global configuration from your old http address, to your new https address. Here’s how to do that:

Login into your hosting account via ssh/FTP/web-based file manager – something that will allow you to make changes to your site’s files/directories, then navigate to where you’ve set up your, “dada” directory:

  • Rename the, “dada/installer-a.bunch.of.letters.and.numbers” directory back to, “dada/installer”
  • Change the file permission of the, “dada/installer/install.cgi” script back to, “755”
  • Visit the “install.cgi” script in your browser
  • Use the option to Upgrade

Once in the installer, we’ll want to look at two configuration variables specifically:

  • Pro Dada Program URL
  •  URL to the Support Files Directory

Simply change these variables from their http version to their https version, click, “Configure Dada Mail/Pro Dada”, finishing the installation processs – and you’re done!

You may also want to double-check that the cronjob set is using the https address as well and change it manually there as well.

And that’s it! You’ve changed your Dada Mail/Pro Dada install from using an http connection to a https connection.


Using Rich Filemanager to Add Images and Attachments in Dada Mail

v10.5.0 of Dada Mail comes with a new file browser/uploader, called Rich Filemanager! This tool allows you to select files from your desktop computer, upload them to the server that Dada Mail is running on, and select the file to add as an inline image or as a file attachment for your mass mailing. Once the file has been uploaded, you may use it again for another mass mailing.

Continue reading…


Dada Mail v10.5.0 Beta 1 Released: Rich File Manager Support!

10.5.0 Beta 1 is out! Give it a try, and give back and feedback you may have:

Download and Install (Pro Dada version is available, too)

http://dadamailproject.com/support/documentation-10_5_0-beta1/install_dada_mail.pod.html

Changes:

http://dadamailproject.com/support/documentation-10_5_0-beta1/changes_10_x.pod.html#Beta

Rich Filemanager Support

Dada Mail has come shipped with multiple file managers: KCFinder, and Core5 Filemanger. We’re adding a new filemanager called, Rich Filemanager (https://github.com/servocoder/RichFilemanager) which will be set as the default.

Rich Filemanager is an update of Core 5 Filemanager, which has shown a slowdown of development and is listed as, “deprecated” by its developer.

Rich Filemanager comes with some pretty great features and enhancments over Core 5 Filemanager:

  • Drag-and-drop support
  • Clipboard feature: copy, cut, paste, clear
  • Multiple & chunked uploads support – based on jQuery-File-Upload
  • New design of multiple upload window; New upload controls for each previewed file (start, abort, resume, delete, etc.)
  • Online text / code editor – based on codeMirror
  • Online PDF & OpenOffice documents viewer – based on viewerJS
  • Online MS Office documents viewer – based on Google Docs Viewer
  • Extended list of previewed file types via ViewerJS

and more.

We are not yet removing support either of the two current file managers, so if you’re happy with them, keep using them!


Demo: Easily Import and Export Subscribers in a Dada Mail Mailing List

We get asked quite a bit about if it’s possible to import an already existing mailing list into Dada Mail, as well as if it’s possible to export a mailing list out. The answer to both of these questions is a resounding, yes! The above screen cast should demo both of these abilities quite nicely. (Sorry for the cracklin’ mic.!)

Some notes on importing to make things even easier:

If you’re importing a mailing list used for things like public announcements and marketing, you’ll need to make sure that either the mailing list only has already confirmed subscribers (like if you’re moving from a past system, to Dada Mail), or that you’re actually importing the addresses to invite them to your mailing list, rather than subscribing them outright. This is a very importing point when running a public mailing list: only have confirmed subscribers!

Log in with your Dada Mail Root Password. This will give you privileges to do the mass import by default.

If you want to give privileges to someone that logs in with the List Password, change the list settings to allow this:

  • Go to, Mailing List: Options.
  • Check, Allow subscriptions in the List Control Panel, without confirmation
  • Uncheck, Only allow when logged in with the Pro Dada Root Password

Don’t go over import limit set! By default, Dada Mail only allows 5,000 subscribers to be imported at once. This is to prevent the app from trying to chew through too much data at one time, and failing. If you would like raise/eliminate this limitation that can also be done in the List Control Panel:

  • Go to: Membership: Options
  • To remove the limit, uncheck, Limit the number of addresses processed to:
  • To change the limit, select a new value in the popup menu below this option

We do have an older screencast going into more detail on how to import a mailing list into Dada Mail – much of what’s available now is the same, athough the UI has been redesigned since this screen cast has been made:


Add Images To Your Newsletter Messages in Dada Mail

New to Dada Mail v10.4.0 is the ability to upload images right into the Rich Text Editor you’ll find in the Send a Message screen just by either copying and pasting the image from a graphics program, or just dragging and dropping an image from your computer’s file manger. Check out the above screencast to see how.

These two new methods make things a whole lot easier to add images quickly, without having to use one of the web file manager that are also bundled with Dada Mail. These methods also work in adding documents to your message too – Say you have a PDF document you’d like to upload and link into your message. Just drag and drop the document itself: the file will be uploaded and a link will be automatically created.

Below, we’ll guide you through the individual steps on how to do this yourself, and go into how to work with the other method of uploading/selecting/inserting an image: one of the bundled file manager. All these techniques are available in v10.4.0 – we didn’t remove the file managers, to make you rely on the copy/paste or drag + drop methods, so don’t worry if those are already deeply seated in your own workflows.

Continue reading…


Use Amazon SES with Dada Mail for Inexpensive and Very Effective Email Marketing


Sending using Amazon SES for huge daily quotas, and fast delivery!

Dada Mail loves Amazon SES! Coupled with Dada Mail, Amazon’s Simple Email Service gives you the horsepower you need, and the deliverability you desire at a price point that rivals any mailing list service, while also keep your freedom to switch to perhaps a better option in the future, without having to move to an entirely new system.

Here’s some things to keep in mind when thinking about using Amazon SES with Dada Mail:

There’s no monthly fee for Amazon SES: it’s pay as you go! This is an enormous amount of flexibility, as it doesn’t bound you to an inflexible monthly service plan. Want to send 5 mass mailing campaigns one month, and NONE the next? You won’t be charged extra for going over your service plan on the first month, and you won’t waste money on not using the service plan, the next.  This is a huge cost saving source, that can be hidden from you when looking at monthly plans.

Amazon SES is very inexpensive: $0.10 per 1,000 individual messages you send. Sending out to a mailing list of $10,000 would cost just one dollar.

Deliverability is awesome, even on shared hosting accounts. Shared hosting accounts are a cheap and easy way to host your own website, and it’s also an easy way to self-host your own copy of Dada Mail. But, sometimes email sending falls a little flat, for two reasons. The first is that you probably have some sort of hourly email limitation between (say) 150 and 750 messages you can send an hour. That may be fine for individual email accounts sending one message to one recipient as a time, but it leaves much to be desired, when you start growing your mailing list from hundreds to thousands of addresses.

Using Amazon SES, you can instead take advantage of SES’s huge daily sending quotas (in the tens of thousands), and fast sending times to really supercharge your mailing list. Even if you have the cheapest Bluehost/cPanel-based shared hosting account, you can expect mass mailing times to be around 10,000 messages an hour. If you have a better upstream connection, Amazon SES will start you at a high limit of, 50,000+ messages that can be theoretically sent out!

If you don’t like, you can switch to a different service, and still use your own Dada Mail as before: Maybe SES isn’t for you? You can switch back to just using your own mail server easily, without having to shop for a new mailing list manager or service. Dada Mail supports sending via your local mail, SMTP, and Amazon SES.

We provide setting up Amazon SES as part of our installation services – visit our installation request page and see all the options we provide.

If you’d like to set up Amazon SES yourself, our documentation for SES provides walkthroughs on setting up Dada Mail to use either the Amazon SES API or SMTP gateway.