Are My Mass Mailings Being Received? Part #1: Sending Errors and the Tracker plugin

I work with a whole lot of different clients in making sure their mass mailings are going out successfully. One of the pressing issues they’re always worried about is: did my message actually get sent out?

Although we can’t ultimately control where a message will be delivered when it finds itself into a mail client,  we can do our best to make sure that things are working as best as possible on our end. I’m going to talk about ways to verify that sending is working out correctly, using the Tracker plugin that comes with Dada Mail.

Sending Errors

Sending errors on your side can happen for a couple of reasons. One reason is that the authentication of your mail server/service has changed, and what has been saved in your mailing list settings is now incorrect.

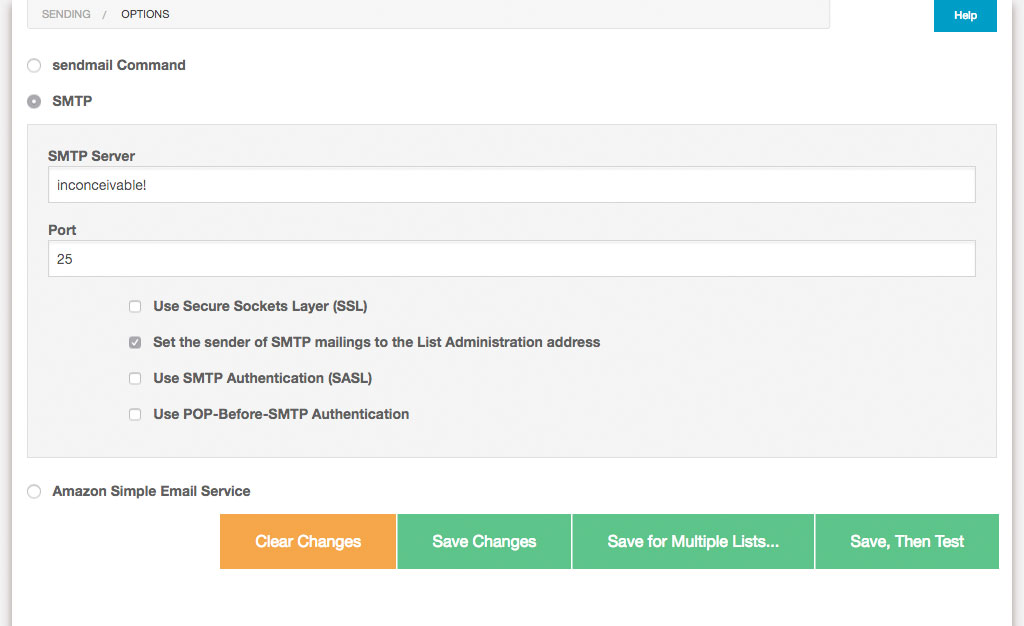
Enter the Tracker plugin: among many other jobs, it does keep track of sending errors. I’ll demonstrate this with a test mailing list with a just few subscribers. I’ll set up my sending options to use an SMTP server that I know doesn’t exist: I’ve set my SMTP server to, inconceivable! which… isn’t even a valid name for an SMTP server!

This will all but guarantee I’ll get sending errors on my end:

To confirm we’ve totally botched up our sending options, we can try them out by clicking the button labeled, Save, Then Test, which will open up a modal window showing the results of testing our sending options:

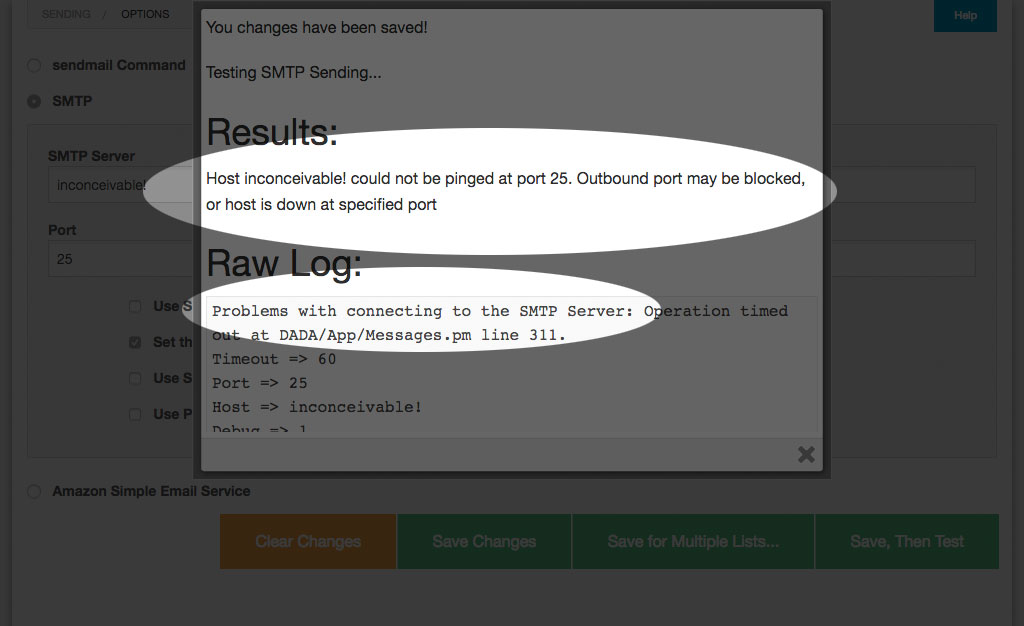
As expected, Dada Mail is having problems connecting to this non-existent SMTP server. So, it should be no surprise that when we send a mass mailing, we’ll also have problems.

So, let’s do just that!

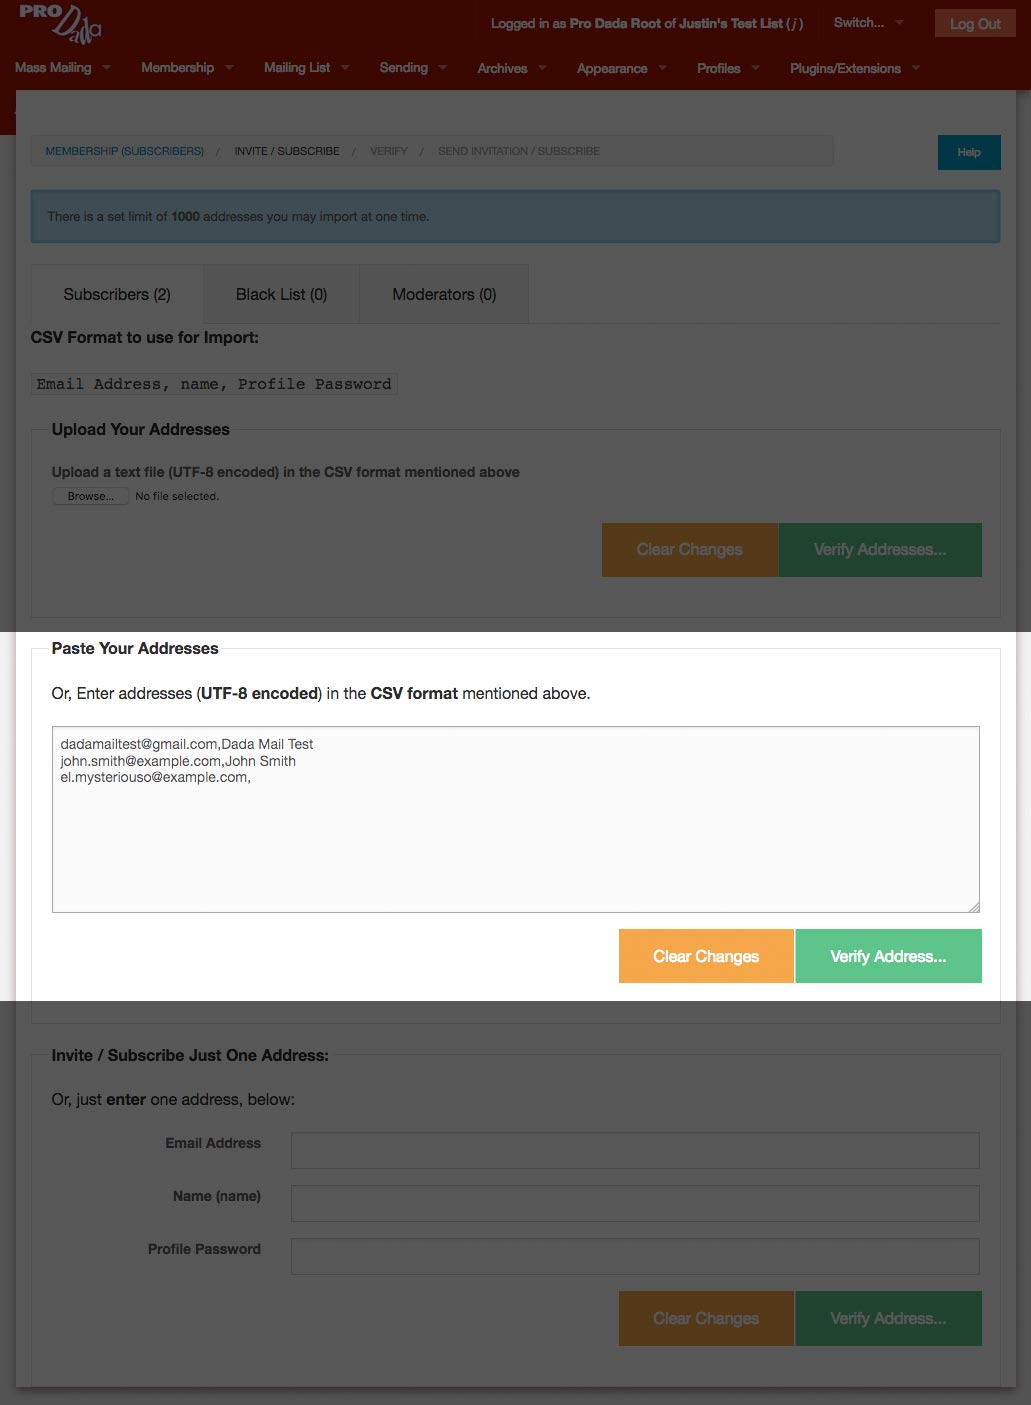
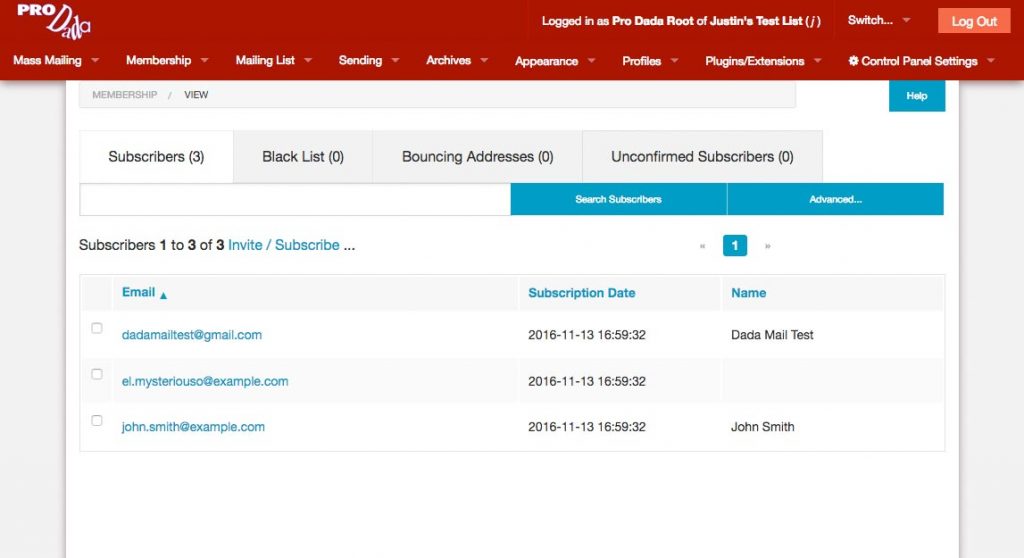
I’m going to send a mass mailing out to a subscription list with just three addresses, and see what the Tracker plugin tells me.

While I wait for my mass mailing to finishing, one strange thing that may be tip me off that there’s a problem is how slow my  mass mailing seems to be taking. Hmm! I wonder what could be going on? If I check my error logs using the Log Viewer plugin, I see lines in the log that look similar to this,

[Mon Jan 30 21:27:09 2017] mail.cgi: [j] Mass Mailing:20170130211832.79094872_at_dadamailproject.com Cannot send to, address: dadamailest+1@gmail.com after 2 x 3 tries, skipping and logging address. at DADA/Mail/Send.pm line 1951.

Even if Dada Mail has trouble sending out to an address, it does try re-sending the same message out a few times, just in case the first attempt and error was a fluke. If it’s not successful, it’ll wait a brief period of time before trying again.

This slowdown is not by accident: many mass mailing sending problems are because the mass mailing options are set to send out messages at too fast of a rate, which leads you to go over your hourly email quota set up for your account. Check your host/email service to see if you fall under such a restriction. Most shared hosts have some sort of hourly email restriction.

Once my mass mailing completed, I checked the Tracker plugin, and found this:

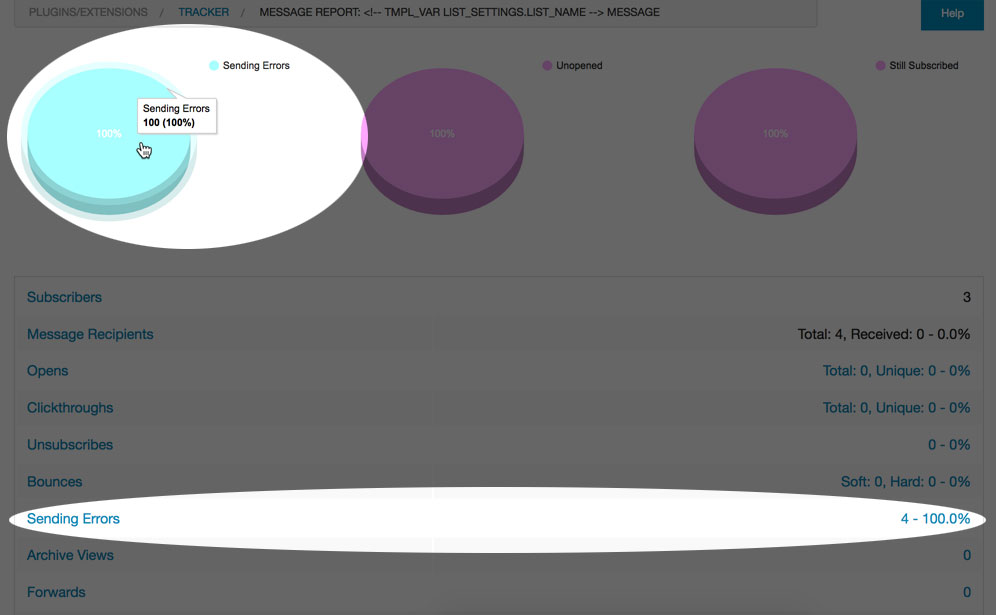
Yup: a 100% failure rate of sending out to my mailing list. D’oh!

This type of evidence:

the test in the sending options failing

the mass mailing taking longer than I would have anticipated

the specific error logs about sending problems

the Tracker plugin reporting a 100% sending error rate

Makes me believe that there’s a problem on MY side! In this case, it’s my SMTP server set up incorrectly, and not something else, like my email server being black listed, or my messages going to a junk folder. This is a problem I can easily fix on my side (use the right SMTP credentials!) and not something I’ll need to investigate further, until I fixed this problem


Use Dada Mail to create a mass mailing from a blog feed, then send it on a recurring schedule

In Dada Mail v10.3.0, the ability to mass mail the content of a blog’s feed was added. We’re going to go over the steps on how to send thtis type of message, then how to send out the mass mailing on a recurring schedule that will be sent whenever new content in the feed is available. That way, we’ll be able to automatically send out new mass mailings in the future without any additional work, helping your users be updated when new blog entries are available to be viewed.

For this walk-through, I’ll be using the blog of The Long Ranger (http://longranger.justinsimoni.com/), an outdoor mountain athlete.

In Dada Mail’s list control panel, go to Mass Mailing: Send a Webpage. In the HTML Version tab,  select the radio button, Grab content from an RSS/Atom feed. The options for this selection will be shown, and the first textbox presented is where you plug in the URL of your feed. In my case it’s, http://longranger.justinsimoni.com/feed/

For the other options, I’m going to select, Use Just the Summary, (rather than, Use Full Content) and I’m setting, Maximum number of entries to include: to, 3.

I’m also going to add some HTML to be shown before the entries are listed,

<h1>How-do, partners,</h1> 

<p>Here are the latest stories I've written:</p>

and after:

<h2>See you on the trails,</h2>

Here’s how that all looks,

And when I preview everything,

Perfect! I can see that the feed is being successfully fetched, and placed into my message!

I could stop here and be satisfied about sending out this single message, but let’s now set it on a recurring schedule. On the top button bar, click, Save As: Schedule. A draft of the message will be saved, and the screen itself will refresh. New scheduling options will be shown at the top of the screen.

Check, Activate, and select, Recurring. I want this to send only once a week on Monday, at 6:00am, and only when there’s fresh content:

If there are no new entries, no message will be sent out. If there’s only one new entry, only that one entry will be sent out. That way, I won’t send out content I’ve already sent out before. Who wants to get the same message, twice?

All I have to do now is click the, Save Schedule button – and I’m done! Here’s what it all looks like when sent:

Some flourishes you may notice: the Subject, The Latest Wild Adventures Since January 2nd, 2017 is dynamic! It will change based on when the message is sent. This is accomplished by using some date-related template tags. Here’s what those look like:

The Latest Wild Adventures Since <!-- tmpl_var date.named_month --> <!-- tmpl_var date.nth_day -->, <!-- tmpl_var date.year -->

I’m also using an email theme that ships with Dada Mail called, Salmon Are Running. You can switch which theme your mailing list uses in, Appearance: Email Themes. Finally, I’ve set an image to be shown on the top banner of my email messages. You can set your own image under, Mailing List: List Information; look for the option labeled, Logo Image URL.


Discussion Lists: Why is the From: header being rewritten?

Recently, I’ve been getting many people wondering why, when running a discussion list in Bridge, that the From: header is rewritten from it’s original form, say:

From: "Subscriber Name" <subscriber@their-domain.com>

to something else completely :

From: "Subscriber Name subscriber@their-domain.com [List Name]" <list.email@your-domain.com>

In my first example, the name of the subscriber (Subscriber Name) occupies the phrase of the From: header, and the email address of the subscriber (subscriber@their-domain.com) is where the address should be. Pretty straightforward.

In the rewritten From header, the phrase is now: "Subscriber Name subscriber@their-domain.com [List Name]" <list.email@your-domain.com)> – that is, the name of the subscriber (as before), then their own email address, and finally the name of the mailing list in brackets. The actual address portion of the From: header is the List Email address (list.email@your-domain.com) – the address you send a message to, to start a thread.

Why not just keep it like it was?

While it’s true that discussion list software – including Dada Mail used to maintain the From: header in its original form, it’s not something we can do anymore, without impacting deliverability in a major way. A big job of a mailing list manager (like Dada Mai) is successfully send out messages to the subscribers of the mailing list, right?

Here’s why this doesn’t work, anymore.

DMARC Policies

Sometime in 2014, Yahoo Changed their “DMARC” policy to only accept email messages that have a @yahoo.com email address in the From: header that also originated from a Yahoo server. Here’s Yahoo explaining it themselves. This actually makes a ton of sense: ow, only messages that say they are from a yahoo.com address, and sent through Yahoo’s mail system will be accepted for delivery by basically everyone that’s following the DMARC Policy rules (and that means Yahoo themselves, Gmail, Hotmail – all the big players).

This is a big win in trying to keep the problem of spoofing email addresses to send unsolicited email and other harmful payloads, but it had a dire consequence:

It broke every single discussion mailing list in the world. And this isn’t hyperbole, this is exactly what Internet Engineering Council expert John R. Levine, a specialist in email infrastructure and spam filtering, actually wrote.  A mailing list that’s keeping say, a @yahoo.com address in the From: header looks exactly like a email message with a spoof’d @yahoo.com address in the From: header.

To counter act this change in policy, discussion mailing lists had to adapt. The primary change that’s been suggested is to change the From: header to utilize the List Email as the actual address, and add more information in the phrase of the address, exactly like Dada Mail does. In fact, Dada Mail uses the exact same pattern as Yahoo’s own group mailing lists.

Thankfully, when this change happened (literally, over a weekend, without any real warning), Dada Mail already had support for this in its Bridge plugin, called: p.p. Mode. One needed simply to enable this feature, and be all set. After the Yahoo policy change, we made this option enabled by default, then removed the option altogether in v10, more than 2 1/2 years later. Being able to disable this option has no real benefit, except to break your mailing list, so it seemed a pretty bad option to have around.

There is an option available to customize what gets set in the phrase of the From: header, and that option can be accessed in the list control panel, under: Plugins: Bridge. Look for the option labeled, From: header phrase: By default, its value is,

<!-- tmpl_var original_from_phrase default="Subscriber" --> <!-- tmpl_var subscriber.email --> [<!-- tmpl_var list_settings.list_name -->]

These are mostly a series of email template tags, the same ones you may also use in the Subject, or Body of your message:

<!-- tmpl_var original_from_phrase default="Subscriber" --> is context specific for this job, as its value will contain the original phrase as it was sent. If there is no phrase, “Subscriber” will instead be printed.

<!-- tmpl_var subscriber.email --> will be replaced with the email address of the message’s original sender.

<!-- tmpl_var list_settings.list_name --> will be set to the name of your mailing list.

Hopefully, that helps you understand why the changes are being made without getting too technical.

What about Announce-Only Mailing Lists?

A similar problem can befall an announce-only mailing list, but isn’t fixed so cleverly. The problem will happen if you’ve set up the List Owner or the List Admin email address to be an address that’s not specifically tied to the mail system you’re using.

So for example, if you’re using the sendmail command (the default option), you most likely have to use an email address that belongs to the same domain that you have Dada Mail installed on – this is also our general advice, no matter how you’re sending out messages. In other words,  if my domain is, your-domain.com, my email address for the List Owner and List Admin needs to be something like, list.owner@your-domain.com and not list.owner@gmail.com.

If you’re sending via SMTP, you most likely need to authenticate the SMTP connection anyways, but both the List Owner, and List Administrator will need to be allowed to send through this SMTP server.

If you’re sending through Amazon SES, the email addresses you’re using for both the List Owner and List Admin need to be a verified address or an address belonging to a verified domain.

Hope this all helps. Happy sending, everyone!


Review: InMotion Hosting for Dada Mail

I recently gave an InMotion Hosting a test drive, to see how it would fair as platform to run Dada Mail, along with the rest of your site. I’m happy to report back that it’s just about as perfect as a shared hosting account can be for Dada Mail.

Click to see InMotion Hosting’s Business Plans

Read on for more details, as well as how you can save 20% on a Pro Dada installation done by us, when you sign up for a new InMotion Hosting account, using our affiliate links!

This review is for InMotion Hosting’s Power Plan, which is one of their least expensive hosting packages. You can see all of InMotion Hosting’s business plans here.

cPanel

InMotion Hosting’s Power Plan includes cPanel, which from my experience is both one the most powerful, and easiest-to-use web hosting control panel there is – especially for running self-hosted web apps written in Perl, like Dada Mail.

Some much so, I specifically target development of Dada Mail to make sure it works well on cPanel-based accounts, and use them in my installation instructions, screencasts, and tutorials.

InMotion’s flavor of cPanel currently comes with the following accoutrements:

File Manger

File Manager allows you to add/edit/remove files from your hosting account, as well as change permissions of those files. That’s all you’ll need to setup and install Dada Mail, so no need to utilize FTP or ssh, which makes installation of Dada Mail well within the reach of a casual user, and follows the installation instructions closely.

MySQL

The Power Plan comes with an up-to-date version of MySQL and support for up to 50 separate databases (Dada Mail will require just one). PostgreSQL is also available, if you wish to go that route.

Perl

Perl on this hosting plan is very much up-to-date. Dada Mail requires at the very least v5.10.1 of Perl, and v5.16.3 is available by default. Having an up to date Perl makes more features available, gives you the best performance, and an up-to-date Perl means less worry about bugs or security problems. Kudos for this, as many cPanel-based hosting accounts lag behind with older versions of Perl offered by default – either v5.10.1, or a supremely ancient v5.8.8. Yuck!

Perl Module Installer w/Compiler Support

Along with an up-to-date Perl, the Perl Module Installer is also enabled in InMotion’s offerings, which  itself has support to install modules that may need compilation. This tool is the easiest way for a casual user to tap into the most advanced features of Dada Mail which require the additional installation of freely available Perl modules.

Features like CSS Inlining, Google reCAPTCHA, Amazon SES Sending, Send a Webpage support (and may more) rely on Perl modules that are outside the standard Perl library. With this tool, you can easily install them.

DNS Zone Editor

The DNS Zone Editor is also available, which becomes important when you would like to set up Sending with Amazon SES, and would like as well to set up proper SPF and DMARC records. Using Dada Mail with Amazon SES sending is one of the most cost-effective ways to run your mailing list, by far, and InMotion Hosting’s Power Plan will support everything you need.

Cronjobs

Cronjob support: check!

One-Click Installer!

If the installation of Dada Mail leaves you a little too breathless to want to take on yourself, InMotion Hosting also comes with an Installer for Dada Mail, with a pretty up-to-date version of Dada Mail available, which I think is powered by Softaculous. I’ve seen one-click installers that offer increasingly old, and out of date versions of Dada Mail, so it’s a nice change to see this one-click installer do the right thing, and keep current.

It is a little awkward to find Dada Mail, as Softaculous categorizes web apps by the language they’re written in, and InMotion Hosting’s cPanel will default to showing you PHP (not Perl), so here’s what you can do:

In the cPanel, look for, “Scripts”, by typing, “Scripts” in the Find search box. That will show two boxes labeled Scripts: and Categories:. Click on any of the icons in the, Categories: box. That will show you all the apps available in that category (but only for PHP, not Perl!):

inmotion_find_dada_mail0

Fear not: once in this directory of apps, just use the search box in the upper left hand corner, and search for, “Dada Mail” – the link to install Dada Mail will come right up,

inmotion_find_dada_mail1

If you have a Pro Dada Subscription, you can install Dada Mail this way, then turn it into Pro Dada. And away you go! One more small point, if you do decide to install this way, make sure to still set up the cronjob, as it’s not done by this installer!

Hourly Sending Limit

If anything, this may be where InMotion Hosting falls a little short. By default, they’ve told me there’s a limit of 250 messags/hour you may send, but you may contact support to have this limit raised to something more realistic for a mailing list (like 750 messages/hour). Using the mail server provided to you with your shared hosting account can work well for starting out, but if your mailing lists are an important part of your business, I would unapologetically suggest moving to your email sending to Amazon SES, which Dada Mail installed on InMotion Hosting 100% supports, which is great news.

Pro Dada Installations: 20% Off for New InMotion Affiliate Signups

Here’s our affiliate link, which you can use to sign up for a new account with InMotion Hosting:

Click to see InMotion Hosting’s Business Plans

Once you’ve signed up with InMotion, request a Pro Dada installation on our request form. Mention that you’ve signed up for InMotion Hosting, and we’ll give you 20% off the total of your Pro Dada install (we’ll know that you’ve done this, as we’ll get a notice about the domain name signed up). Not too shabby!


Add Google reCAPTCHA on Dada Mail Subscription Forms

You’ve asked, we (finally!) answered: v10.2.0 of Dada Mail supports CAPTCHA on the initial signup form!

Although the app has supported CAPTCHA for many years for a whole bunch of things in the app, we never added support for the initial signup form. We were worried about the usability of forcing your potential subscribers to solve a CAPTCHA.

Why have we changed our minds?

Google’s latest reCAPTCHA system is a whole lot more usable to work with, and the threat of abuse on things like newsletter subscription forms is just not going away. So, why not make support at least an option?  Those who would like the subscription form to work as it always has still can. Everyone else can enjoy the enhanced security. Seems like a big win.

Another big change in Dada Mail’s CAPTCHA system is that we now only support the latest version of Google’s reCAPTCHA system (version 2). In the past, we also supported reCAPTCHA version 1, as well as a CAPTCHA system based on, Authen::Captcha.  To keep the code simple and bug-free for something so security-specific, we’ve removed these other choices.

Setting up Google reCAPTCHA in Dada Mail

Create a Site and Secret Key Pair

Sign up for the Google reCAPTCHA service at,

http://www.google.com/recaptcha/admin

and create a site and secret key pair for the site you have Dada Mail installed at, as outlined here:

https://developers.google.com/recaptcha/docs/start

Make sure you record both the site and secret key somewhere safe – we’ll be using them, later.

Configure Dada Mail to use Google ReCAPTCHA

Plugging in the site and secret keys, and telling Dada Mail to use Google reCAPTCHA is done in Dada Mail’s global configuration. The easiest way to work with that is through Dada Mail’s included web-based installer, so an install or upgrade would be the perfect time to set all this up. If you have v10.2.0 (or later) of Dada Mail installed, you can also drop back into the installer to make these configuration changes.

Once in the installer’s configure screen, look for the Advanced Options. This is where you can setup the plugins/extensions, as well as many of Dada Mail’s more advanced features. If you do not see these options, click the button labeled, Show/Hide Advanced Options…

Next, look for a checkbox labeled, Configure CAPTCHA Options. Check the box, and the CAPTCHA options will be revealed.

Check the box labeled, Add CAPTCHA on all subscription forms if it’s not already checked.

Now, you’ll need to plug in the site key and secret key in the textboxes labeled, reCAPTCHA Site key: and, reCAPTCHA Secret key:

Once that’s all set up, you can test to make sure if everything works, but clicking the button labeled, Test CAPTCHA Configuration… If everything works correctly, you’ll be shown a working reCAPTCHA v2 widget!

google_recaptcha_v2

And you’re done! Complete the installation process, and enjoy a CAPTCHA-full Dada Mail.

Here’s what my own subscription form now looks like, with the added reCAPTCHA widget,

google_recaptcha_v2_1

Just remember, if you have a subscription form that you’ve added directly to your website, and you have CAPTCHA now configured, those forms will have to be updated. The code available in the list control panel under, Appearance: Subscription Form HTML will do the trick.

Missing CPAN Module?

Dada Mail’s Google reCAPTCHA support requires the Google::reCAPTCHA Perl module, which you can install from CPAN in a few different ways.

Need More Help?

We offer installation services for Dada Mail, including setting up Google reCAPTCHA for your site. See all our installation services here.


Segmentation And Mass Mailing in Dada Mail

Dada Mail has the ability to send to only part of your mailing list (Segmentation).

We’re going to start with a list set up with a few Profile Fields:

first_name, last_name, city, state, favorite_color, _secret

Here’s a sampling of the csv file I’m going to import into my own mailing list:

angelina.mcintyre376@yahoo.com,Angelina,Mcintyre,Vernon,NV,,that,IAMneoTj
alex.holt126@yahoo.com,Alex,Holt,Milton,ID,,watch,kDaCRtzm
isaiah.rodriguez161@blah,Isaiah,Rodriguez,Kingston,MT,yellow,day,TiepsAau
caroline.albert564@aol.com,Caroline,Albert,Ashland,DC,,place,nkg5PhuY
angelina.hudson750@gmail.com,Angelina,Hudson,Salem,WA,,house,wfHs5ZaC
payton.mcguire914@msn.com,Payton,Mcguire,Riverside,NV,,more,ZpxOkY2f
lucas.barnes666@pobox.com,Lucas,Barnes,Mount,WI,,this,4CQ3wQ97
ariana.conley204@blah,Ariana,Conley,Marion,NV,violet,well,UJquFGAF
madelyn.hale435@hotmail.com,Madelyn,Hale,Milford,MS,,year,bkJjbY3R
aidan.woodard52@blah,Aidan,Woodard,Washington,AL,,stop,8JeipYPC

The first column is the actual email address of my subscriber; the last is the profile password of the address. The column named, _secret won’t show up in my subscription form, as it begins with an underscore. This data is correctly formatted to be easily imported into my list.

Here’s how my subscribers look, once I do import it into my mailing list and viewed in Membership: View:

segmentation

This screen also allows me to do an advanced search across all my subscribers. I’m going to search and see which subscribers have, favorite_color set to, red. My results will be shown below this search form:

segmentation2

So that’s how advanced search works in the Membership: View screen. How would I search for subscribers to send a mass mailing to?

Let’s go into the Mass Mailing: Send a Message screen. Once on that screen, click the Options tab, then click the, Partial Mailing List Sending tab within the Options tab. You’ll be greeted with a search form that looks similar to the advanced search form in Membership: View screen:

segmentation3

Just like we did in the Membership: View screen, we’re going to search for subscribers with a favorite_color of, red. Click the, “Preview…” button to get a preview of the subscribers we’ve found:

segmentation4

Now, when we send out our mass mailing, only the subscribers listed in these results will receive your message.

That’s how easy it is to segment out your mailing list!

Dada Mail also allows you to have different content in your mailing list, depending on the value in each address’s profile fields. For our, favorite_color example, we can use the following snippet of HTML and Dada Mail’s template tags to only show this message to subscribers with favorite_color set to, red:

<!-- tmpl_if expr="(subscriber.favorite_color eq 'red')" -->

<h1>Red Lovers, A Deal You Cannot Pass Up:</h1> 

<p>
Lorem ipsum dolor sit amet, consectetur adipiscing elit, 
sed do eiusmod tempor incididunt ut labore et dolore magna aliqua.
</p>

<!-- /tmpl_if -->

The magic is in this line:

<!-- tmpl_if expr="(subscriber.favorite_color eq 'red')" -->

This way, you can send to your entire list, but have messages custom for practically every subscriber you send to.

Dada Mail’s templating system follows the rules documented here, which should give you a good idea on what it’s capable of.

Experiment with these two advanced features, and let us know how they’re working for you!


How to turn any Dada Mail install into a Pro Dada install

Pro Dada is a distribution of Dada Mail that is shipped without any mailing list, or subscriber quotas, as well as direct email support available. It’s our commercial offering of Pro Dada, and what funds further development of the app. Here’s more about Pro Dada

Many people start with Dada Mail (in fact, we suggest to try Dada Mail first, to make sure it’s what you’re looking for, and that Dada Mail is compatible with your server setup!), then want to upgrade to Pro Dada. But, the idea of upgrading to Pro Dada isn’t always attractive, as it may mean more work, or flubbing up the current, perfectly working configuration. Luckily, this isn’t something you need to worry about, as Dada Mail has the ability to be, “transformed” to a Pro Dada installation easily. Here’s how to do that:

Log into one of your mailing lists, using the Dada Mail Root Password. On the top bar menu, look for a big red button labeled, “Transform This Install Into Pro Dada“:

transform

Click that button! You’ll be directed to a screen that will ask you for you to submit Pro Dada username and password, which are provided to you, once you’ve purchased a Pro Dada subscription:


transform1

Click the Verify… button, and when your login credentials have verified, you’ll be presented with a single button to transform your install. Click that button,

transform2

and you’re done!


How to Send Personalized Emails with Dada Mail

Dada Mail fully supports sending personalized mass email messages to your entire maling list, or just a segment of your mailing list. Let’s go through how to set this all up!

Profile Fields

By default, Dada Mail only captures and stores a subscriber’s email address, but we can add additional fields to capture and save in the List Control Panel. Log into your mailing list (use your Dada Mail Root Password!), and navigate to, Profiles: Profile Fields. In this walk through, we’re just going to make one field called, Name. I’ll then show you how to create a salutation in your message.

Here’s the Profiles: Profile Fields screen, with our new field filled out,

profiles_add_new

Field Name is the internal name used when working with profile fields, and has few constraints on what you can use. In this example, I’ll be using, name.

Label is what you’ll see on things like the subscription form, and is much more free-form. In this example, I’ll be using, Name (notice the capitalization!)

Fallback Value can hold a value used, if there isn’t a value for the subscriber, for this profile field. We’re not going to use it here, but I’ll show you how to add a default value, when using this in our actual message.

Finally, there’s a checkbox to tick, if you would like this field to be required.

Adding Subscribers w/Profile Fields

OK, now that our field is created, let’s add a few subscribers to our mailing list.

I’m going to navigate to the Membership: Invite/Subscribe/Add screen. This screen allows you to subscribe new members one at a time, and en-mass. We’re going to add three at a time in this demo, by adding a CSV (Comma Seperated Value) file. Here’s what that file looks like:

dadamailtest@gmail.com,Dada Mail Test
john.smith@example.com,John Smith
el.mysteriouso@example.com,

I created this file in a spreadsheet, then just exported the data as a .csv file. Our first two subscribers have both an email address and name, and our third subscriber, el.mysteriouso@example.com doesn’t have a name at all.

profiles_add_new2

After pasting the content of my .csv file (you can also just upload the file itself), I’ll click, Verify Addresses…, which goes through the black magic of making sure the data I’m submitting is valid, that these addresses aren’t already subscribed, etc. Once done with the entire process, I can see all my subscribers, in the Membership: View screen,

profiles_add_new3

You’ll see our new, “Name” field in the last column of the table of subscribers. Great! Now that we can capture and save new fields, let’s use them!

Sending out a Personalized Message

We’re now going to go to the Mass Mailing: Send a Message screen, and write a new message. Now that we have the Name field, let’s use it to add a simple salutation up front – “Hello, ” and then the name of my subscriber. How do we do that?

Enter template tags.

Template tags allow you to put placeholders into your message that will then be replaced with the value that they represent. In Dada Mail, a template tag to represent our, Name field will look like this,

<!-- tmpl_var subscriber.name -->

(Notice we’re using the Field Name, and not its Label!) So, to make that salutation we would like to create, we just have to write,

Hello, <!-- tmpl_var subscriber.name -->!

And that’s all there is to it. What about our subscribers, like el.mysteriouso@example.com that are nameless? We can add a default value to our template tag, to let Dada Mail know what to write, if there isn’t a name. Here’s what that looks like,

Hello, <!-- tmpl_var subscriber.name default="Subscriber" -->

In our example above, if there’s no name saved for an address, “Subscriber” will be written instead. Here’s how it all looks, when writing my message:

profiles_add_new4

Let’s see what this looks like, when we send our message out. Checking my test account, dadamailtest@gmail.com:

profiles_add_new5

And that’s all there is too using template tags!

Many other template tags are available to you, and a collection of them can be easily inserted via the rich text editor. Look on the rich text toolbar for a popup menu labeled, Tags. Clicking this popup menu will reveal some of the tags available. Selecting a tag will insert that tag into your message:

profiles_add_new6

Delving Deeper

We’ve only touched upon Dada Mail’s features for Profile Fields, Personalized Email Messages, and Email Template Tags. Check out the doc links, as well as the Pro Dada Manual, which comes with a Pro Dada Subscription.


Introducing Email Theme Layouts in Dada Mail

Easily wrap your mass mailing message in one of the provided layouts that come with Dada Mail. Layouts provide the necessary information for your mailing list message, so you don’t have to: things like making sure the unsubscription link is included correctly in every single mass mailing message you send out. Layouts and Dada Mail’s support for the Zurb Foundation for Emails framework makes your mass mailing email messages look great without any extra work from you.

Layouts can be found in both the Mass Mailing -> Send a Message, and Mass Mailing -> Send a Webpage screen. Look for the row tabs:  HTML Version, PlainText Version, Attachments… – the next tab will be labeled, Layout.

Clicking the Layout tab will reveal the layout choices available:

  • Full Layout
  • Minimal Layout
  • For Discussion List Messages
  • Don’t use a Layout

Let’s use a simple email message with a header, an image, and some text to illustrate how these layouts all work. I’ve put together this message as my HTML Version:

rockclimb_example1

Now, let’s see what this message will look like when we apply one of the included layouts. In v10, there’s a new button on the top bottom bar labeled, Preview. Clicking this button will show a preview of your mailing list message in a modal window with your selected layout applied. This saves you quite a bit of time with testing: no need to send yourself test email messages anymore, just to double-check that your email looks good!

Here’s what our message looks like with the Full Layout applied:

rockclimb_example2

Looks great! With the full layout, we’ve made a simple email message look professional, with minimal effort. Let’s break down what we’re looking at:

The top banner shows our company’s logo (set this in Mailing List -> List Information), as well as the preheader. The preheader will also show up in mail readers as the first bit of text revealed in the email message, like this:

rockclimb_example3

After the banner, there is a small (literally!) line of text, which gives a link to the publicly available archived message, so that if the message below isn’t viewable, you can still see the message from the archive.

Then, there’s your fine message. You’ll notice that the text has been styled to use what’s set in the email theme, so there’s no need to do that while authoring your message in the Send a Message screen (although, you can, if you’d like!)

Afterwards, there is a section that has buttons and links to forward the message to a friend, manage the subscription, and unsubscribe from the mailing list. These links are specific to the  individual subscriber. You won’t have to handle this yourself.

Below this information is the message footer, which has contact information, and social networking links. This information can also be added to, and edited in the Mailing List -> List Information screen.

Let’s try the Minimal layout:

rockclimb_example4

If your main content deserves front and center treatment, this is the template to use. Gone is the top banner and bottom social networking links for a more clean appearance. The unsubscribe link is still present, to keep with mailing list best practices.

For Discussion List Messages is similar to the Minimal layout, but as you may have guessed, is designed specifically for discussion list messages, with a large button to start a new post. This theme is used by default if you’re running a discussion list.

Don’t use a Layout is really the absence of a layout. Let’s try it on the message we have now:

rockclimb_example5

As you can see, no layout or styling is applied. One curious artifact of this is that a unsubscribe link is added to the top of the message, since Dada Mail did not detect one in the mailing list message itself. This is done since Dada Mail enforces the rule that all public mailing list messages MUST be sent with an unsubscribe link. For our message, Don’t use a Layout wouldn’t be the best suggest for a layout, but if you have a full-blown message with its own layout that you don’t want encased in one of the other provided layouts options, this would be a good option choose.

We can move that unsubscribe link from the top, to the bottom of our message by just adding our won unsubcribe link. To do that in Dada Mail, we use the following tag,

<!-- tmpl_var list_unsubscribe_link -->

When the message is sent, this tag will be replaced with an unsubscribe link that is unique to the subscriber and specific mass mailing. Here’s the source of my simple message, with that unsubscribe link added at the bottom:

<html>
<head>
    <title></title>
</head>
<body>
<h1>Learn to Rock Climb Today!</h1>

<p style="text-align: center;"><img alt="" src="http://dancingindigochild.local/dm/dada_mail_support_files/file_uploads/images/climbing(1).jpg" style="width: 500px; height: 283px;" /></p>

<p>Climbing is the fastest growing sport world-wide! Scale our incredible, 20 meter walls - your first visit is free!</p>

<p><a href="<!-- tmpl_var list_unsubscribe_link -->">Unsubscribe Automatically - click here</a></p>
</body>
</html>

Now when we preview the message, the automatically inserted unsubscribe link is gone, leaving only our link:

rockclimb_example6

So that’s an introduction to layouts! What’s your take on layouts, have you found them useful for your own mass mailings?


How to create your own email theme in Dada Mail 10

Dada Mail 10 introduces Email Themes, as well as also allowing you to create your own custom email theme. We cover how to to work with email themes in the docs at: http://dadamailproject.com/support/documentation-10_x_x/features-email_themes.pod.html

In this post, we’re going to go over how to do the actual customization, and start using our new theme live on our own site.

First, we’re going to make a project using the Foundation for Emails Sass workflow. In the command line, I need to type in the following:

foundation new --framework emails

I’ll be prompted for a new name for my project. I called mine,  dada_mail_site.

We’ll then download the starter theme, and merge these two directories together, as we’ve documented here. We’ll then start the build process,

npm run build

The build process will detect whenever we’ve changed any of the source files of the project, and recreate the distribution files (located in, dist) so they’re always up to date.

Now that everything is all set up, let’s do some customization!

I’d like the header and footer of my messages to have the same deep red that Dada Mail’s default UI has. I also want the text in the banner and footer to be white, rather than black, to stand out with the darker background. Finally, I’d also like the default text to be a little larger and a dark grey, rather than black.

Let’s work on the default text size and color first. This is controlled in the, src/assets/scss/_settings.scss file. This file contains Sass, which will be transformed in the cascading style sheet (CSS) that the theme will eventually use.

Among many things, Sass adds variables to vanilla CSS, letting you write less CSS, and do it more simply. For the color of the text, look for the following line:

$global-font-color: $black;

There’s a few ways to change this, but for this demo, we’re just going to change $black to a hex value that represents a dark grey:

$global-font-color: #808080;

Let’s now change the default size of our text. Look for,

$global-font-size: 14px;

We’re  going to change this to,

$global-font-size: 15px;

Now, let’s tackle that banner and footer color. For that, we’re going to open up the, src/assets/scss/app.scss file. There’s a few css classes that have the background set to the default grey, like this one:

.banner {
  background: #e9ebee;
}

We’ll want to change those, to our dark red. Here are the lines with the changes I’ve made – the original have simply been commented out,

.banner {
  //background: #e9ebee;
  background: #990000;
}

.banner .container {
  //background: #e9ebee;
 background: #990000;
}

.wrapper.secondary {
  //background: #e9ebee;
  background: #990000;
}

That takes care of the banner and footer background color.

Now for the color of our text inside the banner and footer. In the same app.scss file, find,

.banner p {
  color: #000000;
  margin-bottom: 0;
}

This css snippet sets the color to black. Let’s make ours white:

.banner p {
  color: #ffffff;
  margin-bottom: 0;
}

And, we’re all done! If the build process has been running, we can now just simply upload our new theme into Dada Mail’s support files directory:

On our site, we’ll navigate to the dada_mail_support_files directory, then go to themes/email. I’ll create a new directory with the same as the name of my Foundation for Emails project: dada_mail_site. I’ll change into that directory, and copy over the entire dist directory my project has made, inside the dada_mail_site directory. Once that’s complete, my theme is essentially, “installed”!

Let’s set up my mailing list to use it. I’m going to log into my list, then navigate to, Appearance -> Email Themes. Our new theme should now be listed when we click on the popup menu. Select it, and Save!

select_an_email_theme

Done! Let’s test it out o the Mass Mailing -> Send a Message screen. This screen has the ability to preview a message, before sending it out. On this screen, I wrote a simple message, clicked the, Preview button:

template_preview_1

Looks pretty good! I’m going to add the following as my Login Image URL in, Mailing List -> List Information:

dada_mail_email_logo

Let’s try the preview again:

template_preview_2

Looks great!

We’ve just scratched the surface on how to create a custom email theme for Dada Mail. Please try it yourself, and let us know if you have any questions or comments!